使用VMware 测试 PXE+DHCP+Apache+Kickstart 批量安装服务器
什么是Kickstart
Kickstart是一种无人值守的安装方式。它的工作原理是在安装过程中记录典型的需要人
工干预填写的各种参数,并生成一个名为ks.cfg的文件。安装程序首先会去查找Kickstart生成
的文件,如果找到合适的参数,就采用这些参数;安装程序会根据ks.cfg中的设置重启系统,并结束安装。
环境:VMware workstation
系统centos 5.8
准备阶段
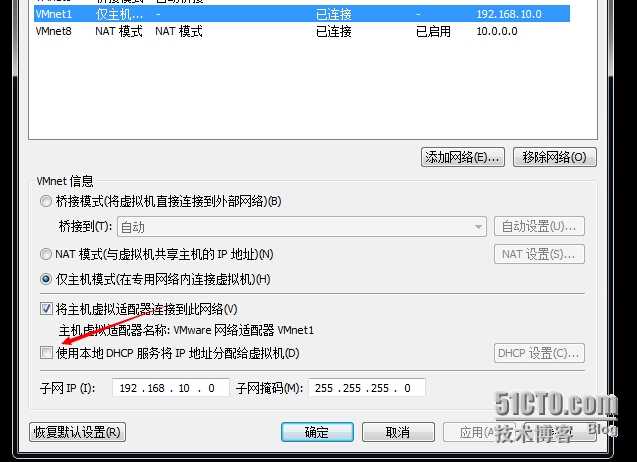
新建一台linux虚拟机,网卡选择hostonly模式,取消hostonly模式的dhcp功能

因为后面要用到system-config-kickstart工具生成ks文件,它必须依赖于X Windows,所以我们要提前安装好桌面环境。
yum-y groupinstall 'X Window System'
yum-y groupinstall 'GNOME Desktop Environment'
安装阶段
因为需要http的环境存放系统镜像文件和ks文件,所以需要先安装http
yum  install httpd
service httpd start
确保 httpd正常,打开浏览器测试下

挂载光盘,并且将光盘文件复制到网站根目录下
mount /dev/cdrom /mnt
cd /mnt
cp -rf * /var/www/html
安装tftp-server
yum-y install tftp-server
修改/etc/xinetd.d/tftp,将disable的值由yes变为no
disable = no
重启xinetd进程
service xinetd restart
建立tftpboot文件夹
mkdir -p /tftpboot
复制pxelinux.0文件至tftpboot文件夹中
cp /usr/share/syslinux/pxelinux.0 /tftpboot
将光盘上的/image/pxeboot/initrd.img和vmlinuz复制到/tftpboot/中
cp /var/www/html/images/pxeboot/initrd.img /tftpboot
cp /var/www/html/images/pxeboot/vmlinuz /tftpboot
光盘上的isolinux/*.msg到/tftpboot目录下
cp /var/www/html/isolinux/*.msg /tftpboot/
在tftpboot中新建一个pxelinux.cfg目录
mkdir pxelinux.cfg
将isolinux目录中的isolinux.cfg复制到pxelinux.cfg目录中,同时更改文件名称为
default
cp /var/www/html/isolinux/isolinux.cfg /tftpboot/pxelinux.cfg/default
安装DHCP服务
yum �Cy install dhcp
复制配置模板文件到指定的目录
cp /usr/share/doc/dhcp-3.0.5/dhcpd.conf.sample /etc/dhcpd.conf
修改/etc/dhcpd.conf配置文件
ddns-update-style interim;
ignore client-updates;
next-server 192.168.10.110;#本机地址,作为ks服务器的地址
filename "/pxelinux.0";

subnet 192.168.10.0 netmask 255.255.255.0 {

# --- default gateway
    option routers            192.168.10.110;
    option subnet-mask        255.255.255.0;

    option nis-domain        "domain.org";
    option domain-name        "domain.org";
    option domain-name-servers    192.168.10.110;

    option time-offset        -18000;    # Eastern Standard Time
#    option ntp-servers        192.168.10.110;
#    option netbios-name-servers    192.168.10.110;
# --- Selects point-to-point node (default is hybrid). Don't change this unless
# -- you understand Netbios very well
#    option netbios-node-type 2;

    range dynamic-bootp 192.168.10.128 192.168.10.254;动态地址池
    default-lease-time 21600;
    max-lease-time 43200;

    # we want the nameserver to appear at a fixed address
    #host ns {
    #    next-server marvin.redhat.com;
    #    hardware ethernet 12:34:56:78:AB:CD;
    #    fixed-address 207.175.42.254;
    #}
}
最后启动dhcp服务
service dhcpd start
用yum工具自动安装Kickstart
yum -y install system-config-kickstart
在桌面环境下启动Kickstart
system-config-Kickstart
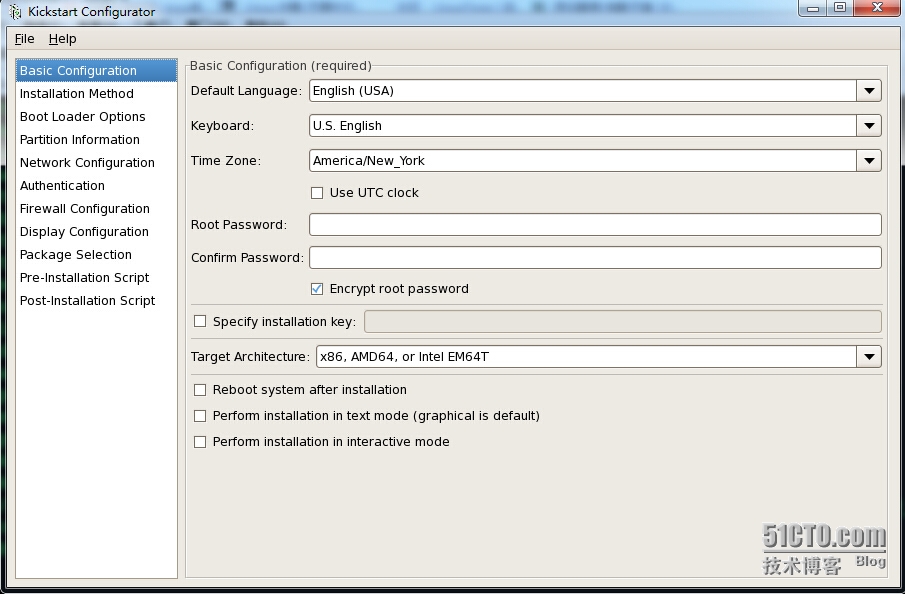
运行上面的命令后可以对系统的一些基本配置进行设置,例如选择时区、设置root密码
等。

最后将生成的文件ks.cfg保存到/var/www/html下
修改/tftpboot/pxelinux.cfg/default文件,指定读取ks.cfg的方法,更改以下两项
default text ks=http://192.168.10.110/ks.cfg
timeout=1
启动相关的服务
Service httpd start
chkconfig httpd on
service dhcpd start
chkconfig dhcpd on
service xinetd restart
测试阶段
新建一台虚拟机,不要装载操作系统,将网卡设置hostonly模式,即可
现在只要启动虚拟机即可实现无人值守自动安装。