Nagios 监控AP客户端数量
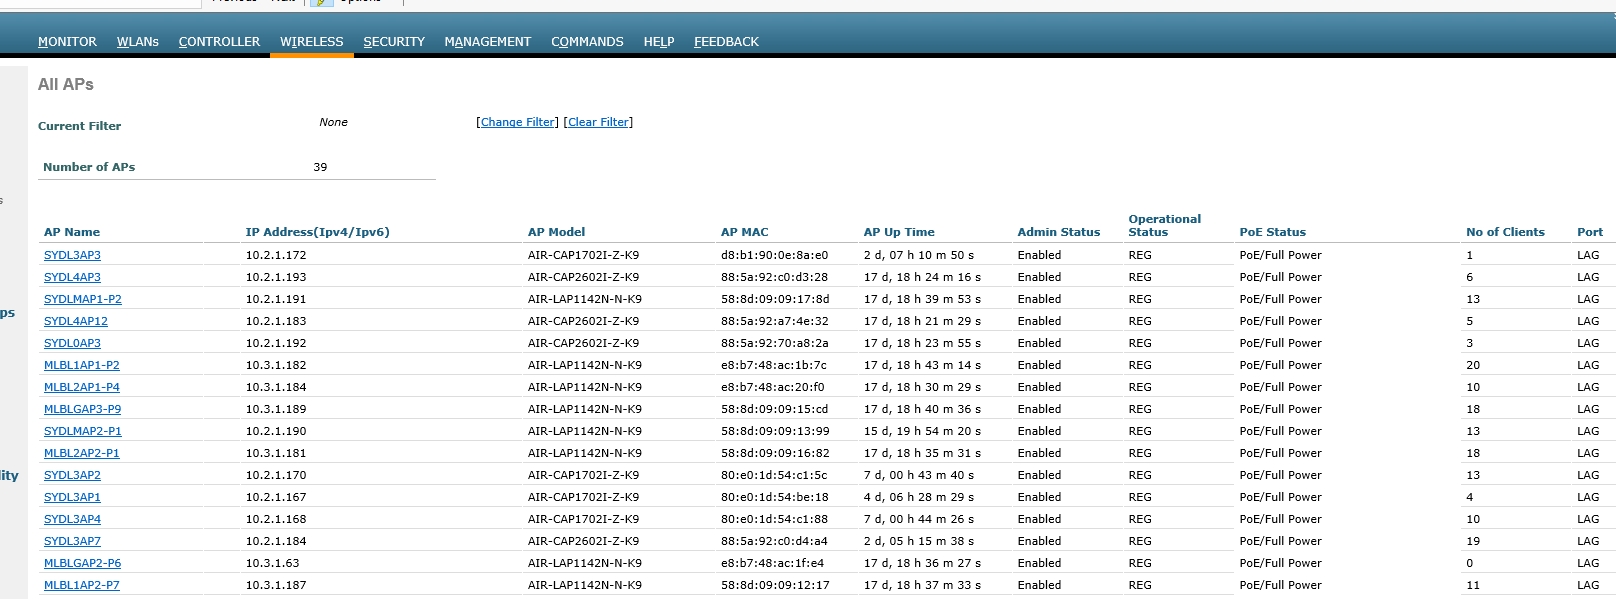
这周一直在忙公司的无线网络,和其他的技术人员一起安装WLC,AP,ISE,配置CA,交换机,HA等等。这个过程中出现了一些问题,比如之前的WLC没有配置agressive load balance,结果导致某些AP超负荷运转,一个AP连接了40个用户导致速度奇慢无比。为了预防再次出现类似问题,老板让我把监控AP连接的功能加入Nagios系统中。
简单的介绍一下公司的无线网络环境,我们使用的都是思科的设备。2台Wireless Controller(WLC)互相HA,WLC连接了约50个AP接入点,不同的SSID通过Cisco ISE进行证书和AD验证和授权。
经过测试,AP已经连在了WLC,因此不允许我直接对AP设备进行SNMP的查询。所有的SNMP查询都需要从WLC上获取。WLC的MIB可以从这里下载或者在思科官网查询。
http://www.oidview.com/mibs/14179/AIRESPACE-SWITCHING-MIB.html
http://www.oidview.com/mibs/14179/AIRESPACE-WIRELESS-MIB.html
http://tools.cisco.com/Support/SNMP/do/BrowseOID.do?objectInput=1.3.6.1.4.1.14179.2.2.1.1.3&translate=Translate&submitValue=SUBMIT
对于我的要求而已,最重要的信息有2个,获取AP的OID以及他对应的客户端连接数目的OID
AP的OID 如下
1.3.6.1.4.1.14179.2.2.1.1.3
比如说我可以获取WLC连接的AP的OID号码
snmpwalk -v 2c -O x -c public 10.2.1.17 1.3.6.1.4.1.14179.2.2.1.1.3
SNMPv2-SMI::enterprises.14179.2.2.1.1.3.24.139.157.244.252.208 = Hex-STRING: 53 59 44 4C 33 41 50 39
SNMPv2-SMI::enterprises.14179.2.2.1.1.3.24.156.93.48.115.96 = Hex-STRING: 53 59 44 4C 34 41 50 33
SNMPv2-SMI::enterprises.14179.2.2.1.1.3.24.156.93.48.139.48 = Hex-STRING: 53 59 44 4C 33 41 50 37
SNMPv2-SMI::enterprises.14179.2.2.1.1.3.84.162.116.28.209.240 = Hex-STRING: 53 59 44 4C 33 41 50 35
SNMPv2-SMI::enterprises.14179.2.2.1.1.3.88.10.32.13.204.224 = Hex-STRING: 53 59 44 4C 30 41 50 34
SNMPv2-SMI::enterprises.14179.2.2.1.1.3.88.151.189.7.198.240 = Hex-STRING: 53 59 44 4C 34 41 50 32
SNMPv2-SMI::enterprises.14179.2.2.1.1.3.88.151.189.12.130.192 = Hex-STRING: 53 59 44 4C 34 41 50 31 31
SNMPv2-SMI::enterprises.14179.2.2.1.1.3.88.151.189.12.183.144 = Hex-STRING: 53 59 44 4C 33 41 50 31
SNMPv2-SMI::enterprises.14179.2.2.1.1.3.88.151.189.12.197.80 = Hex-STRING: 53 59 44 4C 33 41 50 32
SNMPv2-SMI::enterprises.14179.2.2.1.1.3.88.151.189.12.197.240 = Hex-STRING: 53 59 44 4C 33 41 50 34
SNMPv2-SMI::enterprises.14179.2.2.1.1.3.88.151.189.58.209.16 = Hex-STRING: 53 59 44 4C 34 41 50 35
SNMPv2-SMI::enterprises.14179.2.2.1.1.3.88.151.189.58.209.32 = Hex-STRING: 53 59 44 4C 34 41 50 31
SNMPv2-SMI::enterprises.14179.2.2.1.1.3.88.151.189.205.243.240 = Hex-STRING: 53 59 44 4C 33 41 50 38
SNMPv2-SMI::enterprises.14179.2.2.1.1.3.100.233.80.107.97.160 = Hex-STRING: 53 59 44 4C 30 41 50 33
SNMPv2-SMI::enterprises.14179.2.2.1.1.3.100.233.80.107.147.224 = Hex-STRING: 53 59 44 4C 33 41 50 32 2D 50 31 30
SNMPv2-SMI::enterprises.14179.2.2.1.1.3.100.233.80.125.222.192 = Hex-STRING: 53 59 44 4C 33 41 50 36
SNMPv2-SMI::enterprises.14179.2.2.1.1.3.100.233.80.209.233.224 = Hex-STRING: 53 59 44 4C 34 41 50 36
SNMPv2-SMI::enterprises.14179.2.2.1.1.3.108.80.77.43.25.224 = Hex-STRING: 4D 4C 42 4C 47 41 50 31 2D 50 38
SNMPv2-SMI::enterprises.14179.2.2.1.1.3.108.80.77.43.66.192 = Hex-STRING: 4D 4C 42 4C 31 41 50 32 2D 50 37
SNMPv2-SMI::enterprises.14179.2.2.1.1.3.108.80.77.43.107.208 = Hex-STRING: 53 59 44 4C 4D 41 50 32 2D 50 31
SNMPv2-SMI::enterprises.14179.2.2.1.1.3.108.80.77.43.116.160 = Hex-STRING: 53 59 44 4C 30 41 50 35
SNMPv2-SMI::enterprises.14179.2.2.1.1.3.108.80.77.43.141.192 = Hex-STRING: 4D 4C 42 4C 47 41 50 33 2D 50 39
SNMPv2-SMI::enterprises.14179.2.2.1.1.3.108.80.77.43.152.192 = Hex-STRING: 4D 4C 42 4C 32 41 50 32 2D 50 31
SNMPv2-SMI::enterprises.14179.2.2.1.1.3.108.80.77.43.167.144 = Hex-STRING: 4D 4C 42 4C 31 41 50 33 2D 50 35
SNMPv2-SMI::enterprises.14179.2.2.1.1.3.128.224.29.189.85.48 = Hex-STRING: 53 59 44 4C 34 41 50 39
SNMPv2-SMI::enterprises.14179.2.2.1.1.3.128.224.29.189.87.96 = Hex-STRING: 53 59 44 4C 34 41 50 37
SNMPv2-SMI::enterprises.14179.2.2.1.1.3.128.224.29.203.47.32 = Hex-STRING: 53 59 44 4C 30 41 50 32
SNMPv2-SMI::enterprises.14179.2.2.1.1.3.128.224.29.215.216.80 = Hex-STRING: 53 59 44 4C 33 41 50 31 30
SNMPv2-SMI::enterprises.14179.2.2.1.1.3.128.224.29.229.129.128 = Hex-STRING: 53 59 44 4C 33 41 50 33
SNMPv2-SMI::enterprises.14179.2.2.1.1.3.132.184.2.87.64.80 = Hex-STRING: 53 59 44 4C 34 41 50 31 30
SNMPv2-SMI::enterprises.14179.2.2.1.1.3.176.170.119.68.220.160 = Hex-STRING: 53 59 44 4C 34 41 50 34
SNMPv2-SMI::enterprises.14179.2.2.1.1.3.232.101.73.4.138.144 = Hex-STRING: 53 59 44 4C 34 41 50 38
SNMPv2-SMI::enterprises.14179.2.2.1.1.3.232.101.73.4.140.16 = Hex-STRING: 53 59 44 4C 30 41 50 31
SNMPv2-SMI::enterprises.14179.2.2.1.1.3.232.186.112.157.89.144 = Hex-STRING: 4D 4C 42 4C 32 41 50 31 2D 50 34
SNMPv2-SMI::enterprises.14179.2.2.1.1.3.232.186.112.157.91.16 = Hex-STRING: 4D 4C 42 4C 47 41 50 32 2D 50 36
SNMPv2-SMI::enterprises.14179.2.2.1.1.3.232.186.112.157.100.192 = Hex-STRING: 4D 4C 42 4C 32 41 50 33 2D 50 33
SNMPv2-SMI::enterprises.14179.2.2.1.1.3.232.186.112.194.240.160 = Hex-STRING: 4D 4C 42 4C 31 41 50 31 2D 50 32
客户端的连接数目对应的OID如下所示
1.3.6.1.4.1.14179.2.2.13.1.4
例如,我在nagios服务器(CentOS 7)上执行snmpwalk,结果如下
snmpwalk -v 2c -O x -c public 10.2.1.17 1.3.6.1.4.1.14179.2.2.13.1.4
SNMPv2-SMI::enterprises.14179.2.2.13.1.4.24.139.157.244.252.208.0 = INTEGER: 3
SNMPv2-SMI::enterprises.14179.2.2.13.1.4.24.139.157.244.252.208.1 = INTEGER: 19
SNMPv2-SMI::enterprises.14179.2.2.13.1.4.24.156.93.48.115.96.0 = INTEGER: 2
SNMPv2-SMI::enterprises.14179.2.2.13.1.4.24.156.93.48.115.96.1 = INTEGER: 4
SNMPv2-SMI::enterprises.14179.2.2.13.1.4.24.156.93.48.139.48.0 = INTEGER: 2
SNMPv2-SMI::enterprises.14179.2.2.13.1.4.24.156.93.48.139.48.1 = INTEGER: 15
SNMPv2-SMI::enterprises.14179.2.2.13.1.4.24.156.93.108.13.0.0 = INTEGER: 1
SNMPv2-SMI::enterprises.14179.2.2.13.1.4.24.156.93.108.13.0.1 = INTEGER: 3
SNMPv2-SMI::enterprises.14179.2.2.13.1.4.84.162.116.28.209.240.0 = INTEGER: 1
SNMPv2-SMI::enterprises.14179.2.2.13.1.4.84.162.116.28.209.240.1 = INTEGER: 3
SNMPv2-SMI::enterprises.14179.2.2.13.1.4.88.10.32.13.204.224.0 = INTEGER: 0
SNMPv2-SMI::enterprises.14179.2.2.13.1.4.88.10.32.13.204.224.1 = INTEGER: 4
SNMPv2-SMI::enterprises.14179.2.2.13.1.4.88.151.189.7.198.240.0 = INTEGER: 1
SNMPv2-SMI::enterprises.14179.2.2.13.1.4.88.151.189.7.198.240.1 = INTEGER: 6
SNMPv2-SMI::enterprises.14179.2.2.13.1.4.88.151.189.12.130.192.0 = INTEGER: 5
SNMPv2-SMI::enterprises.14179.2.2.13.1.4.88.151.189.12.130.192.1 = INTEGER: 5
SNMPv2-SMI::enterprises.14179.2.2.13.1.4.88.151.189.12.183.144.0 = INTEGER: 0
SNMPv2-SMI::enterprises.14179.2.2.13.1.4.88.151.189.12.183.144.1 = INTEGER: 6
SNMPv2-SMI::enterprises.14179.2.2.13.1.4.88.151.189.12.197.80.0 = INTEGER: 1
SNMPv2-SMI::enterprises.14179.2.2.13.1.4.88.151.189.12.197.80.1 = INTEGER: 11
SNMPv2-SMI::enterprises.14179.2.2.13.1.4.88.151.189.12.197.240.0 = INTEGER: 1
SNMPv2-SMI::enterprises.14179.2.2.13.1.4.88.151.189.12.197.240.1 = INTEGER: 7
和第一个命令对比,可以看见中间那一大串从14179.2.2.13.1.4后面开始的就是代表AP的地址,注意有的AP出现了两个子地址,分别是0和1结尾,这是因为AP可以在两个Radio下工作 802.11a/n/ac 和 802.11/b/g/n, 如果我们把一个AP的两个值相加,得到的就是总共连接的数目,这个数目和WLC图像界面下看见的是一样的。

知道基本原理了,okay,可以开始配置了。豆子的配置主要参考了这个脚本。可以下载之后,根据自己实际情况修改。脚本本身很简单,基本思路是手动配置给AP的OID指定一个号码(1到50),然后查询对应的客户端连接数目,根据数目进行输出
https://exchange.icinga.org/inventory/Check-Plugins/Network/Cisco-AP-Client-number
测试脚本是否工作,查询代号15的AP,显示AP名称和连接数目
[root@sydnagios libexec]# ./check_AP.pl 10.2.1.17 public 2c 15 10 15
OK: "SYDLMAP2-P1" - number of clients: 7 | Clients: 7;10;15;0;25
脚本工作了,那么修改一下我的nagios的配置文件
Nagios上添加一个command
define command{
command_name check_ap_clients
command_line /usr/local/nagios/libexec/check_AP.pl 10.2.1.17 public 2c $ARG1$ 15 20
}
定义一个host
define host{
        use             generic-ap          ; Inherit default values from a template
        host_name       SYDL3AP8             ; The name we're giving to this switch
        alias           SYDL3AP8       ; A longer name associated with the switch
        address         10.2.1.166            ; IP address of the switch
        hostgroups      ap                ; Host groups this switch is associated with
        parents         DDBSYD6509
        }
定义一个service
define service {
        use                     generic-service
        host                    SYDL3AP8
        servicegroups           network-services
        service_description     ap client Information
        check_interval          5
        check_command          check_ap_clients!
}
重启nagios服务,看看结果如何

成功!
参考资料:
https://supportforums.cisco.com/document/9869811/cisco-wlc-snmp-historical-user-statistics-monitoring-w-syslog-or-splunk
http://awesomeadmin.blogspot.com.au/2009/11/monitoring-cisco-wireless-controller.html