linux下使用google Authenticator加强ssh及自建堡垒机
本文转载自大神博客:
linux下自建ssh堡垒机:http://www.361way.com/linux-diy-fort-machine/3135.html
使用google Authenticator加强ssh: http://www.361way.com/google-authenticator-ssh/2186.html
开源web终端ssh解决方案-gateone简介:http://itnihao.blog.51cto.com/1741976/1311506
一、安装相关包
1、安装相关包
yum -y install wget gcc make pam-devel libpng-devel
2、安装qrencode
wget http://fukuchi.org/works/qrencode/qrencode-3.4.1.tar.gz
tar zxf qrencode-3.4.1.tar.gz
cd qrencode-3.4.1
./configure --prefix=/usr && make && make install
该软件为非必须包,其主要用于在终端下生成二维码用。
3、google authenticator PAM插件安装
该插件有两种安装方式,一种是通过下载tar.gz包安装,一种是通过git下载安装。
tar.gz包安装:
wget http://google-authenticator.googlecode.com/files/libpam-google-authenticator-1.0-source.tar.bz2
tar jxf libpam-google-authenticator-1.0-source.tar.bz2
cd libpam-google-authenticator-1.0
make && make install
git下载安装:
git clone https://code.google.com/p/google-authenticator/
cd google-authenticator/libpam/
make install
二、使用google Authenticator加强ssh:
ssh本身是一个非常安全的认证连接方式。不过由于人过等方面的原因,难免会造成密码的泄露。针对这种问题我们不妨给ssh再加一把锁。当然,增加这层锁的方式有很多种。例如:knockd、S/KEY、OPIE/OPTW、Two-factor authentication等(以上列举的几种方式中可能互相包含,有兴趣的可以去维基百科上查下,进而细分下)。而今天讲到的Google Authenticator就属于Two-factor authentication的代表。
1、配置google-authenticator
安装完成后会在/lib64/security/目录生成pam_google_authenticator.so文件,如果是32位系统会在/lib/security/目录生成。除此之外,系统还会多在/usr/local/bin目录生成一个google-authenticator可执行文件,运行该命令。
[root@localhost /]# google-authenticator
Do you want authentication tokens to be time-based (y/n) y
https://www.google.com/chart?chs=200x200&chld=M|0&cht=qr&chl=otpauth://totp/[email protected]%3Fsecret%3DIO4SZL7YYHOTFNQJ
Your new secret key is: IO4SZL7YYHOTFNQJ
Your verification code is 236731
Your emergency scratch codes are:
98144901
30891929
79811882
84230327
53670228
Do you want me to update your "/root/.google_authenticator" file (y/n) y
Do you want to disallow multiple uses of the same authentication
token? This restricts you to one login about every 30s, but it increases
your chances to notice or even prevent man-in-the-middle attacks (y/n) y
By default, tokens are good for 30 seconds and in order to compensate for
possible time-skew between the client and the server, we allow an extra
token before and after the current time. If you experience problems with poor
time synchronization, you can increase the window from its default
size of 1:30min to about 4min. Do you want to do so (y/n) n
If the computer that you are logging into isn't hardened against brute-force
login attempts, you can enable rate-limiting for the authentication module.
By default, this limits attackers to no more than 3 login attempts every 30s.
Do you want to enable rate-limiting (y/n) y
注:
1.1、如果安装了qrencode包,会在出现google的链接后出一个二维码图标。方便手持设备扫描。当然,没装该包,可以打开https开头的url,打开也是一个二维码图片,同qrencode在终端下生成的是一样的。
1.2、"Your emergency scratch codes are:"下面的五个码用于在取不到或错的验证码有错时,用于应急用的。不过每个只能用一次,不能重复使用。
1.3、第四处选择项是由于选择是否开启时间容错。如果客户端设备具有很好的同时间服务器同步功能,建议此处选择n。如果客户端设备(手机、ipad等)不具有很好的同ntp时间同步的功能,可以设为y ―― 即开启时间容错。
2、ssh调用及客户端配置
2.1、sshd服务配置
按以上方式配置完成以后,是没有程序去调用的。想要ssh调用,还需要在pam.d认证上进行配置。打开 /etc/pam.d/sshd 文件在第一行添加
auth required pam_google_authenticator.so
再打开 /etc/ssh/sshd_config 文件
ChallengeResponseAuthentication no
把上面配置改成
ChallengeResponseAuthentication yes
service ssh restart重启ssh服务生效。
2.2、客户端配置
获取30秒一次的动态码的客户端是浏览器(仅支持chrome、firefox)、Android设备、苹果IOS设备、Blackberry、WP手持设备。各自程序的下载地址为:
chrome google-authenticator插件
firefox google-authenticator插件
手机应用下载地址 (该手机链接提示支持symbian系统,不过经本人手机测试,发现应用安装完以后账户add没用反应)
以下以chrome下的插件为例,新增一个配置:
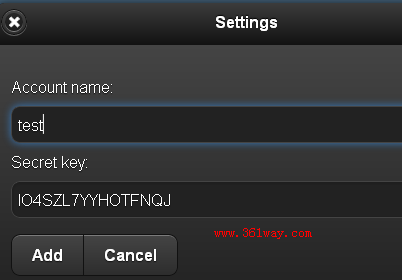
帐户名可以随意添写,安全key即为刚刚运行google-authenticator命令后生成的,add增加完成后。就会每过30秒新生成一个验证码。此时可以通过另外一台主机连接的方式如下:
[root@localhost ~]# ssh [email protected]
Verification code:
Password:
Last login: Fri Jan 4 16:27:57 2013 from 192.168.10.11
[root@localhost ~]#
注:
1、如果命使用SecureCRT客户端登录时,需要在 连接――属性――连接――ssh2――"鉴权/authenicaion" 中将 "键盘交互/keyboard Interactive" 调到第一位。不然连接会出错。
2、以上安全配置对于ssh密钥认证方式进行的登录无效――即在pam配置中增加上面的配置后,通过密钥认证时不会要求输入验证码 。
三、 linux下自建ssh堡垒机
1、原理及原则

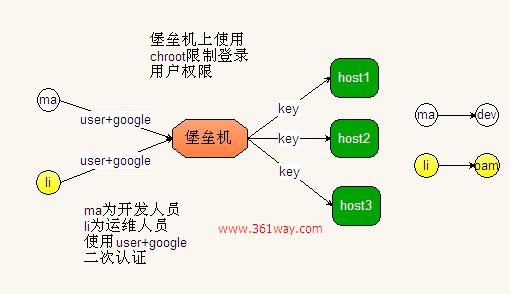
原理如上图所示,原则如下:
1、所有主机的连接都通过/etc/hosts.deny和/etc/hosts.allow控制只允许两台堡垒机连接(冗余考虑,避免一旦坏了所有主机都无法连接,这里图上只画了一个)。
2、所有主机关闭密码认证方式,只允许key认证。但切换用户可以使用su - 用户名 的方式进行切换。
3、角色控制,虽然连接到堡垒机上的各用户名密码不同,但后端所有的服务器按角色进行区分,如运维人员到后端服务器统一成oam用户、开发人员统一成dev用户。
4、堡垒机使用用户名+google authenticator+密码的方式认证。登录用户在堡垒机上的权限是受chroot限制的。
2、ssh服务配置
在/etc/pam.d/sshd中首行添加
auth required pam_google_authenticator.so
在/etc/ssh/sshd_config中修改:
ChallengeResponseAuthentication 将no改为yes
UsePAM 将no改为yes
3、chroot配置
修改/etc/ssh/sshd_config:
ChrootDirectory /var/chroot
创建模拟系统环境:
mkdir /var/chroot/
cd /var/chroot/
mkdir {bin,dev,lib,lib64,etc,home}
创建块设备,并赋予所有用户可执行权限,null,zero,tty这三个模拟设备需要所有用户可写:
mknod dev/null c 1 3
mknod dev/zero c 1 5
mknod dev/random c 1 8
mknod dev/urandom c 1 9
mknod dev/tty c 5 0
chmod -R 755 /var/chroot/
chmod 0666 dev/{null,zero,tty}
注:这里块设备是在/var/chroot/dev目录下创建的,上面的dev前面是没加/的。mknod的用法也可以参看百度百科上的介绍。
复制lib库文件到chroot环境下:
#!/bin/bash
ldd /bin/bash /bin/ls /bin/cp /bin/mkdir /bin/mv /bin/rm /bin/rmdir|awk '{print $1}'|grep "/lib64" >> liblist
ldd /bin/bash /bin/ls /bin/cp /bin/mkdir /bin/mv /bin/rm /bin/rmdir|awk '{print $3}'|grep "/lib64" >> liblist
for libfile in `sort liblist|uniq`
do
cp -p $libfile /var/chroot/lib64/
done
特别注意的是还需要增加libnss库文件的支持,不然ssh登录时会报“You don't exist, go away!”的错误,操作命令如下:
cp /lib64/libnss_* lib64/
以上操作都是64位系统下进行的,如果是32系统,直接使用lib目录下的库文件。
最后就是链接sh到bash,操作如下:
cd /var/chroot/bin
ln -s bash sh
4、创建用户及密钥文件
创建用户及passwd、group文件
useradd yang
passwd yang --abc123
grep ^yang /etc/passwd > /var/chroot/etc/passwd
grep ^yang /etc/group > /var/chroot/etc/group
创建用户chroot家目录
cd /var/chroot
mkdir home/yang
chown -R yang:yang home/yang
chmod 700 -R home/*
创建密钥文件
$ ssh-keygen -t rsa
Generating public/private rsa key pair.
Enter file in which to save the key (/home/yang/.ssh/id_rsa):/var/chroot/home/yang/.ssh/id_rsa
最后将生成的id_rsa.pub文件的内容传到后端受保护机相对应用户的.ssh/authorized_keys文件中,当然批量机器的话建议使用puppet、saltstack这类的自动化工具实现。
5、google认证
切换到相应的用户,例如,我这里是su - yang,执行google-authenticator命令,然后就是一路的按y,这里不再列出,可以参看之前写的加强ssh安全的文章。
注:若要让某账户不使用chroot环境,可以直接su到系统root账户,则须修改/etc/ssh/sshd_config配置,在文件末尾添加:
Match User 用户名
ChrootDirectory /
6、后端服务器配置
后端主机权限配置主要有以下几个地方可以操作
6.1、只开启KEY认证,关掉密码认证
RSAAuthentication yes
PasswordAuthentication no
6.2、设置hosts.allow和hosts.deny,指定允许远程连接的主机IP(堡垒机IP)
如:
#cat /etc/hosts.allow
sshd:192.168.10.
#cat /etc/hosts.deny
ALL:ALL
记住hosts.allow的规则优先级高于hosts.deny就行了
6.3、设置只允许ssh连接的用户(这个方法有好几种),本步略
6.4、利用chattr给几个特定文件权限限定死,连root用户都只读而无法更改,本步略
6.5、将用户操作命令记入日志(这个对bash有效,对个别csh等无效)
创建/etc/profile.d/sshlog.sh文件,内容如下:
PS1="`whoami`@`hostname`:"'[$PWD]'
history
USER_IP=`who -u am i 2>/dev/null| awk '{print $NF}'|sed -e 's/[()]//g'`
if [ "$USER_IP" = "" ]
then
USER_IP=`hostname`
fi
if [ ! -d /var/log/history ]
then
mkdir /var/log/history
chmod 777 /var/log/history
fi
if [ ! -d /var/log/history/${LOGNAME} ]
then
mkdir /var/log/history/${LOGNAME}
chmod 700 /var/log/history/${LOGNAME}
fi
export HISTSIZE=4096
DT=`date +"%Y%m%d_%H%M%S"`
export HISTFILE="/var/log/history/${LOGNAME}/${USER_IP}_history.$DT"
chmod 600 /var/log/history/${LOGNAME}/*history* 2>/dev/null
在/var/log/history目录下,会在用户登录并退出后,创建与用户名相同的目录,并且记录每次的登录IP和时间,格式如:192.168.10.50_history.20130514_100547。
6.6、利用/etc/sudoers命令给个别组用户一些特定权限(图个便利)
例如:
oam ALL=(ALL) NOPASSWD: /sbin/reboot, /sbin/ifconfig
//oam为可以以root执行命令的用户,reboot、ifconfig为可以执行的命令,需要完整路径,多个命令用逗号加空格隔开