CentOS5.8 HA集群之基于crm配置 heartbeat + nfs + mysql
规划:
让mysql的数据目录位于一个NFS Server上,并且这个数据目录是一个LVM,方便备份和扩容
注意:
要做高可用集群,事先的准备工作有三个:①时间同步②主机名与uname -n保持一致,且能够通过/etc/hosts文件解析③ssh互信通信,此处不再重复此操作,我的这篇博客中很详细:Linux HA集群之基于crm配置 heartbeat + nfs + httpd
1、NFS Server准备一个逻辑卷
此处以一个分区做演示
[root@NFS ~]# fdisk /dev/sda

WARNING: DOS-compatible mode is deprecated. It's strongly recommended to
         switch off the mode (command 'c') and change display units to
         sectors (command 'u').

Command (m for help): n
Command action
   e   extended
   p   primary partition (1-4)
p
Partition number (1-4): 1
First cylinder (1-2610, default 1):
Using default value 1
Last cylinder, +cylinders or +size{K,M,G} (1-2610, default 2610): +15G

Command (m for help): t
Selected partition 1
Hex code (type L to list codes): 8e
Changed system type of partition 1 to 8e (Linux LVM)

Command (m for help): p

Disk /dev/sda: 21.5 GB, 21474836480 bytes
255 heads, 63 sectors/track, 2610 cylinders
Units = cylinders of 16065 * 512 = 8225280 bytes
Sector size (logical/physical): 512 bytes / 512 bytes
I/O size (minimum/optimal): 512 bytes / 512 bytes
Disk identifier: 0x7dd89809

   Device Boot      Start         End      Blocks   Id  System
/dev/sda1               1        1959    15735636   8e  Linux LVM

Command (m for help): w
The partition table has been altered!

Calling ioctl() to re-read partition table.
Syncing disks.
[root@NFS ~]# cat /proc/partitions
major minor  #blocks  name

   8        0   20971520 sda
   8        1   15735636 sda1
   8       16   20971520 sdb
   8       17     512000 sdb1
   8       18   20458496 sdb2
 253        0   18423808 dm-0
 253        1    2031616 dm-1

创建逻辑卷
[root@NFS ~]# pvremove /dev/sda
  Physical Volume /dev/sda not found
[root@NFS ~]# pvremove /dev/sda1
  Labels on physical volume "/dev/sda1" successfully wiped
[root@NFS ~]# pvcreate /dev/sda1
  Physical volume "/dev/sda1" successfully created
[root@NFS ~]# vgcreate myvg /dev/sda1
  Volume group "myvg" successfully created
[root@NFS ~]# lvcreate -L 10G -n mydata myvg
  Logical volume "mydata" created
[root@NFS ~]# lvs
  LV      VG         Attr       LSize  Pool Origin Data%  Move Log Cpy%Sync Convert
  mydata  myvg       -wi-a----- 10.00g
  lv_root vg_centos6 -wi-ao---- 17.57g
  lv_swap vg_centos6 -wi-ao----  1.94g

格式化此逻辑卷
[root@NFS ~]# mke2fs -t ext4 /dev/mapper/myvg-mydata
mke2fs 1.41.12 (17-May-2010)
Filesystem label=
OS type: Linux
Block size=4096 (log=2)
Fragment size=4096 (log=2)
Stride=0 blocks, Stripe width=0 blocks
655360 inodes, 2621440 blocks
131072 blocks (5.00%) reserved for the super user
First data block=0
Maximum filesystem blocks=2684354560
80 block groups
32768 blocks per group, 32768 fragments per group
8192 inodes per group
Superblock backups stored on blocks:
	32768, 98304, 163840, 229376, 294912, 819200, 884736, 1605632

Writing inode tables: done
Creating journal (32768 blocks): done
Writing superblocks and filesystem accounting information: done

This filesystem will be automatically checked every 33 mounts or
180 days, whichever comes first.  Use tune2fs -c or -i to override.
2、NFS Server上创建mysql用户
[root@NFS ~]# groupadd -g 3306 mysql
[root@NFS ~]# useradd -u 3306 -g mysql -s /sbin/nologin -M  mysql
[root@NFS ~]# id mysql
uid=3306(mysql) gid=3306(mysql) groups=3306(mysql)
3、设置开机自动挂载此逻辑卷
[root@NFS ~]# mkdir /mydata
[root@NFS ~]# vim /etc/fstab
[root@NFS ~]# tail -1 /etc/fstab
/dev/myvg/mydata	/mydata			ext4    defaults	0 0
[root@NFS ~]# mount -a
[root@NFS ~]# mount
/dev/mapper/vg_centos6-lv_root on / type ext4 (rw)
proc on /proc type proc (rw)
sysfs on /sys type sysfs (rw)
devpts on /dev/pts type devpts (rw,gid=5,mode=620)
tmpfs on /dev/shm type tmpfs (rw)
/dev/sdb1 on /boot type ext4 (rw)
none on /proc/sys/fs/binfmt_misc type binfmt_misc (rw)
/dev/mapper/myvg-mydata on /mydata type ext4 (rw)
4、准备数据目录
[root@NFS ~]# mkdir /mydata/data
[root@NFS ~]# chown -R mysql.mysql /mydata/data
[root@NFS ~]# ll -d /mydata/data
drwxr-xr-x 2 mysql mysql 4096 Jan  3 10:03 /mydata/data
5、导出数据目录
[root@NFS ~]# vim /etc/exports
[root@NFS ~]# cat /etc/exports
/mydata			172.16.0.0/16(rw)
[root@NFS ~]# exportfs -arv
exporting 172.16.0.0/16:/mydata
6、手动挂载此数据目录,测试两个节点是否能进行读写操作
node1
先在node1上添加mysql用户
[root@node1 ~]# hostname
node1.network.com
[root@node1 ~]# groupadd -g 3306 mysql
[root@node1 ~]# useradd -u 3306 -g mysql -s /sbin/nologin -M mysql
[root@node1 ~]# mkdir /mydata
[root@node1 ~]# mount -t nfs 172.16.1.102:/mydata /mydata
[root@node1 ~]# ll /mydata/
total 20
drwxr-xr-x 2 mysql mysql  4096 Jan  3 10:03 data
drwx------ 2 root  root  16384 Jan  3 09:56 lost+found

切换到mysql用户测试能否读写
[root@node1 ~]# su - mysql
su: warning: cannot change directory to /home/mysql: No such file or directory
This account is currently not available.
[root@node1 ~]# usermod -s /bin/bash mysql            # 临时性修改
[root@node1 ~]# su - mysql
su: warning: cannot change directory to /home/mysql: No such file or directory
-bash-3.2$ pwd
/root
-bash-3.2$ cd /mydata/data/
-bash-3.2$ touch a
-bash-3.2$ ls
a
-bash-3.2$ rm a
-bash-3.2$ exit
logout
[root@node1 ~]# usermod -s /sbin/nologin mysql        # 将默认shell还改为/sbin/nologin
[root@node1 ~]# umount /mydata/                        # 卸载完成,node1的测试结束
node2
同样的添加mysql用户
[root@node2 ~]# hostname
node2.network.com
[root@node2 ~]# groupadd -g 3306 mysql
[root@node2 ~]# useradd -u 3306 -g mysql -M mysql
[root@node2 ~]# mkdir /mydata
[root@node2 ~]# mount -t nfs 172.16.1.102:/mydata /mydata/
[root@node2 ~]# ll /mydata/
total 20
drwxr-xr-x 2 mysql mysql  4096 Jan  3 10:19 data
drwx------ 2 root  root  16384 Jan  3 09:56 lost+found
[root@node2 ~]# su - mysql
su: warning: cannot change directory to /home/mysql: No such file or directory
-bash-3.2$ pwd
/root
-bash-3.2$ cd /mydata/data/
-bash-3.2$ touch hello
-bash-3.2$ ls
hello
-bash-3.2$ rm hello
-bash-3.2$ exit
logout
[root@node2 ~]# usermod -s /sbin/nologin mysql
[root@node2 ~]# umount /mydata/
7、安装并初始化mysql(选择一个节点即可,这里以node1为例)
解压并初始化mysql
[root@node1 ~]# tar xf mysql-5.5.28-linux2.6-x86_64.tar.gz -C /usr/local/
[root@node1 ~]# cd /usr/local/
[root@node1 local]# ln -sv mysql-5.5.28-linux2.6-x86_64 mysql
create symbolic link `mysql' to `mysql-5.5.28-linux2.6-x86_64'
[root@node1 local]# cd mysql
[root@node1 mysql]# chown -R root.mysql ./*
[root@node1 mysql]# ll
total 132
drwxr-xr-x  2 root mysql  4096 Jan  7 19:31 bin
-rw-r--r--  1 root mysql 17987 Aug 29  2012 COPYING
drwxr-xr-x  4 root mysql  4096 Jan  7 19:31 data
drwxr-xr-x  2 root mysql  4096 Jan  7 19:30 docs
drwxr-xr-x  3 root mysql  4096 Jan  7 19:31 include
-rw-r--r--  1 root mysql  7604 Aug 29  2012 INSTALL-BINARY
drwxr-xr-x  3 root mysql  4096 Jan  7 19:31 lib
drwxr-xr-x  4 root mysql  4096 Jan  7 19:31 man
drwxr-xr-x 10 root mysql  4096 Jan  7 19:31 mysql-test
-rw-r--r--  1 root mysql  2552 Aug 29  2012 README
drwxr-xr-x  2 root mysql  4096 Jan  7 19:31 scripts
drwxr-xr-x 27 root mysql  4096 Jan  7 19:31 share
drwxr-xr-x  4 root mysql  4096 Jan  7 19:31 sql-bench
drwxr-xr-x  2 root mysql  4096 Jan  7 19:31 support-files
[root@node1 mysql]# mount -t nfs 172.16.1.102:/mydata/ /mydata/  # 挂载数据目录

初始化mysql出错
[root@node1 mysql]# scripts/mysql_install_db --user=mysql --datadir=/mydata/data
chown: changing ownership of `/mydata/data': Operation not permitted
Cannot change ownership of the database directories to the 'mysql'
user.  Check that you have the necessary permissions and try again.

管理员权限是被压缩的了,所以此时我们需要在NFS共享目录上设置no_root_squash参数
[root@NFS ~]# vim /etc/exports
[root@NFS ~]# cat /etc/exports
/mydata			172.16.0.0/16(rw,no_root_squash)    # 其实这是很危险的操作,应只能运行指定的几个节点才能挂载
[root@NFS ~]# exportfs -arv
exporting 172.16.0.0/16:/mydata

此时再在node1上初始化mysql
[root@node1 mysql]# scripts/mysql_install_db --user=mysql --datadir=/mydata/data
Installing MySQL system tables...
OK
Filling help tables...
OK

To start mysqld at boot time you have to copy
support-files/mysql.server to the right place for your system

PLEASE REMEMBER TO SET A PASSWORD FOR THE MySQL root USER !
To do so, start the server, then issue the following commands:

./bin/mysqladmin -u root password 'new-password'
./bin/mysqladmin -u root -h node1.network.com password 'new-password'

Alternatively you can run:
./bin/mysql_secure_installation

which will also give you the option of removing the test
databases and anonymous user created by default.  This is
strongly recommended for production servers.

See the manual for more instructions.

You can start the MySQL daemon with:
cd . ; ./bin/mysqld_safe &

You can test the MySQL daemon with mysql-test-run.pl
cd ./mysql-test ; perl mysql-test-run.pl

Please report any problems with the ./bin/mysqlbug script!

给mysql增加配置文件以及服务脚本
[root@node1 mysql]# ll /mydata/data/
total 12
drwx------ 2 mysql root  4096 Jan  3 10:52 mysql
drwx------ 2 mysql mysql 4096 Jan  3 10:52 performance_schema
drwx------ 2 mysql root  4096 Jan  3 10:52 test
[root@node1 mysql]# ls
bin  COPYING  data  docs  include  INSTALL-BINARY  lib  man  mysql-test  README  scripts  share  sql-bench  support-files
[root@node1 mysql]# cp support-files/my-large.cnf /etc/my.cnf

修改mysql的配置文件
[root@node1 mysql]# vim /etc/my.cnf
[root@node1 mysql]# grep -A 1 "datadir" /etc/my.cnf
datadir = /mydata/data
innodb_file_per_table = 1

拷贝服务启动脚本,并设置开机不自动启动
[root@node1 mysql]# cp support-files/mysql.server /etc/rc.d/init.d/mysqld
[root@node1 mysql]# chkconfig --add mysqld
[root@node1 mysql]# chkconfig mysqld off
8、手动连接mysql,测试是否能读写mysql
[root@node1 mysql]# service mysqld start
Starting MySQL......                                       [  OK  ]
[root@node1 mysql]# /usr/local/mysql/bin/mysql
Welcome to the MySQL monitor.  Commands end with ; or \g.
Your MySQL connection id is 2
Server version: 5.5.28-log MySQL Community Server (GPL)

Copyright (c) 2000, 2012, Oracle and/or its affiliates. All rights reserved.

Oracle is a registered trademark of Oracle Corporation and/or its
affiliates. Other names may be trademarks of their respective
owners.

Type 'help;' or '\h' for help. Type '\c' to clear the current input statement.

mysql> SHOW DATABASES;
+--------------------+
| Database           |
+--------------------+
| information_schema |
| mysql              |
| performance_schema |
| test               |
+--------------------+
4 rows in set (0.01 sec)

mysql> CREATE DATABASE testdb;
Query OK, 1 row affected (0.10 sec)

mysql> SHOW DATABASES;
+--------------------+
| Database           |
+--------------------+
| information_schema |
| mysql              |
| performance_schema |
| test               |
| testdb             |
+--------------------+
5 rows in set (0.01 sec)

mysql> \q
Bye
[root@node1 mysql]# service mysqld stop
Shutting down MySQL..                                      [  OK  ]
[root@node1 mysql]# chkconfig mysqld off                # 确保mysqld服务不能开机自启动
[root@node1 mysql]# chkconfig --list mysqld
mysqld         	0:off	1:off	2:off	3:off	4:off	5:off	6:off

卸载之前挂载的mysql数据目录
[root@node1 mysql]# umount /mydata/
[root@node1 mysql]# mount
/dev/mapper/VolGroup00-LogVol00 on / type ext3 (rw)
proc on /proc type proc (rw)
sysfs on /sys type sysfs (rw)
devpts on /dev/pts type devpts (rw,gid=5,mode=620)
/dev/sda1 on /boot type ext3 (rw)
tmpfs on /dev/shm type tmpfs (rw)
none on /proc/sys/fs/binfmt_misc type binfmt_misc (rw)
sunrpc on /var/lib/nfs/rpc_pipefs type rpc_pipefs (rw)
nfsd on /proc/fs/nfsd type nfsd (rw)
9、配置另外节点上的mysql
我这里直接从node1节点上拷贝过来
[root@node2 mysql]# hostname
node2.network.com
[root@node2 ~]# scp  node1:~/mysql-5.5.28-linux2.6-x86_64.tar.gz /tmp/
mysql-5.5.28-linux2.6-x86_64.tar.gz                     100%  178MB   9.4MB/s   00:19
[root@node2 ~]# cd /tmp/
[root@node2 tmp]# ls
mysql-5.5.28-linux2.6-x86_64.tar.gz
[root@node2 tmp]# tar xf mysql-5.5.28-linux2.6-x86_64.tar.gz -C /usr/local/
[root@node2 tmp]# cd /usr/local/
[root@node2 local]# ln -sv mysql-5.5.28-linux2.6-x86_64 mysql
create symbolic link `mysql' to `mysql-5.5.28-linux2.6-x86_64'
[root@node2 local]# cd mysql
[root@node2 mysql]# chown -R root.mysql ./*
[root@node2 mysql]# ll
total 132
drwxr-xr-x  2 root mysql  4096 Jan  7 20:10 bin
-rw-r--r--  1 root mysql 17987 Aug 29  2012 COPYING
drwxr-xr-x  4 root mysql  4096 Jan  7 20:10 data
drwxr-xr-x  2 root mysql  4096 Jan  7 20:09 docs
drwxr-xr-x  3 root mysql  4096 Jan  7 20:10 include
-rw-r--r--  1 root mysql  7604 Aug 29  2012 INSTALL-BINARY
drwxr-xr-x  3 root mysql  4096 Jan  7 20:10 lib
drwxr-xr-x  4 root mysql  4096 Jan  7 20:10 man
drwxr-xr-x 10 root mysql  4096 Jan  7 20:10 mysql-test
-rw-r--r--  1 root mysql  2552 Aug 29  2012 README
drwxr-xr-x  2 root mysql  4096 Jan  7 20:10 scripts
drwxr-xr-x 27 root mysql  4096 Jan  7 20:10 share
drwxr-xr-x  4 root mysql  4096 Jan  7 20:10 sql-bench
drwxr-xr-x  2 root mysql  4096 Jan  7 20:10 support-files
mysql数据目录在node1节点上已经初始化过了,所以此时不需要再进行初始化,只需要拷贝配置文件和服务启动脚本

[root@node2 mysql]# scp node1:/etc/rc.d/init.d/mysqld /etc/rc.d/init.d/
mysqld                                                  100%   10KB  10.4KB/s   00:01
[root@node2 mysql]# scp node1:/etc/my.cnf /etc/
my.cnf                                                  100% 4713     4.6KB/s   00:00

确保mysqld服务不能开机自启动
[root@node2 mysql]# chkconfig --add mysqld
[root@node2 mysql]# chkconfig mysqld off
[root@node2 mysql]# chkconfig --list mysqld
mysqld         	0:off	1:off	2:off	3:off	4:off	5:off	6:off

再挂载数据目录,连上去,看是否能访问到之前node1节点上创建的一个测试库testdb
[root@node2 mysql]# mount -t nfs 172.16.1.102:/mydata/ /mydata/
[root@node2 mysql]# ll /mydata/data/
total 28704
-rw-rw---- 1 mysql mysql 18874368 Jan  3 11:33 ibdata1
-rw-rw---- 1 mysql mysql  5242880 Jan  3 11:33 ib_logfile0
-rw-rw---- 1 mysql mysql  5242880 Jan  3 10:58 ib_logfile1
drwx------ 2 mysql root      4096 Jan  3 10:52 mysql
-rw-rw---- 1 mysql mysql      298 Jan  3 11:02 mysql-bin.000001
-rw-rw---- 1 mysql mysql      213 Jan  3 11:33 mysql-bin.000002
-rw-rw---- 1 mysql mysql       38 Jan  3 11:31 mysql-bin.index
-rw-rw---- 1 mysql root      3846 Jan  3 11:33 node1.network.com.err
drwx------ 2 mysql mysql     4096 Jan  3 10:52 performance_schema
drwx------ 2 mysql root      4096 Jan  3 10:52 test
drwx------ 2 mysql mysql     4096 Jan  3 11:32 testdb

启动mysql
[root@node2 mysql]# service mysqld start
Starting MySQL...                                          [  OK  ]
[root@node2 mysql]# /usr/local/mysql/bin/mysql
Welcome to the MySQL monitor.  Commands end with ; or \g.
Your MySQL connection id is 1
Server version: 5.5.28-log MySQL Community Server (GPL)

Copyright (c) 2000, 2012, Oracle and/or its affiliates. All rights reserved.

Oracle is a registered trademark of Oracle Corporation and/or its
affiliates. Other names may be trademarks of their respective
owners.

Type 'help;' or '\h' for help. Type '\c' to clear the current input statement.

mysql> SHOW DATABASES;
+--------------------+
| Database           |
+--------------------+
| information_schema |
| mysql              |
| performance_schema |
| test               |
| testdb             |                                # 在node1节点上创建的testdb库是可以看到的
+--------------------+
5 rows in set (0.07 sec)

mysql> DROP DATABASE testdb;
Query OK, 0 rows affected (0.14 sec)

mysql> \q
Bye

关闭mysql服务,并卸载数据目录
[root@node2 mysql]# service mysqld stop
Shutting down MySQL..                                      [  OK  ]
[root@node2 mysql]# umount /mydata/

到此为止,基本配置已完成,再来配置heartbeat即可
10、在各节点上启动heartbeat服务
首先在两个节点上启动heartbeat服务
[root@node1 ~]# service heartbeat start
Starting High-Availability services:
                                                           [  OK  ]
[root@node1 ~]# ssh node2 'service heartbeat start'
Starting High-Availability services:
[  OK  ]

查看当前高可用集群各节点状态
[root@node1 ~]# crm_mon
Refresh in 12s...

============
Last updated: Thu Jan  7 20:31:25 2016
Current DC: node1.network.com (e719d448-df8b-4d58-ae0e-020f67bbbb49)    # 当前DC为node1
2 Nodes configured.
0 Resources configured.
============

Node: node1.network.com (e719d448-df8b-4d58-ae0e-020f67bbbb49): online
Node: node2.network.com (734de3f1-c370-46d7-b89d-69145618e8a9): online

启动hb_gui
[root@node1 ~]# hb_gui &
[1] 14906
首先进入图形配置界面,输入密码
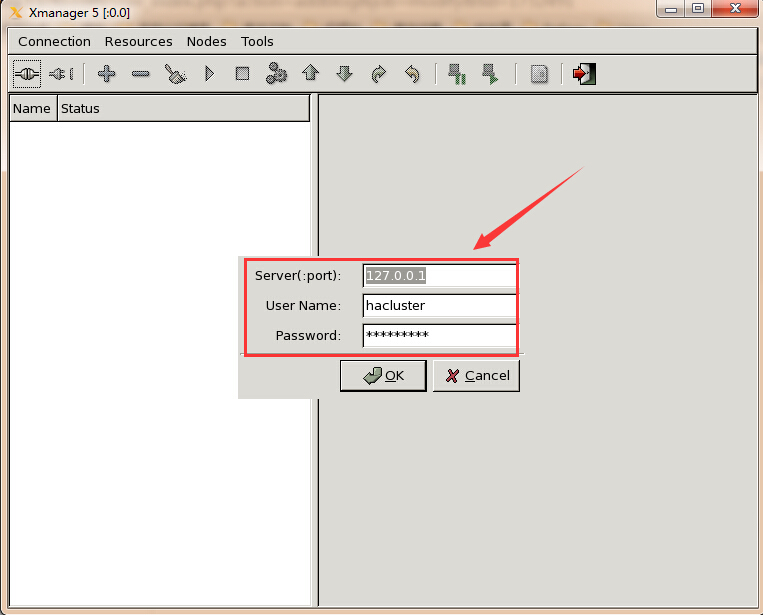
成功进入图形配置界面
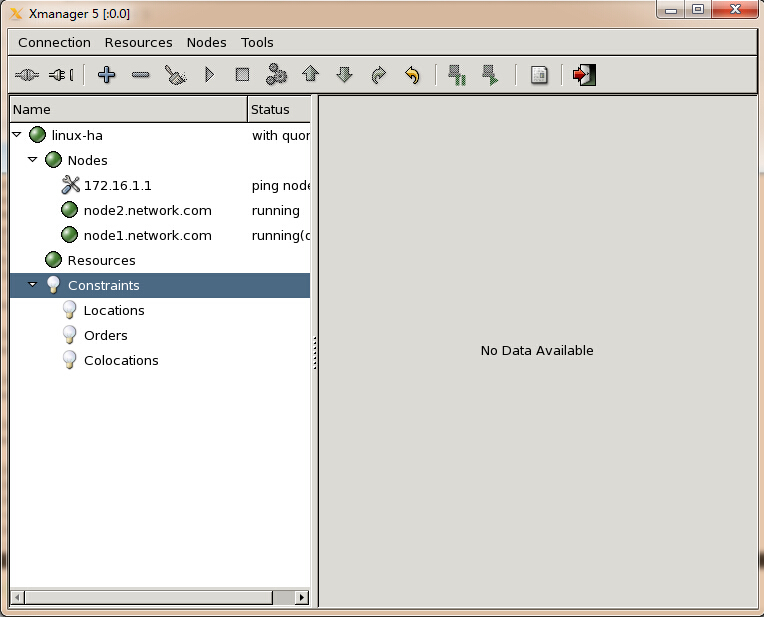
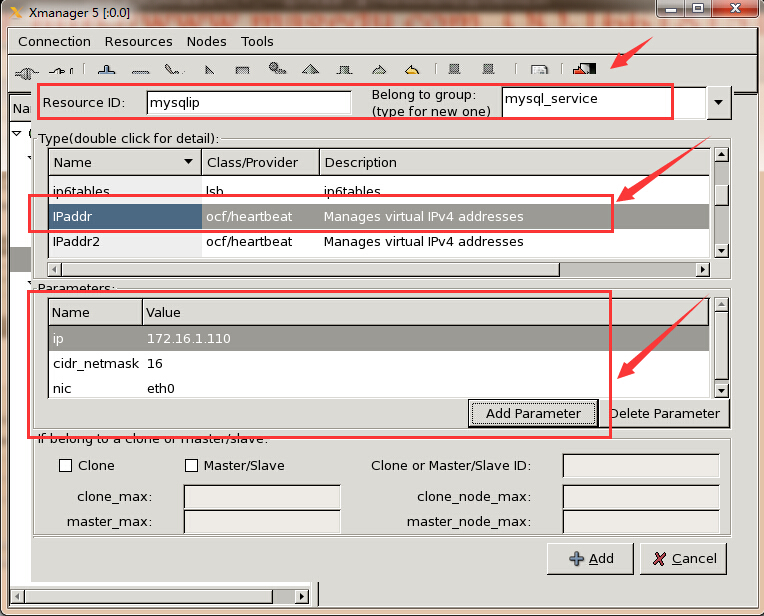
接下来配置mysql高可用的各个资源即可,VIP、Filesystem和mysqld服务
11、配置mysql高可用
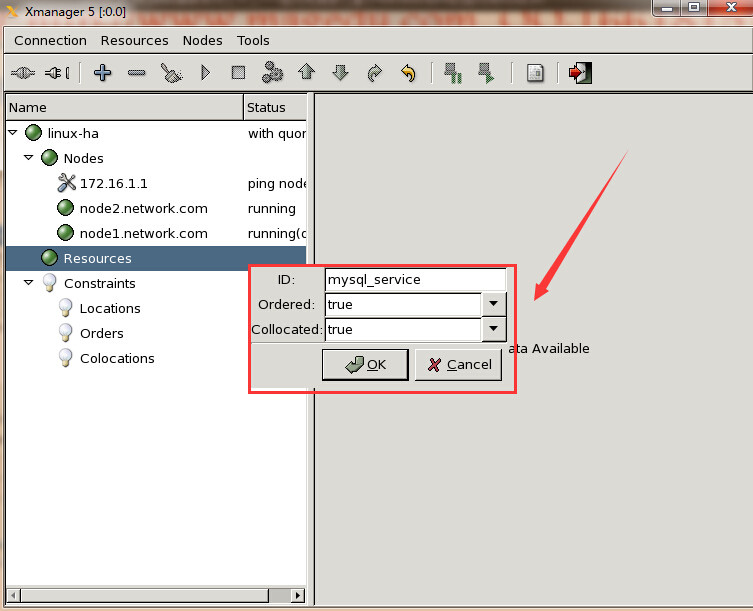
(1)、配置mysql_service组和mysqlip
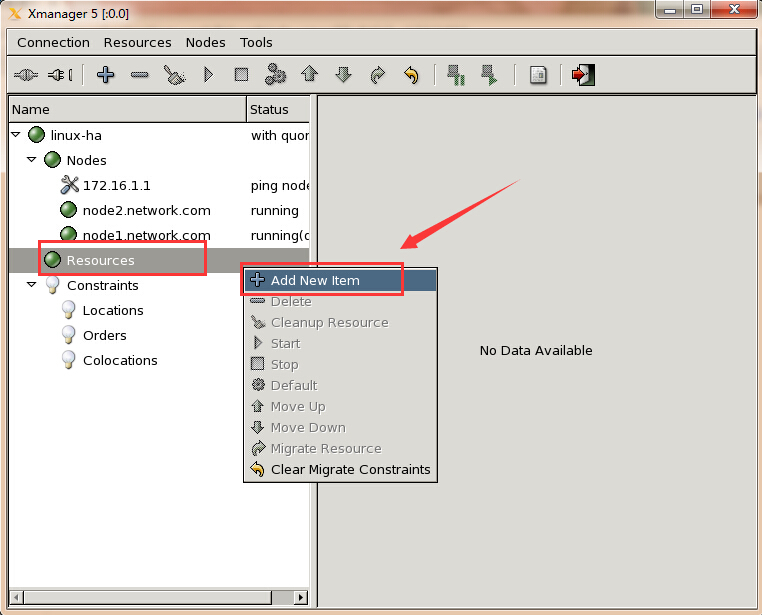
选择类型为组
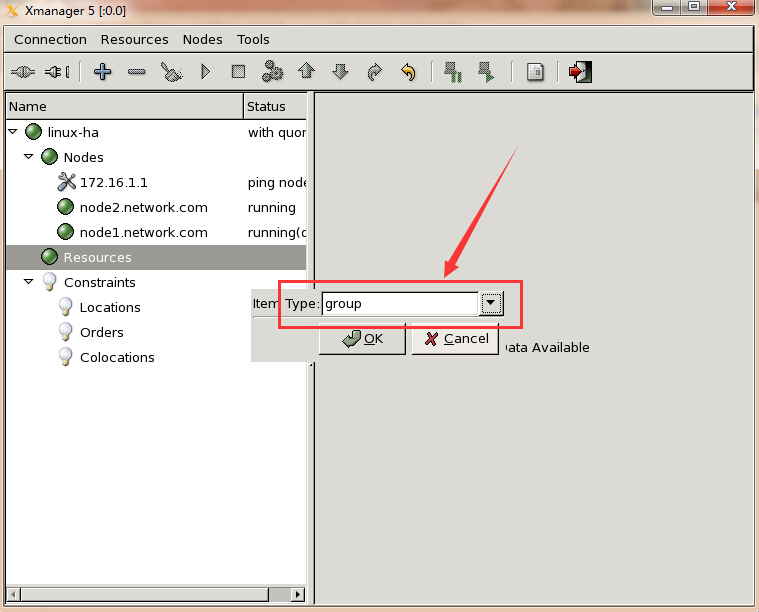
给组命名,我这里为mysql_service
配置第一个资源mysqlip
(2)、配置mysqlstore
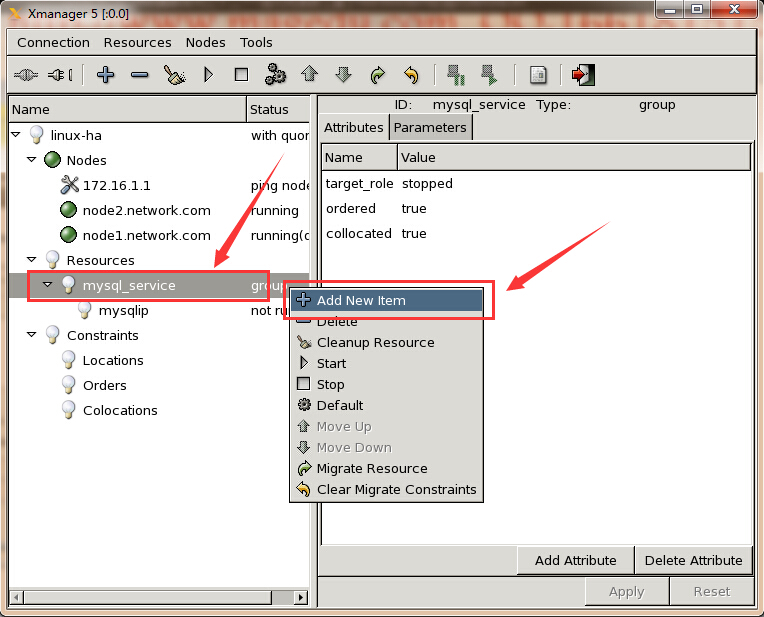
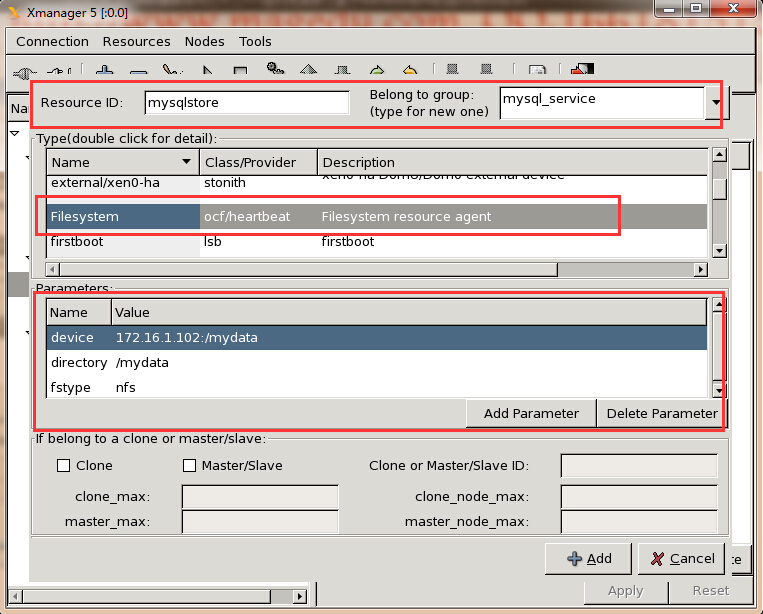
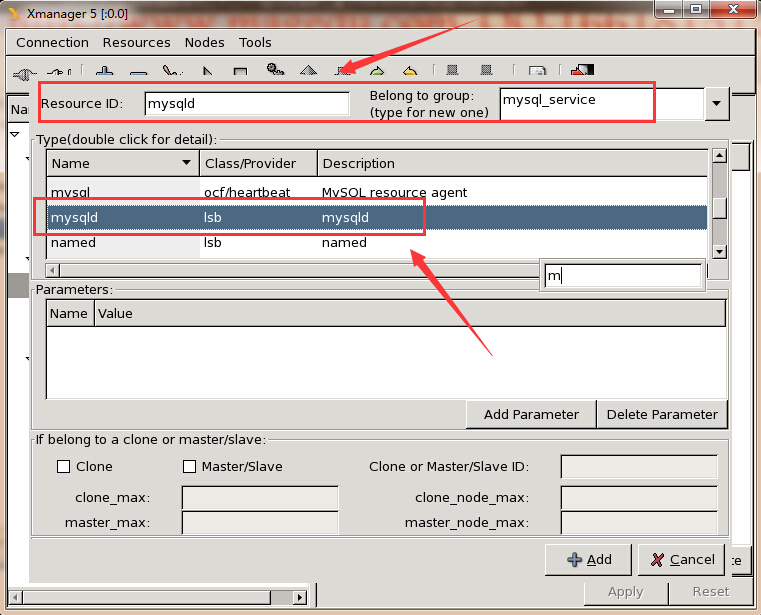
(3)、配置mysqld
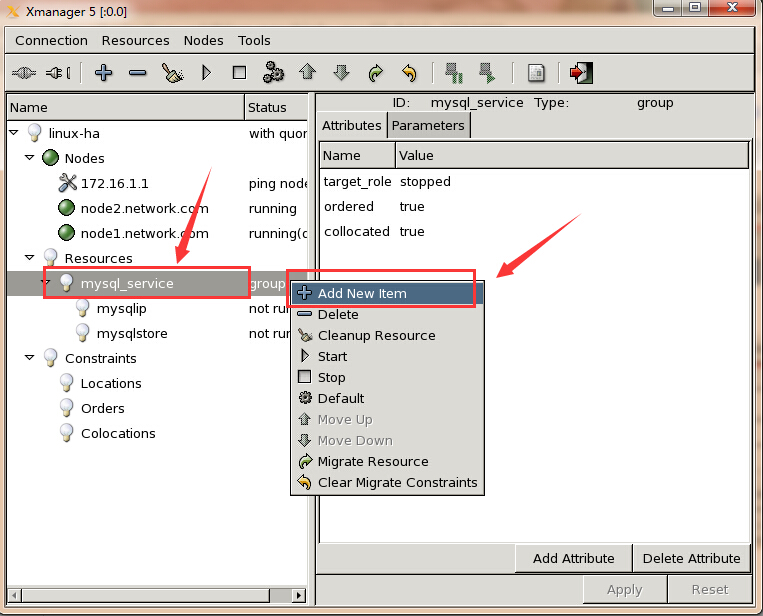
这里可以选择LSB的mysqld,也可以选择ocf的mysql,自行根据需要,我这里选择的是mysqld
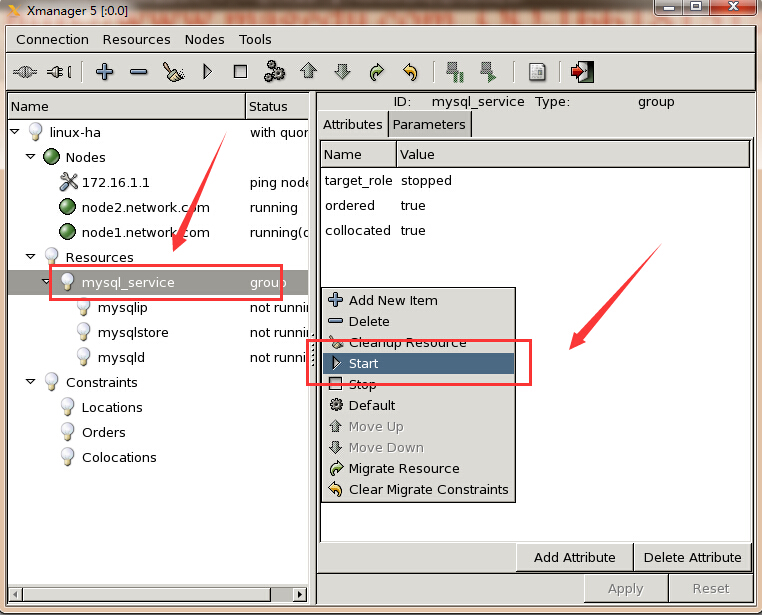
(4)、启动mysql_service组资源
启动成功,显示如下
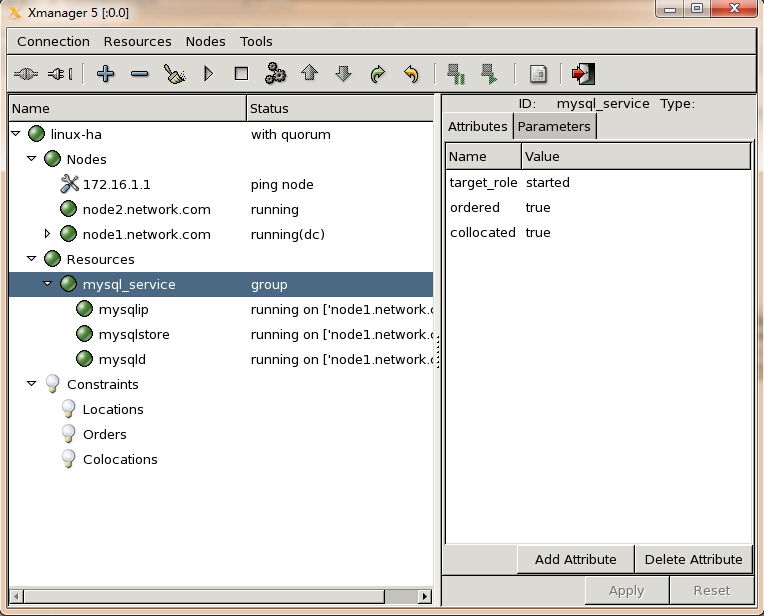
12、测试mysql服务的高可用性
此时mysql服务运行在node1节点上,连上node1,然后授权远程访问用户
[root@node1 ~]# /usr/local/mysql/bin/mysql
Welcome to the MySQL monitor.  Commands end with ; or \g.
Your MySQL connection id is 3
Server version: 5.5.28-log MySQL Community Server (GPL)

Copyright (c) 2000, 2012, Oracle and/or its affiliates. All rights reserved.

Oracle is a registered trademark of Oracle Corporation and/or its
affiliates. Other names may be trademarks of their respective
owners.

Type 'help;' or '\h' for help. Type '\c' to clear the current input statement.

mysql> GRANT ALL PRIVILEGES ON *.* TO 'root'@'%' IDENTIFIED BY 'redhat';
Query OK, 0 rows affected (0.07 sec)

mysql> FLUSH PRIVILEGES;
Query OK, 0 rows affected (0.01 sec)

mysql> \q
Bye

此时在node2节点上做测试,看是否能够远程访问mysql
[root@node2 mysql]# /usr/local/mysql/bin/mysql -uroot -h 172.16.1.110 -p
Enter password:
Welcome to the MySQL monitor.  Commands end with ; or \g.
Your MySQL connection id is 4
Server version: 5.5.28-log MySQL Community Server (GPL)

Copyright (c) 2000, 2012, Oracle and/or its affiliates. All rights reserved.

Oracle is a registered trademark of Oracle Corporation and/or its
affiliates. Other names may be trademarks of their respective
owners.

Type 'help;' or '\h' for help. Type '\c' to clear the current input statement.

mysql> SHOW DATABASES;
+--------------------+
| Database           |
+--------------------+
| information_schema |
| mysql              |
| performance_schema |
| test               |
+--------------------+
4 rows in set (0.06 sec)

mysql> CREATE DATABASE mydb;
Query OK, 1 row affected (0.03 sec)

mysql> SHOW DATABASES;
+--------------------+
| Database           |
+--------------------+
| information_schema |
| mydb               |
| mysql              |
| performance_schema |
| test               |
+--------------------+
5 rows in set (0.02 sec)

mysql> \q
Bye
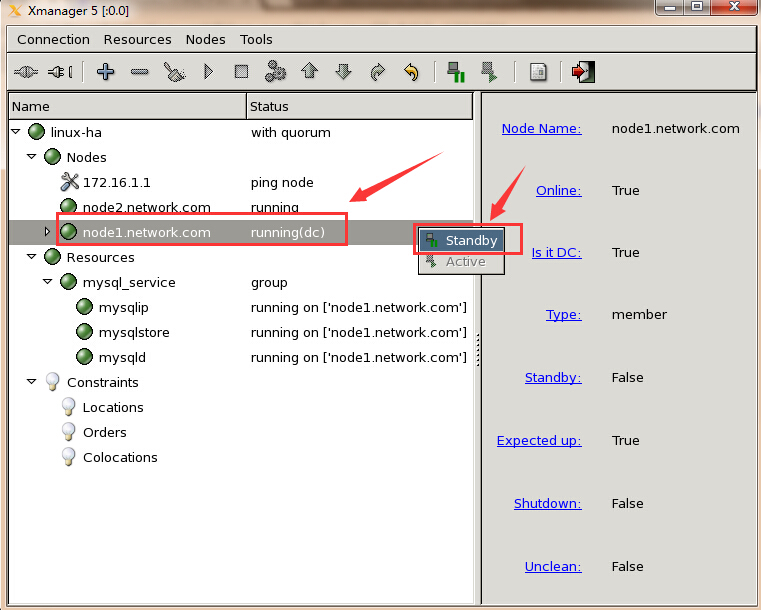
此时让node1节点处于standby状态
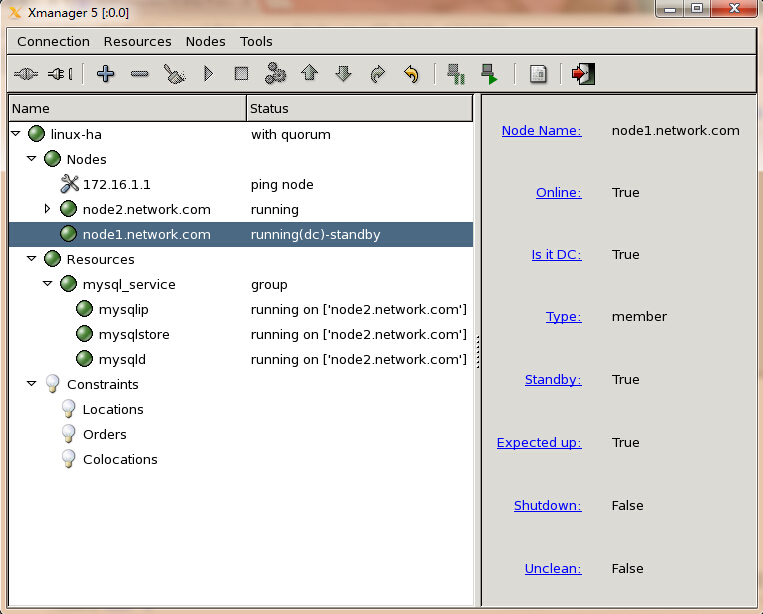
此时可以看到资源已成功转移至node2节点上了
再来测试是否能连上msyql
[root@node2 mysql]# /usr/local/mysql/bin/mysql -uroot -h 172.16.1.110 -p
Welcome to the MySQL monitor.  Commands end with ; or \g.
Your MySQL connection id is 6
Server version: 5.5.28-log MySQL Community Server (GPL)

Copyright (c) 2000, 2012, Oracle and/or its affiliates. All rights reserved.

Oracle is a registered trademark of Oracle Corporation and/or its
affiliates. Other names may be trademarks of their respective
owners.

Type 'help;' or '\h' for help. Type '\c' to clear the current input statement.

mysql> SHOW DATABASES;
+--------------------+
| Database           |
+--------------------+
| information_schema |
| mydb               |
| mysql              |
| performance_schema |
| test               |
+--------------------+
5 rows in set (0.14 sec)

mysql> \q
Bye
到此为止,一个简单的heartbeat + NFS + mysql的高可用服务搭建完成