Android 开发之旅:短信的收发及在android模拟器之间实践(一)
引言
本文通过运行两个Android模拟器,介绍在Android中如何实现短信服务(SMS,short message service)的功能。通过这个例子,我想带给大家的是:更加熟悉之前介绍过的Android应用程序的概念及技术细节,且通过实例调度大家的兴趣。我之所以选择SMS为例子,主要原因是SMS已经非常成熟了,从中可以发掘更多的信息和技术细节,而且我相信大部分人发短信比打电话多。
本文的主要内容如下:
- 1、温故知新
- 2、准备工作:SMS涉及的主要类SmsManager
- 3、简单的SMS发送程序
- 3.1、运行SMS程序给另一个android模拟器发短
- 4、SMS增强(一)
- 5、SMS增强(二)
- 6、SMS接收程序(下篇)
- 7、emulator工具(下篇)
- 8、…
1、温故知新
广播接收者:一个广播接收者是这样一个组件,它不做什么事,仅是接受广播公告并作出相应的反应。许多广播源自于系统代码,例如公告时区的改变、电池电量低、已采取图片、用户改变了语言偏好。应用程序也可以发起广播,例如为了他其他程序知道某些数据已经下载到设备且他们可以使用这些数据
BroadcastReceiver类:是接受sendBroadcast()发送的意图(intents)的基类。可以用Context.registerReceiver()动态地注册这个类的实例,或者通过AndroidManifest.xml中<receiver>标签静态发布。
广播接收者不显示一个用户界面。然而,它们启动一个活动去响应收到的信息,或者他们可能使用NotificationManager去通知用户。通知可以使用多种方式获得用户的注意——闪烁的背光、振动设备、播放声音等等。典型的是放在一个持久的图标在状态栏,用户可以打开获取信息。
2、准备工作:SMS涉及的主要类SmsManager
实现SMS主要用到SmsManager类,该类继承自java.lang.Object类,下面我们介绍一下该类的主要成员。
公有方法:
- ArrayList<String> divideMessage(String text)
当短信超过SMS消息的最大长度时,将短信分割为几块。
参数:text——初始的消息,不能为空
返回值:有序的ArrayList<String>,可以重新组合为初始的消息 - static SmsManager getDefault()
获取SmsManager的默认实例。
返回值:SmsManager的默认实例 - void SendDataMessage(String destinationAddress, String scAddress, short destinationPort, byte[] data, PendingIntent sentIntent, PendingIntent deliveryIntent)
发送一个基于SMS的数据到指定的应用程序端口。
参数:
1)、destinationAddress——消息的目标地址
2)、scAddress——服务中心的地址or为空使用当前默认的SMSC 3)destinationPort——消息的目标端口号
4)、data——消息的主体,即消息要发送的数据
5)、sentIntent——如果不为空,当消息成功发送或失败这个PendingIntent就广播。结果代码是Activity.RESULT_OK表示成功,或RESULT_ERROR_GENERIC_FAILURE、RESULT_ERROR_RADIO_OFF、RESULT_ERROR_NULL_PDU之一表示错误。对应RESULT_ERROR_GENERIC_FAILURE,sentIntent可能包括额外的“错误代码”包含一个无线电广播技术特定的值,通常只在修复故障时有用。
每一个基于SMS的应用程序控制检测sentIntent。如果sentIntent是空,调用者将检测所有未知的应用程序,这将导致在检测的时候发送较小数量的SMS。
6)、deliveryIntent——如果不为空,当消息成功传送到接收者这个PendingIntent就广播。
异常:如果destinationAddress或data是空时,抛出IllegalArgumentException异常。 - void sendMultipartTextMessage(String destinationAddress, String scAddress, ArrayList<String> parts, ArrayList<PendingIntent> sentIntents, ArrayList<PendingIntent> deliverIntents)
发送一个基于SMS的多部分文本,调用者应用已经通过调用divideMessage(String text)将消息分割成正确的大小。
参数:
1)、destinationAddress——消息的目标地址
2)、scAddress——服务中心的地址or为空使用当前默认的SMSC
3)、parts——有序的ArrayList<String>,可以重新组合为初始的消息
4)、sentIntents——跟SendDataMessage方法中一样,只不过这里的是一组PendingIntent
5)、deliverIntents——跟SendDataMessage方法中一样,只不过这里的是一组PendingIntent
异常:如果destinationAddress或data是空时,抛出IllegalArgumentException异常。 - void sendTextMessage(String destinationAddress, String scAddress, String text, PendingIntent sentIntent, PendingIntent deliveryIntent)
发送一个基于SMS的文本。参数的意义和异常前面的已存在的一样,不再累述。
常量:
- public static final int RESULT_ERROR_GENERIC_FAILURE
表示普通错误,值为1(0x00000001) - public static final int RESULT_ERROR_NO_SERVICE
表示服务当前不可用,值为4 (0x00000004) - public static final int RESULT_ERROR_NULL_PDU
表示没有提供pdu,值为3 (0x00000003) - public static final int RESULT_ERROR_RADIO_OFF
表示无线广播被明确地关闭,值为2 (0x00000002) - public static final int STATUS_ON_ICC_FREE
表示自由空间,值为0 (0x00000000) - public static final int STATUS_ON_ICC_READ
表示接收且已读,值为1 (0x00000001) - public static final int STATUS_ON_ICC_SENT
表示存储且已发送,值为5 (0x00000005) - public static final int STATUS_ON_ICC_UNREAD
表示接收但未读,值为3 (0x00000003) - public static final int STATUS_ON_ICC_UNSENT
表示存储但为发送,值为7 (0x00000007)
3、简单的SMS发送程序
1)、首先,编辑布局文件res/layout/main.xml,达到我们想要的结果,界面如下:
图1、程序运行界面
对应的xml代码如下:
- <?xml version="1.0" encoding="utf-8"?>
- <LinearLayout xmlns:android="http://schemas.android.com/apk/res/android"
- android:orientation="vertical"
- android:layout_width="fill_parent"
- android:layout_height="fill_parent" >
- <TextView android:layout_width="fill_parent"
- android:layout_height="wrap_content"
- android:text="@string/txtPhoneNo"/> <!-- text's value define in res/values/strings.xml -->
- <EditText android:layout_width="fill_parent"
- android:layout_height="wrap_content"
- android:id="@+id/edtPhoneNo"/>
- <TextView android:layout_width="fill_parent"
- android:layout_height="wrap_content"
- android:text="@string/txtContent"/>
- <EditText android:layout_width="fill_parent"
- android:layout_height="wrap_content"
- android:minLines="3"
- android:id="@+id/edtContent"/>
- <Button android:layout_width="wrap_content"
- android:layout_height="wrap_content"
- android:text="@string/btnText"
- android:id="@+id/btnSend"/>
- </LinearLayout>
相应的要在res/values/strings.xm中添加上面定义的视图的text的值,如下:
- <?xml version="1.0" encoding="utf-8"?>
- <resources>
- <string name="txtPhoneNo">Please input phone NO:</string>
- <string name="txtContent">Please input SMS\'s content:</string>
- <string name="btnText">send!</string>
- <string name="app_name">SMS</string>
- </resources>
2)、做完这些准备工作之后,我么要开始编写代码实现简单的短信发送了。
通过第一步我们构建好界面之后,现在要在上面的基础上编写业务逻辑了。大致过程为:在java源文件中,获取用户在edtPhoneNo中输入的电话号码,edtContent中输入要发送的内容;然后点击btnSend按钮发送短信,要达到这个目的我们要设置btnSend的OnClickListener以达到当点击它触发发送短信的功能,而且要发送短信就要用到我们前面介绍的SmsManager类提供的方法接口。
设置btnSend的OnClickListener的代码如下:
- btnSend.setOnClickListener(new View.OnClickListener() {
- public void onClick(View v) {
- String phoneNo = edtPhoneNo.getText().toString();
- String message = edtContent.getText().toString();
- if (phoneNo.length() > 0 && message.length() > 0){
- //call sendSMS to send message to phoneNo
- sendSMS(phoneNo, message);
- }
- else
- Toast.makeText(getBaseContext(),
- "Please enter both phone number and message.",
- Toast.LENGTH_SHORT).show();
- }
- });
发送短信的功能的代码如下:
- private void sendSMS(String phoneNumber, String message) {
- // ---sends an SMS message to another device---
- SmsManager sms = SmsManager.getDefault();
- PendingIntent pi = PendingIntent.getActivity(this, 0, new Intent(this,TextMessage.class), 0);
- //if message's length more than 70 ,
- //then call divideMessage to dive message into several part //and call sendTextMessage()
- //else direct call sendTextMessage()
- if (message.length() > 70) {
- ArrayList<String> msgs = sms.divideMessage(message);
- for (String msg : msgs) {
- sms.sendTextMessage(phoneNumber, null, msg, pi, null);
- }
- } else {
- sms.sendTextMessage(phoneNumber, null, message, pi, null);
- }
- Toast.makeText(TextMessage.this, "短信发送完成", Toast.LENGTH_LONG).show();
- }
如果你已经看了第2节介绍的SmsManager类的介绍,代码应该很好理解。在这里要说明的是,sendTextMessage方法中的第4个和第5个参数PendingIntent设为null,这样的话不能根据短信发出之后的状态做相应的事情,如短信发送失败后的提醒、接收者成功接收后的回执……完整的流程源码如下:
- package skynet.com.cnblogs.www;
- import java.util.ArrayList;
- import android.app.Activity;
- import android.app.PendingIntent;
- import android.content.Intent;
- import android.os.Bundle;
- import android.telephony.SmsManager;
- import android.view.View;
- import android.widget.*;
- public class TextMessage extends Activity {
- /** Called when the activity is first created. */
- @Override
- public void onCreate(Bundle savedInstanceState) {
- super.onCreate(savedInstanceState);
- setContentView(R.layout.main);
- btnSend = (Button) findViewById(R.id.btnSend);
- edtPhoneNo = (EditText) findViewById(R.id.edtPhoneNo);
- edtContent = (EditText) findViewById(R.id.edtContent);
- btnSend.setOnClickListener(new View.OnClickListener() {
- public void onClick(View v) {
- String phoneNo = edtPhoneNo.getText().toString();
- String message = edtContent.getText().toString();
- if (phoneNo.length() > 0 && message.length() > 0) {
- // call sendSMS to send message to phoneNo
- sendSMS(phoneNo, message);
- } else
- Toast.makeText(getBaseContext(),
- "Please enter both phone number and message.",
- Toast.LENGTH_SHORT).show();
- }
- });
- }
- private Button btnSend;
- private EditText edtPhoneNo;
- private EditText edtContent;
- private void sendSMS(String phoneNumber, String message) {
- // ---sends an SMS message to another device---
- SmsManager sms = SmsManager.getDefault();
- PendingIntent pi = PendingIntent.getActivity(this, 0, new Intent(this,
- TextMessage.class), 0);
- // if message's length more than 70 ,
- // then call divideMessage to dive message into several part ,and call
- // sendTextMessage()
- // else direct call sendTextMessage()
- if (message.length() > 70) {
- ArrayList<String> msgs = sms.divideMessage(message);
- for (String msg : msgs) {
- sms.sendTextMessage(phoneNumber, null, msg, pi, null);
- }
- } else {
- sms.sendTextMessage(phoneNumber, null, message, pi, null);
- }
- Toast.makeText(TextMessage.this, "短信发送完成", Toast.LENGTH_LONG).show();
- }
- }
3)运行前,还要在清单文件AndroidManifest.xml中加入允许发送短信的权限:
- <?xml version="1.0" encoding="utf-8"?>
- <manifest xmlns:android="http://schemas.android.com/apk/res/android"
- package="skynet.com.cnblogs.www"
- android:versionCode="1"
- android:versionName="1.0">
- <application android:icon="@drawable/icon" android:label="@string/app_name">
- <activity android:name=".TextMessage"
- android:label="@string/app_name">
- <intent-filter>
- <action android:name="android.intent.action.MAIN" />
- <category android:name="android.intent.category.LAUNCHER" />
- </intent-filter>
- </activity>
- </application>
- <uses-permission android:name="android.permission.SEND_SMS"/>
- </manifest>
3.1、运行SMS程序给另一个android模拟器发短信
运行上面我们编写的TextMessage程序,另外在Windows的命令行下切换到tools目录下,并输入emulator –data smsReceiver,我的如下:

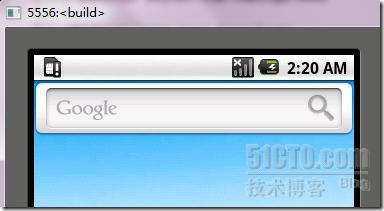
这样就会启动一个android模拟器,如下所示:(注意它的编号:5556,就是用这个编号与它通信的)

图2、通过emulator启动一个android模拟器
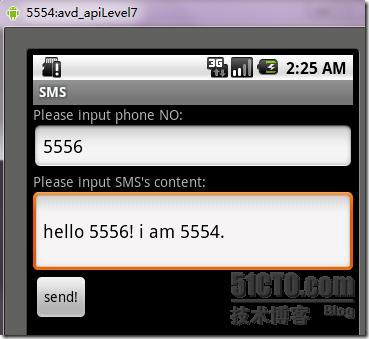
通过我们TextMessage程序启动的android模拟器,编写短信:

图3、TextMessage程序个5556模拟器发短信
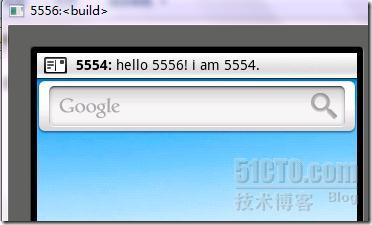
点击发送之后,通过命令行启动的5556号android模拟器会收到我们刚才发送的短信,如下所示:

图4、收到短信的提示
tips:
如果通过命令行的emulator启动android模拟器提示“NO DNS servers found!”,这时我们发的短信模拟器是收不到的。
-
在Windows下,如果电脑没有介入网络,即找不DNS服务器的话会出现这种情况!
-
在Mac下,如果提示这个警告的话,可以这样解决:检查你是否有
/etc/resolv.conf文件,如果没有的话,通过下面的命令行ln -s /private/var/run/resolv.conf /etc/resolv.conf可以解决。
4、SMS增强(一)
上面我们实现了一个简单的SMS程序,下面我们要对它进行增强!你肯定已经注意到了,我们上面的SMS程序的sendTextMessage方法中的第4个和第5个参数PendingIntent设为null,即sentIntent和deliveryIntent。
第4个参数-sendIntent,当消息成功发送或发送失败都将被触发。广播接收者的结果码,Activity.RESULT_OK表示成功,或RESULT_ERROR_GENERIC_FAILURE、RESULT_ERROR_RADIO_OFF、RESULT_ERROR_NULL_PDU之一表示错误。对应RESULT_ERROR_GENERIC_FAILURE,sentIntent可能包括额外的“错误代码”包含一个无线电广播技术特定的值,通常只在修复故障时有用。第5个参数-deliveryIntent,仅当目标接收到你的SMS消息才触发。
为了跟踪发出的短信的状态,实现和注册Broadcast Receiver(广播接收者)监听传递给sendTextMessage方法的参数Pending Intents。下面我们就实现和注册这个广播接收者:
- String SENT_SMS_ACTION="SENT_SMS_ACTION";
- String DELIVERED_SMS_ACTION="DELIVERED_SMS_ACTION";
- //create the sentIntent parameter
- Intent sentIntent=new Intent(SENT_SMS_ACTION);
- PendingIntent sentPI=PendingIntent.getBroadcast(
- this,
- 0,
- sentIntent,
- 0);
- //create the deilverIntent parameter
- Intent deliverIntent=new Intent(DELIVERED_SMS_ACTION);
- PendingIntent deliverPI=PendingIntent.getBroadcast(
- this,
- 0,
- deliverIntent,
- 0);
- //register the Broadcast Receivers
- registerReceiver(new BroadcastReceiver(){
- @Override
- public void onReceive(Context _context,Intent _intent)
- {
- switch(getResultCode()){
- case Activity.RESULT_OK:
- Toast.makeText(getBaseContext(),
- "SMS sent success actions",
- Toast.LENGTH_SHORT).show();
- break;
- case SmsManager.RESULT_ERROR_GENERIC_FAILURE:
- Toast.makeText(getBaseContext(),
- "SMS generic failure actions",
- Toast.LENGTH_SHORT).show();
- break;
- case SmsManager.RESULT_ERROR_RADIO_OFF:
- Toast.makeText(getBaseContext(),
- "SMS radio off failure actions",
- Toast.LENGTH_SHORT).show();
- break;
- case SmsManager.RESULT_ERROR_NULL_PDU:
- Toast.makeText(getBaseContext(),
- "SMS null PDU failure actions",
- Toast.LENGTH_SHORT).show();
- break;
- }
- }
- },
- new IntentFilter(SENT_SMS_ACTION));
- registerReceiver(new BroadcastReceiver(){
- @Override
- public void onReceive(Context _context,Intent _intent)
- {
- Toast.makeText(getBaseContext(),
- "SMS delivered actions",
- Toast.LENGTH_SHORT).show();
- }
- },
- new IntentFilter(DELIVERED_SMS_ACTION));
在基本完成了要做的工作,接下来要做的就是将sendTextMessage的第4个和第5个参数改为sentPI、deliverPI,这样工作基本完成,修改后的sendSMS方法如下:
- private void sendSMS(String phoneNumber, String message) {
- // ---sends an SMS message to another device---
- SmsManager sms = SmsManager.getDefault();
- String SENT_SMS_ACTION = "SENT_SMS_ACTION";
- String DELIVERED_SMS_ACTION = "DELIVERED_SMS_ACTION";
- // create the sentIntent parameter
- Intent sentIntent = new Intent(SENT_SMS_ACTION);
- PendingIntent sentPI = PendingIntent.getBroadcast(this, 0, sentIntent,
- 0);
- // create the deilverIntent parameter
- Intent deliverIntent = new Intent(DELIVERED_SMS_ACTION);
- PendingIntent deliverPI = PendingIntent.getBroadcast(this, 0,
- deliverIntent, 0);
- // register the Broadcast Receivers
- registerReceiver(new BroadcastReceiver() {
- @Override
- public void onReceive(Context _context, Intent _intent) {
- switch (getResultCode()) {
- case Activity.RESULT_OK:
- Toast.makeText(getBaseContext(),
- "SMS sent success actions", Toast.LENGTH_SHORT)
- .show();
- break;
- case SmsManager.RESULT_ERROR_GENERIC_FAILURE:
- Toast.makeText(getBaseContext(),
- "SMS generic failure actions", Toast.LENGTH_SHORT)
- .show();
- break;
- case SmsManager.RESULT_ERROR_RADIO_OFF:
- Toast
- .makeText(getBaseContext(),
- "SMS radio off failure actions",
- Toast.LENGTH_SHORT).show();
- break;
- case SmsManager.RESULT_ERROR_NULL_PDU:
- Toast.makeText(getBaseContext(),
- "SMS null PDU failure actions", Toast.LENGTH_SHORT)
- .show();
- break;
- }
- }
- }, new IntentFilter(SENT_SMS_ACTION));
- registerReceiver(new BroadcastReceiver() {
- @Override
- public void onReceive(Context _context, Intent _intent) {
- Toast.makeText(getBaseContext(), "SMS delivered actions",
- Toast.LENGTH_SHORT).show();
- }
- }, new IntentFilter(DELIVERED_SMS_ACTION));
- // if message's length more than 70 ,
- // then call divideMessage to dive message into several part ,and call
- // sendTextMessage()
- // else direct call sendTextMessage()
- if (message.length() > 70) {
- ArrayList<String> msgs = sms.divideMessage(message);
- for (String msg : msgs) {
- sms.sendTextMessage(phoneNumber, null, msg, sentPI, deliverPI);
- }
- } else {
- sms.sendTextMessage(phoneNumber, null, message, sentPI, deliverPI);
- }
- }
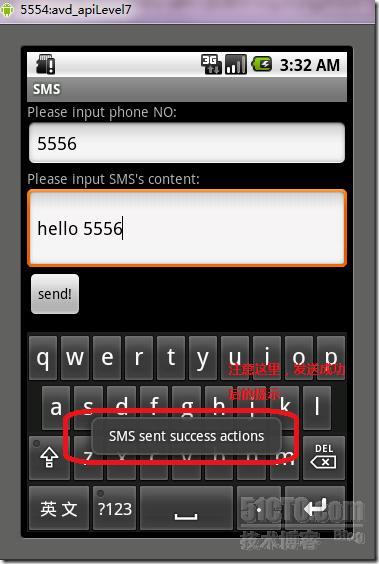
运行之后的,发送短信成功的话就可以看到如下界面:

图5、增强SMS(一)
5、SMS增强(二)
下面这个增强是使SMS能够发送二进制数据。要发送数据要使用SmsManager类的sendDataMessage方法,跟sendTextMessage方法类似,只不过该方法多了一个目标端口的参数,构建该SMS的过程跟前面的类似这里就不在累述。
本系列的其它文章:
- Android 开发之旅:环境搭建及HelloWorld
- Android 开发之旅:HelloWorld项目的目录结构
- Android 开发之旅:android架构
- Android 开发之旅:应用程序基础及组件
- Android 开发之旅:应用程序基础及组件(续)
- Android 开发之旅:活动与任务
- Android 开发之旅:进程与线程
- Android 开发之旅:组件生命周期(一)
- Android 开发之旅:组件生命周期(二)
- Android 开发之旅:组件生命周期(三)
- Android 开发之旅:又见Hello World!
- Android 开发之旅:深入分析布局文件&又是"Hello World!"
- Android 开发之旅:view的几种布局方式及实践
- Android 开发之旅:短信的收发及在android模拟器之间实践(一)
- 请期待Android 开发之旅:短信的收发及在android模拟器之间实践(二)…
