Panabit安装(二、Panabit安装)
安装好FreeBSD之后,进入系统再进行Panabit的安装
1、安装前的准备
(1)一台CPU P3 800Mhz,内存 256M 以上,2-3块网卡,最好是Intel网卡, 128M 以上电子盘或硬盘(Panabit V8.05起,由于增加了运行日志存储时间,多桥分别统计流量,增加了日志空间,单桥需要 50M 的空间,建议使用 256M 以上的电子盘),带光驱的新旧服务器;已经安装好FreeBSD 8.0,如果没有安装,请参考本站的FreeBSD 8.0安装相关文档。(Panabit 2008起系列版本,由于数据网卡独立,定制优化了驱动,所以数据采集网卡不能兼任管理网卡;在Panabit用于桥接模式时,必须要3块网卡,最好保证数据采集的一对网卡是相同规格的优质网卡,推荐使用Intel双网口网卡,如果Panabit用于监听模式,则使用两块网卡,一个做管理,一个采集数据。)

(2)网站论坛下载Panabit软件包,下载地址见:http://www.panabit.com/forum/forumdisplay.php?fid=13,Panabit安装包文件名格式Panabitxxxx.tar.gz,其中“xxxx”表示Panabit版本号,如“ 0808” 表示2008年08月份发布的版本,软件包名是Panabit0808.tar.gz。建议先下载到Windows桌面,用另存为、迅雷等常见下载工具均可。
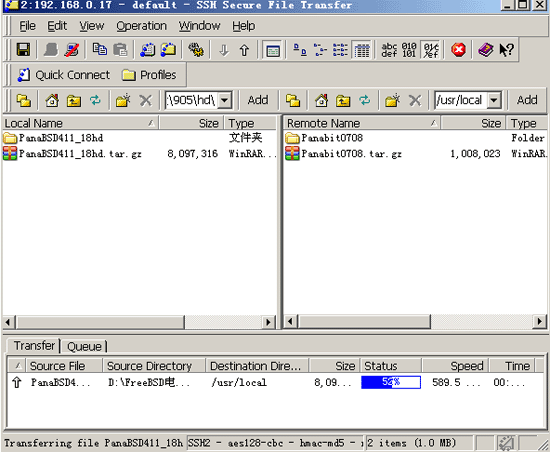
(3)推荐下载使用Panabit网站提供的带sftp的ssh客户端,远程登陆和上传文件比较方便快捷,支持鼠标的复制粘贴动作,这个软件出自www.ssh.com,本站提供的是早期下载版本,含注册码。软件名是:SSHSecureShellClient- 3.2.9 ,本站下载地址:
http://www.panabit.com/download/ssh_3_2_9.rar 。
下载到Windows桌面后,解压、双击SSHSecureShellClient-3.2.9安装,安装之后,在桌面生成两个快捷方式SSH Secure Shell Client、SSH Secure File Transfer Client。
2、打开FreeBSD root用户的SSH功能
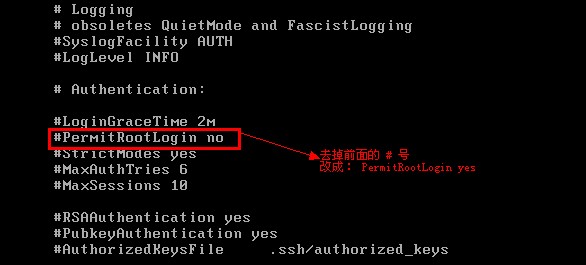
编辑 /etc/ssh/sshd_config

修改 sshd_config 文件,将 #PermitRootLogin no 改成 PermitRootLogin yes
保存退出后,重启sshd服务 /etc/rc.d/sshd restart

3、Panabit的安装(有安装脚本,比Windows下安装软件还容易!)
(1)上传Panabit安装包
可以选择熟悉的方式,将Panabit安装包上传到FreeBSD 8.0系统;如果使用Panabit推荐的客户端,点击sftp图标,输入root用户名和口令,图形化界面上传;
(2)安装Panabit
步骤如下:
Panabit#tar zxvf Panabitxxxx.tar.gz (xxxx需要换成对应版本数字编号)
Panabit#cd Panabitxxxx
Panabit# ./ipeinstall
根据脚本提示,可以按照缺省的安装目录,1-2分钟,即可安装完毕。下面是脚本运行过程:
Welcome installing panabit!
Please input the directory to install panabit [/usr/panabit]:(缺省直接回车,可以更换目录)
Please input the directory to store log [/usr/panalog]:(缺省直接回车,可以更换目录)
Please input the directory to store configuration [/usr/panaetc]:(缺省直接回车,可以更换目录)
The last time to verify your choice:
(1) The directory that you want to install is "/usr/panabit"
(2) The directory that the log to be stored is "/usr/panalog"
(3) The directory that the configuration to be stored is "/usr/panaetc"
Above are right(y/n[y])?(回车"y"表示确认)
Creating directory "/usr/panabit" ...ok
Creating directory "/usr/panalog" ...ok
Installing Panabit to "/usr/panabit" ...ok
Initializing configurations ...ok
Saving configuration to /etc/PG.conf ...
****** Congratulations ******!
You have successfully installed Panabit on your system:
(1) The installed path is: /usr/panabit
(2) The log path is: /usr/panalog
(3) The configuration path is: /usr/panaetc
To make your system more sutiable for panabit running, it's recomended of tuning your system according your system memory size and cpu frequence.
Do you want to tune your system(y/n[y])(回车"y"表示确认)(此处询问是否调节内核优化参数,系统自动检测)
Your kernel configuration has been tuned as the followings:
#console="comconsole"
autoboot_delay="2"
beastie_disable="YES"
kern.ipc.nmbclusters=10240
kern.maxdsiz=2000000000
(上面5行,后2行为安装脚本自动增加,前3行是系统原有的,这3行不是每个人的系统都有的)
Warning: your em driver has been compiled into kernel.
To optimize panabit performance, we recommend you use the optimized driver panaos provides.
To use the optimized driver, please remove em driver from your kernel.
(此处为一般性提示,仅作为参考,标准版用户忽略此项)
You should restart your system to make they take effects.
(需要重启系统,调整参数才会生效。注意安装完毕,reboot系统)
Following interfaces are installed in your system:
em0 em1 em2(这是系统识别的3块网卡列表,供下面选择指定使用)
Please choose one of above as your admin interface: em0(选择em0作为管理端口)
Please input ip address of admin interface: 192.168.0.8
Please input network mask of admin interface: 255.255.255.0
Please input default gateway: 192.168.0.1(这3行的网路参数根据实际情况给定)
The following interfaces are left for your data processing:
em1 em2
Please select data interfaces: em1 em2(指定两个网卡时,用空格隔开,一般选择性能好的网卡作为数据网卡)
Your interface configurations are:
Admin interface : em0
Admin ip address : 192.168.0.8
Admin netmask : 255.255.255.0
Default gateway : 192.168.0.1
Data interfaces : em1 em2
(再次显示管理口参数、数据网路接口)
Thank you for using panabit!
You can issue "/usr/panabit/bin/ipectrl start" to start panabit!
And you can also add the above command to /etc/rc.local file to let the system automaticly start panabit at system startup!
(启动Panabit进程命令:/usr/panabit/bin/ipectrl start,如果安装目录非缺省目录,则需要根据实际情况改变路径;为了能开机自动启动,可以将启动进程命令行加入: /etc/rc.local文件)
If you want to stop the currently running panabit, you can issue
"/usr/panabit/bin/ipectrl stop" to stop it!
(停止Panabit进程命令:/usr/panabit/bin/ipectrl stop)
4、设置开机自启动Panabit进程:
开机自动启动Panabit进程:/usr/panabit/bin/ipectrl start 一定要写在/etc/rc.local文件里,如果没有/etc/rc.local这个文件,则自己新建一个。内容如下:
#!/bin/sh
/usr/panabit/bin/ipectrl start
5、检查Panabit进程是否正常启动:
启动Panabit进程之后,可以使用ps ax查看进程是否启动,正常应该有ipe_monitor、ipe_datamon、ipe_xping、ipe_httpd进程。
6、使用浏览器,进入Web界面配置管理:
https://192.168.0.8,输入用户名:admin,缺省口令:panabit,则登陆管理界面。进入管理界面后,选择网络配置->数据接口,配置网桥,网桥配置完成后,测试网桥的连通性,如果网桥正常,则安装成功了。
至此,一台Panabit应用层流量管理系统安装完毕,即可上线运行,虽然还没有配置策略,但是已经可以分析流量了,一般是先空策略上线运行,待有流量分析数据之后,再进行策略设置和调整。
用系统命令临时更改IP地址,参考如下命令:
Panabit#ifconfig em0 192.168.0.100 netmask 255.255.255.0
修改管理口IP地址,请使用Panabit的Web管理界面修改,配置自动保存。
附加:关于更新和重新安装Panabit新版本
升级系统版本、升级特征库可以直接通过Web管理界面升级,如果选择安装新版本,参考如下方法:
(注:Panabit 7.09版本起,缺省的是三个目录,分别是/usr/panabit、/usr/panaetc、/usr/panalog,其中panaetc是保存配置文件,可以保留。)
卸载旧版本:
Panabit# /usr/panabit/bin/ipectrl stop (停止Panabit进程)
Panabit# cd /usr
Panabit# rm -rf panabit
Panabit# rm -rf panalog
Panabit# rm -rf Panabit070* (删除旧版本安装包解压后生成的目录)
Panabit# rm -rf Panabit070*.tar.gz (删除旧版本安装包)
安装新版本:
Panabit#cd /usr/local
Panabit#tar zxvf Panabitxxxx.tar.gz (xxxx需要换成对应版本数字编号)
Panabit#cd Panabitxxxx
Panabit#./ ipeinstall
方法同新安装,需要注意的是:系统会提示已有一个目录叫panabit,问是否覆盖它,缺省的选择是n,注意要输入y,选择覆盖,其余选项与初次安装Panabit的步骤一样;安装完成后需执行:
Panabit#/usr/panabit/bin/ipectrl start
启动Panabit进程。
安装完新版本后,如配置需要有所变化,则登陆Web管理界面重新配置。
后续是对Panabit的配置与管理,参考Panabit 管理配置手册。