linux-nis&autofs2
6.配置客户端
首先客户端要加入到nis域
6.1检查ypbind
[root@nis-client ~]# chkconfig --list|grep ypb
ypbind 0:off 1:off 2:off 3:off 4:off 5:off 6:off
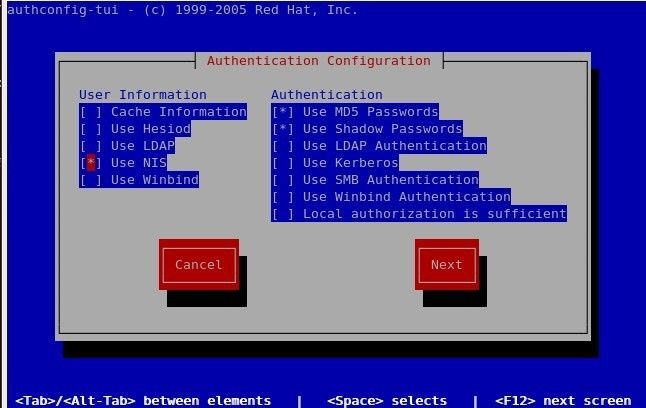
[root@nis-client ~]# authconfig-tui
6.2把客户端机器加入域环境
#authconfig-tui
1) 选择
[*]use nis
38-2
2)domain nisexample
server 192.168.100.70

38-3
Stopping portmap: [ OK ]
Starting portmap: [ OK ]
Binding to the NIS domain: [ OK ]
Listening for an NIS domain server.
7.服务器上创建用户导入到资料库,实现在客户端能够登陆
[root@nis-server yp]# useradd tom
[root@nis-server yp]# passwd tom
[root@nis-server yp]# tail /etc/passwd
tom:x:503:503::/home/tom:/bin/bash
[root@nis-server yp]# pwd
/var/yp
[root@nis-server yp]#
[root@nis-server yp]# make ---–重新导出资料库
gmake[1]: Entering directory `/var/yp/nisexample'
Updating passwd.byname...
Updating passwd.byuid...
Updating group.byname...
Updating group.bygid...
gmake[1]: Leaving directory `/var/yp/nisexample'
[root@nis-server yp]#
[root@nis-server yp]#
用户可以通过身份验证登陆,但是会找不到家目录,登陆出现:-bash-3.2$
8.更改用户在客户端登陆的家目录问题
8.1在服务器端
挂载server的/home目录到本地 ,用户在本地登陆就可以找到自己的家目录了
编辑共享清单
[root@nis-server yp]# vim /etc/exports
/home 192.168.100.0/255.255.255.0(rw,sync) –----在该网段可读可写、保持同步
~
启动nfs服务
[root@nis-server yp]# service nfs start
Starting NFS services: [ OK ]
Starting NFS quotas: [ OK ]
Starting NFS daemon: [ OK ]
Starting NFS mountd: [ OK ]
[root@nis-server yp]# exportfs rv
导出共享清单
[root@nis-server yp]# exportfs -rv
exporting 192.168.100.0/255.255.255.0:/home
[root@nis-server yp]#
8.2客户端配置
客户端挂载服务器的/home
[root@nis-client ~]#
[root@nis-client ~]# mount 192.168.100.70:/home /home
[root@nis-client ~]# mount
192.168.100.70:/home on /home type nfs (rw,addr=192.168.100.70)
[root@nis-client ~]# ll /home
total 24
drwx------ 3 jim jim 4096 Oct 5 14:04 jim
drwx------ 3 tom tom 4096 Oct 5 13:45 tom
drwx------ 3 user user 4096 Sep 16 00:16 user
drwx------ 3 user1 user1 4096 Oct 5 11:38 user1
drwx------ 3 user2 user2 4096 Oct 5 11:38 user2
[root@nis-client ~]#
用户在客户端登陆正常:
[tom@nis-client ~]$
9.自动挂载
解决服务器负担
9.1Nis-server
重新创建nis的家目录
[root@nis-server yp]# mkdir /nishome
[root@nis-server yp]# useradd -d /nishome/user9 user9
[root@nis-server yp]# useradd -d /nishome/user10 user10
[root@nis-server yp]# passwd user9
[root@nis-server yp]# passwd user10
[root@nis-server yp]# make
gmake[1]: Entering directory `/var/yp/nisexample'
Updating passwd.byname...
Updating passwd.byuid...
Updating group.byname...
Updating group.bygid...
gmake[1]: Leaving directory `/var/yp/nisexample'
[root@nis-server yp]#
[root@nis-server yp]# vim /etc/exports
/nishome 192.168.100.0/255.255.255.0(rw,sync)
[root@nis-server yp]# exportfs -rv
exporting 192.168.100.0/255.255.255.0:/nishome
[root@nis-server yp]#
[root@nis-server yp]# servcie nfs restart
9.2 Nis-Client
[root@nis-client etc]# ll -d /nishome
drwxr-xr-x 2 root root 0 Oct 5 14:44 /nishome
[root@nis-client etc]# chmod o+wt /nishome/
[root@nis-client etc]# ll -d /nishome
drwxr-xrwt 2 root root 0 Oct 5 14:44 /nishome
[root@nis-client ~]# vim /etc/auto.m
auto.master auto.misc
[root@nis-client ~]# vim /etc/auto.master
/nishome /etc/auto.nis --timeout=60
--添加监控文件,超出时间60秒
[root@nis-client ~]# cd /etc/
[root@nis-client etc]# cp auto.misc auto.nis
[root@nis-client etc]# vim auto.nis
user9 -rw,soft,intr 192.168.100.70:/nishome/user9
user10 -rw,soft,intr 192.168.100.70:/nishome/user10
有人进入user9时,可读可写 允许报错 允许中断;把服务器的user9挂到本地user9
用户实现客户端的登录
客户机不需配置账号
只需在服务器上配置账号就可以了
[root@nis-client etc]# showmount -e 192.168.100.70
Export list for 192.168.100.70:
/home 192.168.100.0/255.255.255.0
[root@nis-client etc]# service autofs restart
Stopping automount: [ OK ]
Starting automount: [ OK ]
[root@nis-client etc]#
[root@nis-client etc]# mount 192.168.100.70:/nishome /nishome
[root@nis-client etc]#
User9在客户端登陆:
[user9@nis-client ~]$
9.3.多用户自动挂载
Nis-server
[root@nis-server yp]# passwd user11
Changing password for user user11.
New UNIX password:
BAD PASSWORD: it is WAY too short
Retype new UNIX password:
passwd: all authentication tokens updated successfully.
[root@nis-server yp]#
[root@nis-server yp]#
[root@nis-server yp]# make
gmake[1]: Entering directory `/var/yp/nisexample'
Updating passwd.byname...
Updating passwd.byuid...
Updating group.byname...
Updating group.bygid...
gmake[1]: Leaving directory `/var/yp/nisexample'
[root@nis-server yp]#
Nis-client
[root@nis-client etc]# vim /etc/auto.nis
* -rw,soft,intr 192.168.100.70:/nishome/&
用户多了,可以用一句
*表示要进入客户端的用户
--*替换&
&表示将该*用户在服务器上的目录自动挂载过来、
[root@nis-client etc]# service autofs restart
Stopping automount: [ OK ]
Starting automount: [ OK ]
[root@nis-client etc]#
[root@nis-client etc]#
用户在client登陆
[user11@nis-client ~]$
