mybatis代码生成的2种方式
mybatis使用方便,但是各种配置文件、bean及dao的重复书写很是烦人。幸好mybatis已经有了自动生成工具:常用的方式有命令行、maven、eclipse插件。下面,将介绍eclipse及maven的方式生成mybatis代码。
一、eclipse中使用插件生成代码
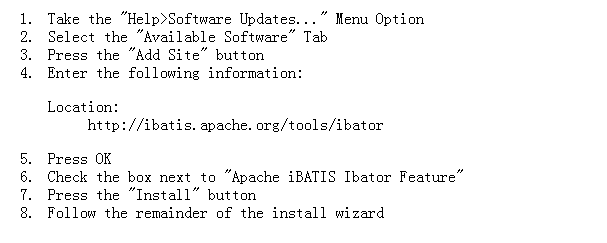
1.首先需要在eclipse中安装ibator插件
打开网址(http://ibatis.apache.org/tools/ibator/)
根据说明,在eclipse中安装ibator插件,然后重启eclipse。
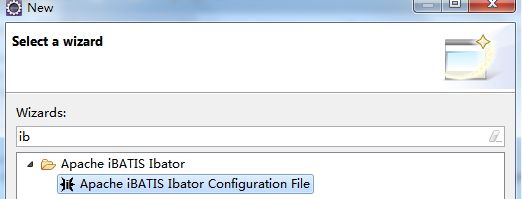
2.验证ibator插件是否安装成功
在eclipse中依次点击:File–New–other,在搜索框中输入ib,如果出现如下所示,则说明安装成功。
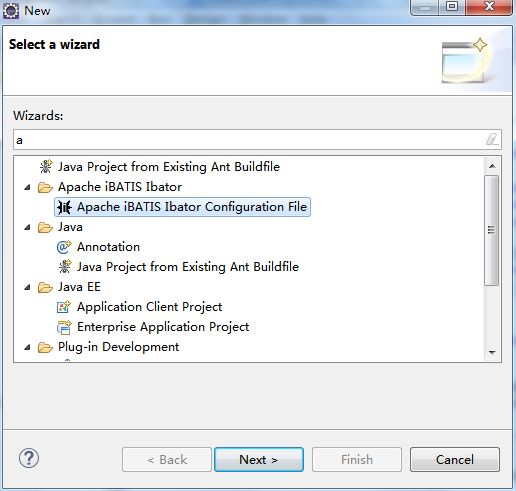
3.新建java项目,在src下右键New–Other
点击Next,在File Name中输入ibatorConfig.xml,点击完成,就会在src下生存所需的配置文件。
4.ibatorConfig.xml配置
<?xml version="1.0" encoding="UTF-8" ?>
<!DOCTYPE ibatorConfiguration PUBLIC "-//Apache Software Foundation//DTD Apache iBATIS Ibator Configuration 1.0//EN" "http://ibatis.apache.org/dtd/ibator-config_1_0.dtd" >
<ibatorConfiguration>
<classPathEntry location="E:\***\sources\mysql\mysql-connector-java-5.1.15-bin.jar" />
<ibatorContext id="context1">
<jdbcConnection driverClass="com.mysql.jdbc.Driver"
connectionURL="jdbc:mysql://localhost:3306/spring4mybatis"
userId="root" password="******" />

<!-- javaBean生成器 targetPackage:包名,targetProject:项目名 -->
<javaModelGenerator targetPackage="com.ibator.model"
targetProject="IbatorDemo" />

<!-- 映射文件生成器 -->
<sqlMapGenerator targetPackage="com.ibator.mapper"
targetProject="IbatorDemo" />

<!-- dao生成器,type 指定生成dao类的模板,可选择IBATIS、SPRING、GENERIC-CI、GENERIC-SI implementationPackage
dao实现类的包名 -->
<daoGenerator targetPackage="com.ibator.dao"
targetProject="IbatorDemo" implementationPackage="com.ibator.dao.impl"
type="IBATIS" />

<!-- 表名属性映射 tableName为表名,可使用SQL通配符%和_,domainObjectName为对应类名,如不写则默认和表名相同 -->
<table schema="" tableName="role">

<!-- columnOverride 指定属性名称,不指定则以默认规则处理:字母先全变小写,然后去掉下划线,下划线后首字母大写 <columnOverride
column="???" property="???" /> -->

<!-- 是否使用列名做属性名,默认值为false,处理规则:字母先全变小写,然后去掉下划线,下划线后首字母大写 <property name="useActualColumnNames"
value="true" /> -->

<!-- 指定生成主键的语句
<generatedKey column="id" sqlStatement="SELECT LAST_INSERT_ID()+1" />-->

<!-- 指定生成列名的 替换规则
<columnRenamingRule searchString="flag"
replaceString="FLAG" />-->

<!-- 指定生成的列名
<columnOverride column="id" property="uid" />-->

<!-- 忽略掉无需生成的列
<ignoreColumn column="???" />-->
</table>
</ibatorContext>
</ibatorConfiguration>
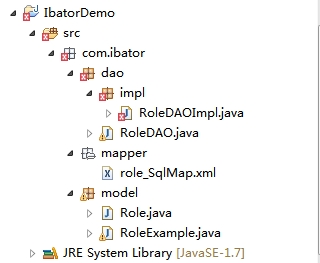
5.配置完成后,在该文件上右击,选择Generate IBATIS Artifacts,然后在IbatorDemo项目下就会看到生成的代码。
注:当使用的daoGenerator类型为SPRING时,生成的dao所继承的类为SqlMapClientDaoSupport,但是在spring 3.2之后该方法已经废弃,所以如果所用spring版本在3.2之后,应该使用org.mybatis.spring.support.SqlSessionDaoSupport。
二、maven生成mybatis代码
1.新建maven项目
2.修改pom.xml文件
<project xmlns="http://maven.apache.org/POM/4.0.0" xmlns:xsi="http://www.w3.org/2001/XMLSchema-instance"
xsi:schemaLocation="http://maven.apache.org/POM/4.0.0 http://maven.apache.org/maven-v4_0_0.xsd">
<modelVersion>4.0.0</modelVersion>
<groupId>IbatorDemo</groupId>
<artifactId>com.ibator</artifactId>
<packaging>war</packaging>
<version>0.0.1-SNAPSHOT</version>
<name>IbatorDemo Maven Webapp</name>
<url>http://maven.apache.org</url>
<dependencies>
<dependency>
<groupId>junit</groupId>
<artifactId>junit</artifactId>
<version>3.8.1</version>
<scope>test</scope>
</dependency>
</dependencies>

<build>
<finalName>IbatorDemo</finalName>
<plugins>
<plugin>
<groupId>org.mybatis.generator</groupId>
<artifactId>mybatis-generator-maven-plugin</artifactId>
<version>1.3.2</version>
<configuration>
<verbose>true</verbose>
<overwrite>true</overwrite>
</configuration>
</plugin>
<plugin>
<groupId>org.mybatis.generator</groupId>
<artifactId>mybatis-generator-maven-plugin</artifactId>
<version>1.3.2</version>
</plugin>
</plugins>
</build>
</project>
3.在src/main/resources下建立配置文件generatorConfig.xml
<?xml version="1.0" encoding="UTF-8"?>
<!DOCTYPE generatorConfiguration
PUBLIC "-//mybatis.org//DTD MyBatis Generator Configuration 1.0//EN"
"http://mybatis.org/dtd/mybatis-generator-config_1_0.dtd">

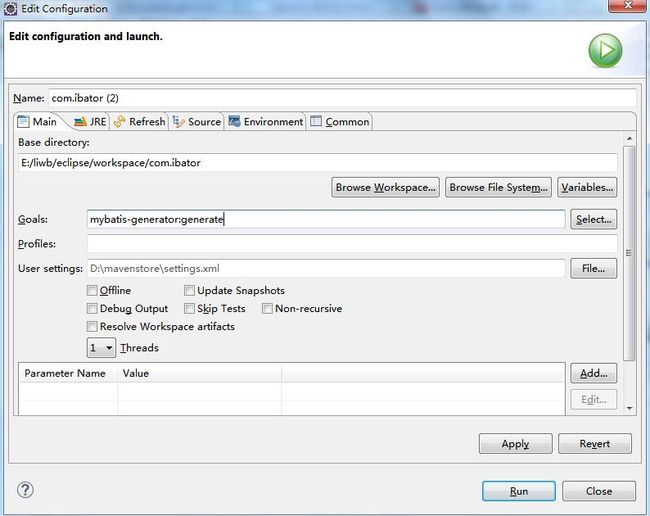
<!-- 配置Run As Maven build : Goals 参数 : mybatis-generator:generate -Dmybatis.generator.overwrite=true -->
<!-- 配置 tableName,使用 Run As Maven build 生成 dao model 层 -->
<generatorConfiguration>

<!--数据库驱动包路径 -->
<classPathEntry location="E:\****\sources\mysql\mysql-connector-java-5.1.15-bin.jar"/>

<context id="DB2Tables" targetRuntime="MyBatis3">
<!--关闭注释 -->
<commentGenerator>
<property name="suppressAllComments" value="true"/>
</commentGenerator>

<!--数据库连接信息 -->
<jdbcConnection driverClass="com.mysql.jdbc.Driver" connectionURL="jdbc:mysql://localhost:3306/spring4mybatis" userId="root"
password="******">
</jdbcConnection>

<!--生成的model 包路径 -->
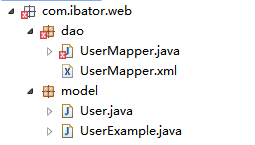
<javaModelGenerator targetPackage="com.ibator.web.model" targetProject="src/main/java">
<property name="enableSubPackages" value="ture"/>
<property name="trimStrings" value="true"/>
</javaModelGenerator>

<!--生成xml mapper文件 路径 -->
<sqlMapGenerator targetPackage="com.ibator.web.dao" targetProject="src/main/java">
<property name="enableSubPackages" value="ture"/>
</sqlMapGenerator>

<!-- 生成的Dao接口 的包路径 -->
<javaClientGenerator type="XMLMAPPER" targetPackage="com.ibator.web.dao" targetProject="src/main/java">
<property name="enableSubPackages" value="ture"/>
</javaClientGenerator>

<!--对应数据库表名 -->
<table tableName="user">

</table>
</context>
</generatorConfiguration>
4.项目上右键–run as–maven build
点击run,完成。
http://www.1024china.com/?p=94
