1.5 运行、测试、部署mule应用
我们刚刚开发完成第一Mule应用,并设置了一个与它交互的消息代理。
现在看如何运行、测试和部署应用程序。
1.5.1 运行应用
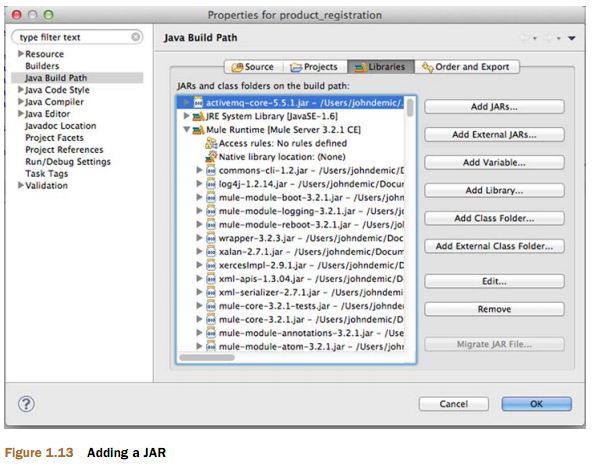
运行应用前,需要把ActiveMQ的JAR包添加项目中。这和普通Eclipse项目添加JAR包过程一样。
在工程视图面板左边右键单击 Mule Runtime--选择 Build Path--选择Configure。
你将会看到如图1.13的画面,
现在已准备好运行应用程序了。但还是先修改一下flow,配置记录日志并输出到控制台。
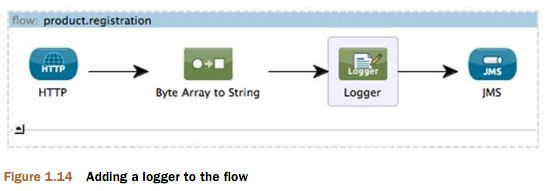
选择一个logger ,拖曳到flow的byte-array-to-string转化器之后,JMS outbound endpoint之前。
通过使用Mule表达式设置消息属性 ,以打印出消息payload中的字符串。
mule表达式语言--MEL,是一个轻量级的脚本语言,它在运行时才进行计算。
本例中发送给mule的是JSON格式数据。见图1.14。
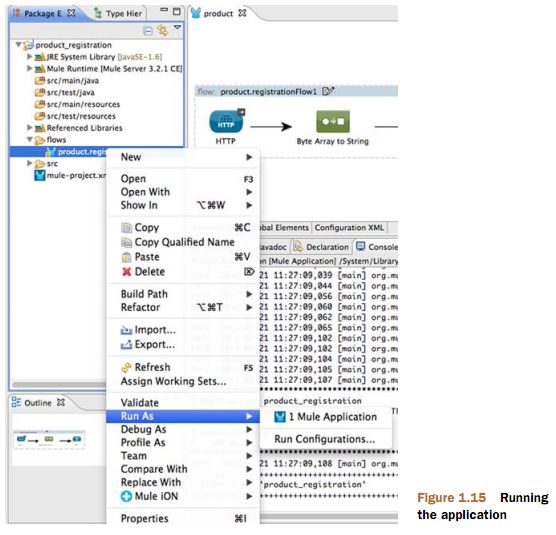
右键单击项目资源管理器页面上的项目并选择Run As--Mule Application,
如图1.15,将在内嵌的Mule的实例中启动应用程序。
你到类似图1.16在控制台,说明 应用程序正在运行。
日志显示你的 byte-array-to-string 转换器已成功的把输入流转换为了字符串。
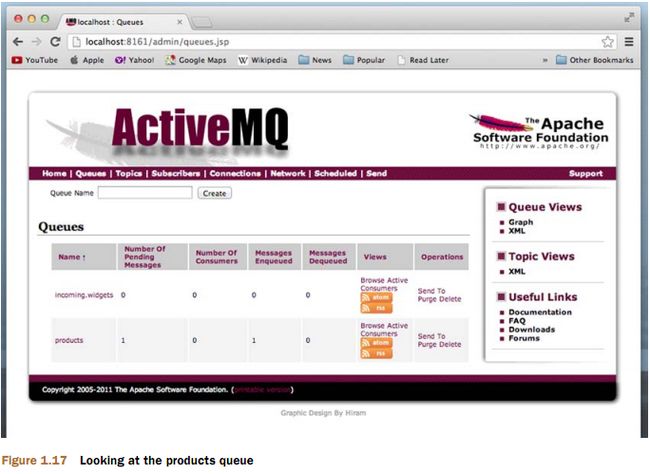
打开ActiveMQ 控制台,看消息队列里是否收到消息。
在浏览器输入地址http://localhost:8161/admin/queues.jsp ,看到如图 1.17所示界面
1.5.2 测试流
现在可以手工的验证流的运行情况了,再来写个测试方法验证流的运行情况。
创建类ProductServiceFunctionalTestCase,内容如下:
  public class ProductRegistrationFunctionalTestCase extends FunctionalTestCase {
     protected String getConfigResources() {
        return "./src/main/app/product_registration.xml";
     }
    @Test
    public void testCanRegisterProducts() throws Exception {
        MuleClient client = muleContext.getClient();
        //(1) JSON格式的产品数据
        String productAsJson = "{\"name\":\"Widget\", \"price\": 9.99,
                \"weight\": 1.0, \"sku\":\"abcd-12345\"}";

        // (2)把JSON字符串发送到 http://localhost:8080/products
        client.dispatch("http://localhost:8080/products",productAsJson, null);
        // (3)在JMS products消息队列取消息
        MuleMessage result = client.request("jms://products",RECEIVE_TIMEOUT);
         //(4)断言返回结果非空
        assertNotNull(result);
        assertNull(result.getExceptionPayload());
        assertFalse(result.getPayload() instanceof NullPayload);
        // (5)断言JMS消息payload数据和发送的数据相同
        assertEquals(productAsJson, result.getPayloadAsString());
       }
}
我们将在第12章详细讨论测试,先来预习一下。
FunctionalTestCase类是mule 提供的一个基础类,它抽象了启动和关闭mule实例的一些细节。
上面的测试案例就继承了FunctionalTestCase。
getConfigResources()方法,用来指明启动melu 时使用的配置文件。
Mule的测试框架使用JUnit 4,你可以在方法testCanRegisterProducts上使用@TEST注解。
可使用MuleClient(第12章进行描述的讲解)以编程的方式与用mule进行交互。
代码(1)处,创建一个简单的JSON作为测试数据。
代码(2)处,把JSON数据POST到一个HTTP endpoint.
代码(3)处,发送到消息到JMS的队列.
代码(4)处,当收到返回值或超时后开始执行
代码(5)处,先做一系列的断定来确保response不是null且处理过程没抛出异常,
然后判断JMS收到的消息内容是否和发出的请求数据一致。
右键单击测试类--选择Run As--JUnit Test。
这将启动Mule,并运行你的测试类。
如果一切顺利,你应该可以看到一个绿条--表示测试通过(见图1.18)。
1.5.3 xml配置文件
使用Mule Studio的图形化编辑器可以开发非常复杂的集成应用 。
你即使不修改的话也应当看一眼 Mule Studio生成的xml配置文件。
这不仅有利于你理解mule运行原理,而且使你更好的使用mule框架。
本书中示例将主要集中在流的XML配置文件。也会显示 Mule Studio中有意义的流的截图。
注意mule的社区版没有依赖与Mule Studio的功能。
你用不用IDE和运行mule 应用是没有关系的。
双击xml配置文件,其内容如下:
<mule xmlns:doc="http://www.mulesoft.org/schema/mule/documentation"
	xmlns:spring="http://www.springframework.org/schema/beans"
	xmlns="http://www.mulesoft.org/schema/mule/core"
	xmlns:xsi="http://www.w3.org/2001/XMLSchema-instance"
	xmlns:http="http://www.mulesoft.org/schema/mule/http"
	xmlns:jms="http://www.mulesoft.org/schema/mule/jms"
	xsi:schemaLocation="
	http://www.mulesoft.org/schema/mule/jms
	http://www.mulesoft.org/schema/mule/jms/current/mule-jms.xsd
	http://www.mulesoft.org/schema/mule/http
	http://www.mulesoft.org/schema/mule/http/current/mule-http.xsd
	http://www.mulesoft.org/schema/mule/http
	http://www.mulesoft.org/schema/mule/http/current/mule-http.xsd
	http://www.mulesoft.org/schema/mule/jms
	http://www.mulesoft.org/schema/mule/jms/current/mule-jms.xsd
	http://www.springframework.org/schema/beans
	http://www.springframework.org/schema/beans/spring-beans-current.xsd
	http://www.mulesoft.org/schema/mule/core
	http://www.mulesoft.org/schema/mule/core/current/mule.xsd "
	version="CE-3.4.0">

    <!-- 上面是命名空间定义 -->
	<description>
		Mule Application to REST-fully Accept Product Data
	</description>

	<!-- 使用Active MQ作为 JMS连接器的配置 -->
	<jms:activemq-connector name="jmsConnector" doc:name="Active MQ" />
        <!-- 流的名字 -->
	<flow name="product.registration" doc:name="product.registration">

		<!-- 配置HTTP inbound  endpoint  --HTTP 接入端口 ,-->
		<http:inbound-endpoint host="localhost"
				       port="8080"
			               path="products" doc:name="HTTP" />

		<!-- 配置字节流到字符串的转换器 -->
		<byte-array-to-string-transformer doc:name="Byte Array to String" />

		<!-- 配置 JMS的接出端口 -->
		<jms:outbound-endpoint queue="products"
			connector-ref="jmsConnector" doc:name="JMS" />

	</flow>
</mule>
首先注意命名空间声明。--可以理解为java类中的import。
流和消息处理器的配置会使用到这些命名空间的元素。
配置文件中的流和消息处理器是与你从图形界面的配置是一一对应的。
mule2 的用户可能会高兴的发现mule studio 可以自动引入命名空间,
再也不用每次手工导入了。
1.5.4 部署到单独的mule服务器
部署前先要运行一个独立的mule服务器。
你可以到www.mulesoft.org/download-mule-esb-community-edition去下载。
之后解压缩文件,到bin目录下,然后运行 mule的可执行文件来启动Mule服务器实例。
现在,将使用Mule的Studio构建部署文件。
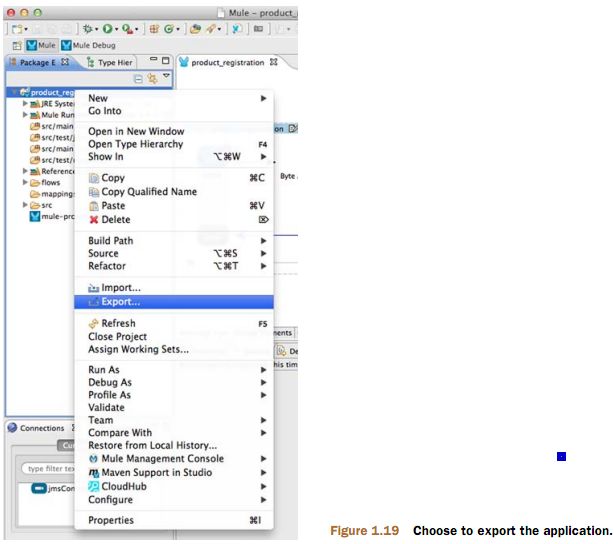
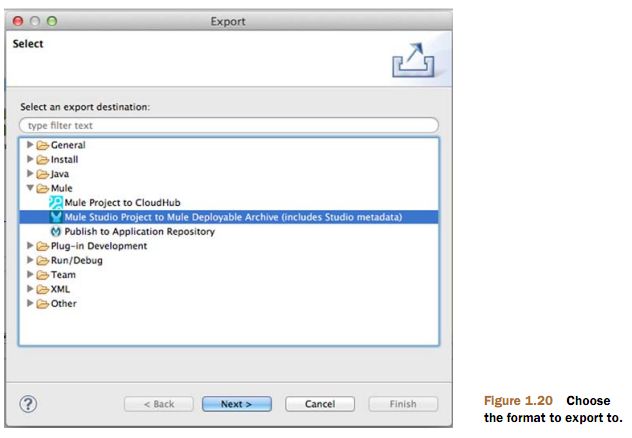
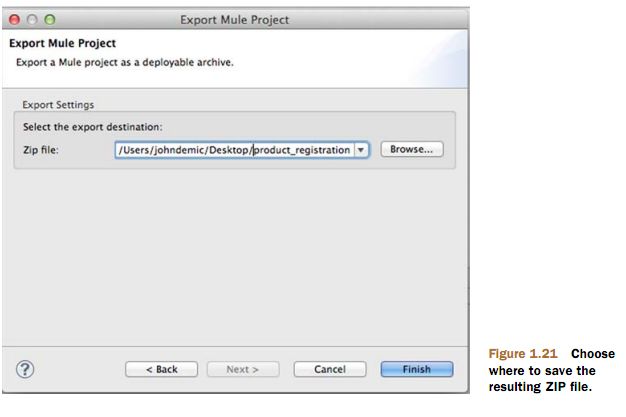
首先,你需要把应用程序导出为一个Mule的部署文件。
右键-选择导出-选择Mule Studio Project,然后设置ZIP文件存放路径,
见图1.19,1.20,和1.21。
把导出的ZIP文件放到 Mule 服务器的apps目录下,稍后mule控制台显示如下信息:
INFO 2011-12-19 10:01:07,741 [Mule.app.deployer.monitor.1.thread.1]
org.mule.module.launcher.DeploymentService:
++++++++++++++++++++++++++++++++++++++++++++++++++++++++++++
+ Started app 'productservice-1.0-SNAPSHOT' +
++++++++++++++++++++++++++++++++++++++++++++++++++++++++++++
ok ,只是20几行的xml和少量的java代码,就开发完成了你的集成应用。
是不是很简单?体会到mule的简单强大了吧!
如果没有mule下面这些事都需要你自己做:
1、启动一个web server接受HTTP请求
2、配置JMS工厂、session 等等
3、对应用进行功能测试
4、确定怎么打包盒部署
写很多代码却完成不了你的目标,这会浪费大量时间。
本书中你会看到大量的 使用mule来简单快速地完成集成任务的例子。
1.6 总结
至此简单介绍了企业集成,了解应用集成的理念和Mule3的功能,
并且编写,测试和部署了Mule应用。
接下来,我们将讨论Mule的消息处理。
