一、memcached的安装
1.准备文件:下载libevent与memcached的安装文件
libevent下载地址:http://rpmfind.net/linux/rpm2html/search.php
memcached下载地址:http://memcached.org/files/memcached-1.4.24.tar.gz
2.安装libevent:
tar zxvf libevent-2.0.21-stable.tar.gz
cd libevent-2.0.21-stable
./configure --prefix=/usr/local/libevent
make
make install
3.安装memcached
tar zxvf memcached-1.4.2.tar.gz
cd memcached-memcached-1.4.2
./configure --prefix=/usr/local/memcached --with-libevent=
/usr/local/libevent/
make
make install
4.启动memcached
./usr/local/memcached/bin/memcached -d -m 256 -u root -p 11211 -c 1024 –P /callplat/memcached/memcached.pid
启动参数说明:
-d 选项是启动一个守护进程。
-u root 表示启动memcached的用户为root。
-m 是分配给Memcache使用的内存数量,单位是MB,默认64MB。
-M return error on memory exhausted (rather than removing items)。
-u 是运行Memcache的用户,如果当前为root 的话,需要使用此参数指定用户。
-p 是设置Memcache的TCP监听的端口,最好是1024以上的端口。
-c 选项是最大运行的并发连接数,默认是1024。
-P 是设置保存Memcache的pid文件。
也可以启动多个守护进程,但是端口不能重复
查看memcached启动命令(存在上面执行命令的进程,表示启动成功)
ps -ef|grep memcached
5.停止memcached
kill -9 'cat /callplat/memcached/memcached.pid'
二、通过nginx集群tomcat
通过实际步骤的操作,我在虚拟机10上安装centos6.3,启动虚拟机,启动centos系统,用private shell软件和root用户登录系统,在根目录上新建callplat目录,然后在里面分别新建jdk,tomcat,nginx,memcached目录,按照笔记一和笔记二前面部分已经完成jdk、tomcat、nginx、memcached的安装,现在在新建web目录用来存放项目,目录如右图所示:
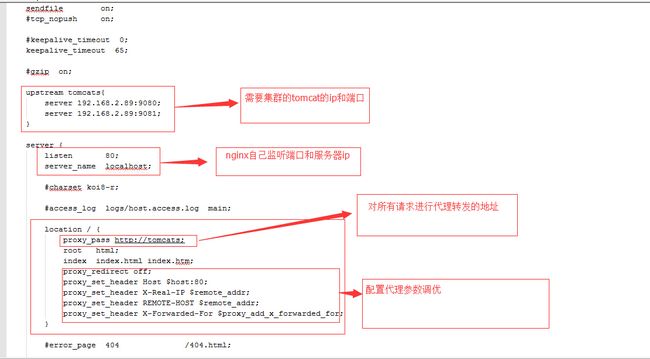
在nginx进行集群的步骤
vi /usr/local/nginx/conf/nginx.conf
按insert键,进行修改,修改完成按esc,输入:wq保存退出
修改内容主要这两部分如下截图
cd /callplat/memcached/memcached-1.4.15
./memcached -d -m 256m -u root -p 9999 -c 1024 -P /callplat/memcached/memcached.pid
检查是否启动成功,ps -ef|grep memcached 如果有进程存在表示成功
(2)启动tomcat(前面已经在tomcat server.xml配置好虚拟目录/callplat/web)
cd /callplat/tomcat/tomcat-6.0.43-9080/bin
./startup.sh
cd /callplat/tomcat/tomcat-6.0.43-9081/bin
./startup.sh
检查tomcat是否启动,ps -ef|grep tomcat,进程存在表示启动成功
(3)启动nginx
cd /usr/local/nginx/sbin
./nginx
检查nginx是否启动,ps -ef|grep nginx,进程存在表示启动成功
(4)验证项目是否启动成功,输入http://localhost/f5.html,如果正常显示页面内容,表示集群成功

