【WEB API项目实战干货系列】- API登录与身份验证(三)
上一篇: 【WEB API项目实战干货系列】- 接口文档与在线测试(二)
这篇我们主要来介绍我们如何在API项目中完成API的登录及身份认证. 所以这篇会分为两部分, 登录API, API身份验证.
这一篇的主要原理是: API会提供一个单独的登录API, 通过用户名,密码来产生一个SessionKey, SessionKey具有过期时间的特点, 系统会记录这个SessionKey, 在后续的每次的API返回的时候,客户端需带上这个Sessionkey, API端会验证这个SessionKey.
登录API
我们先来看一下登录API的方法签名
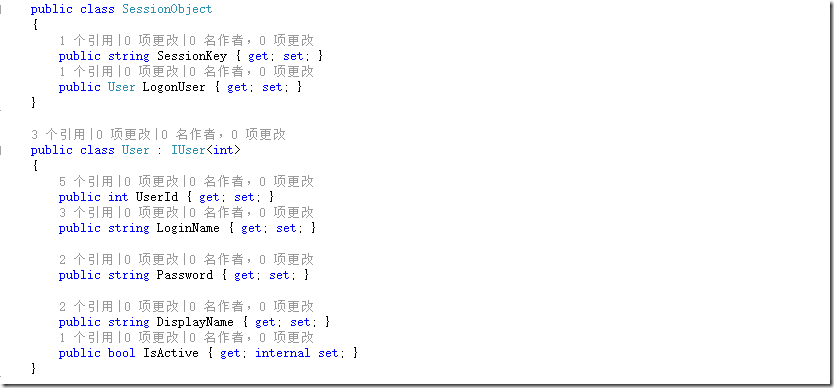
SessionObject是登录之后,给客户端传回的对象, 里面包含了SessionKey及当前登录的用户的信息
这里每次的API调用,都需要传SessionKey过去, SessionKey代表了用户的身份信息,及登录过期信息。
登录阶段生成的SessionKey我们需要做保存,存储到一个叫做UserDevice的对象里面, 从语意上可以知道用户通过不同的设备登录会产生不同的UserDevice对象.
最终的登录代码如下:
[RoutePrefix("api/accounts")]
    public class AccountController : ApiController
    {
        private readonly IAuthenticationService _authenticationService = null;

        public AccountController()
        {
            //this._authenticationService = IocManager.Intance.Reslove<IAuthenticationService>();
        }

        [HttpGet]
        public void AccountsAPI()
        {

        }

        /// <summary>
        /// 登录API
        /// </summary>
        /// <param name="loginIdorEmail">登录帐号(邮箱或者其他LoginID)</param>
        /// <param name="hashedPassword">加密后的密码,这里避免明文,客户端加密后传到API端</param>
        /// <param name="deviceType">客户端的设备类型</param>
        /// <param name="clientId">客户端识别号, 一般在APP上会有一个客户端识别号</param>
        /// <remarks>其他的登录位置啥的,是要客户端能传的东西,都可以在这里扩展进来</remarks>
        /// <returns></returns>
        [Route("account/login")]
        public SessionObject Login(string loginIdorEmail, string hashedPassword, int deviceType = 0, string clientId = "")
        {
            if (string.IsNullOrEmpty(loginIdorEmail))
                throw new ApiException("username can't be empty.", "RequireParameter_username");
            if (string.IsNullOrEmpty(hashedPassword))
                throw new ApiException("hashedPassword can't be empty.", "RequireParameter_hashedPassword");

            int timeout = 60;

            var nowUser = _authenticationService.GetUserByLoginId(loginIdorEmail);
            if (nowUser == null)
                throw new ApiException("Account Not Exists", "Account_NotExits");

            #region Verify Password
            if (!string.Equals(nowUser.Password, hashedPassword))
            {
                throw new ApiException("Wrong Password", "Account_WrongPassword");
            }
            #endregion

            if (!nowUser.IsActive)
                throw new ApiException("The user is inactive.", "InactiveUser");

            UserDevice existsDevice = _authenticationService.GetUserDevice(nowUser.UserId, deviceType);// Session.QueryOver<UserDevice>().Where(x => x.AccountId == nowAccount.Id && x.DeviceType == deviceType).SingleOrDefault();
            if (existsDevice == null)
            {
                string passkey = MD5CryptoProvider.GetMD5Hash(nowUser.UserId + nowUser.LoginName + DateTime.UtcNow.ToString() + Guid.NewGuid().ToString());
                existsDevice = new UserDevice()
                {
                    UserId = nowUser.UserId,
                    CreateTime = DateTime.UtcNow,
                    ActiveTime = DateTime.UtcNow,
                    ExpiredTime = DateTime.UtcNow.AddMinutes(timeout),
                    DeviceType = deviceType,
                    SessionKey = passkey
                };

                _authenticationService.AddUserDevice(existsDevice);
            }
            else
            {
                existsDevice.ActiveTime = DateTime.UtcNow;
                existsDevice.ExpiredTime = DateTime.UtcNow.AddMinutes(timeout);
                _authenticationService.UpdateUserDevice(existsDevice);
            }
            nowUser.Password = "";
            return new SessionObject() { SessionKey = existsDevice.SessionKey, LogonUser = nowUser };
        }
    }
API身份验证
身份信息的认证是通过Web API 的 ActionFilter来实现的, 每各需要身份验证的API请求都会要求客户端传一个SessionKey在URL里面丢过来。
在这里我们通过一个自定义的SessionValidateAttribute来做客户端的身份验证, 其继承自 System.Web.Http.Filters.ActionFilterAttribute, 把这个Attribute加在每个需要做身份验证的ApiControler上面,这样该 Controller下面的所有Action都将拥有身份验证的功能, 这里会存在如果有少量的API不需要身份验证,那该如何处理,这个会做一些排除,为了保持文章的思路清晰,这会在后续的章节再说明.
public class SessionValidateAttribute : System.Web.Http.Filters.ActionFilterAttribute
    {
        public const string SessionKeyName = "SessionKey";
        public const string LogonUserName = "LogonUser";

        public override void OnActionExecuting(HttpActionContext filterContext)
        {
            var qs = HttpUtility.ParseQueryString(filterContext.Request.RequestUri.Query);
            string sessionKey = qs[SessionKeyName];

            if (string.IsNullOrEmpty(sessionKey))
            {
                throw new ApiException("Invalid Session.", "InvalidSession");
            }

            IAuthenticationService authenticationService = IocManager.Intance.Reslove<IAuthenticationService>();

            //validate user session
            var userSession = authenticationService.GetUserDevice(sessionKey);

            if (userSession == null)
            {
                throw new ApiException("sessionKey not found", "RequireParameter_sessionKey");
            }
            else
            {
                //todo: 加Session是否过期的判断
                if (userSession.ExpiredTime < DateTime.UtcNow)
                    throw new ApiException("session expired", "SessionTimeOut");

                var logonUser = authenticationService.GetUser(userSession.UserId);
                if (logonUser == null)
                {
                    throw new ApiException("User not found", "Invalid_User");
                }
                else
                {
                    filterContext.ControllerContext.RouteData.Values[LogonUserName] = logonUser;
                    SetPrincipal(new UserPrincipal<int>(logonUser));
                }

                userSession.ActiveTime = DateTime.UtcNow;
                userSession.ExpiredTime = DateTime.UtcNow.AddMinutes(60);
                authenticationService.UpdateUserDevice(userSession);
            }
        }

        private void SetPrincipal(IPrincipal principal)
        {
            Thread.CurrentPrincipal = principal;
            if (HttpContext.Current != null)
            {
                HttpContext.Current.User = principal;
            }
        }
    }
OnActionExcuting方法:
这个是在进入某个Action之前做检查, 这个时候我们刚好可以同RequestQueryString中拿出SessionKey到UserDevice表中去做查询,来验证Sessionkey的真伪, 以达到身份验证的目的。
用户的过期时间:
在每个API访问的时候,会自动更新Session(也就是UserDevice)的过期时间, 以保证SessionKey不会过期,如果长时间未更新,则下次访问会过期,需要重新登录做处理。
Request.IsAuthented:
上面代码的最后一段SetPrincipal就是来设置我们线程上下文及HttpContext上下文中的用户身份信息, 在这里我们实现了我们自己的用户身份类型
public class UserIdentity<TKey> : IIdentity
    {
        public UserIdentity(IUser<TKey> user)
        {
            if (user != null)
            {
                IsAuthenticated = true;
                UserId = user.UserId;
                Name = user.LoginName.ToString();
                DisplayName = user.DisplayName;
            }
        }

        public string AuthenticationType
        {
            get { return "CustomAuthentication"; }
        }

        public TKey UserId { get; private set; }

        public bool IsAuthenticated { get; private set; }

        public string Name { get; private set; }

        public string DisplayName { get; private set; }
    }

    public class UserPrincipal<TKey> : IPrincipal
    {
        public UserPrincipal(UserIdentity<TKey> identity)
        {
            Identity = identity;
        }

        public UserPrincipal(IUser<TKey> user)
            : this(new UserIdentity<TKey>(user))
        {

        }

        /// <summary>
        ///
        /// </summary>
        public UserIdentity<TKey> Identity { get; private set; }

        IIdentity IPrincipal.Identity
        {
            get { return Identity; }
        }


        bool IPrincipal.IsInRole(string role)
        {
            throw new NotImplementedException();
        }
    }

    public interface IUser<T>
    {
        T UserId { get; set; }
        string LoginName { get; set; }
        string DisplayName { get; set; }
    }
这样可以保证我们在系统的任何地方,通过HttpContext.User 或者 System.Threading.Thread.CurrentPrincipal可以拿到当前线程上下文的用户信息, 方便各处使用
加入身份认证之后的Product相关API如下:
[RoutePrefix("api/products"), SessionValidate]
    public class ProductController : ApiController
    {
        [HttpGet]
        public void ProductsAPI()
        { }

        /// <summary>
        /// 产品分页数据获取
        /// </summary>
        /// <returns></returns>
        [HttpGet, Route("product/getList")]
        public Page<Product> GetProductList(string sessionKey)
        {
            return new Page<Product>();
        }

        /// <summary>
        /// 获取单个产品
        /// </summary>
        /// <param name="productId"></param>
        /// <returns></returns>
        [HttpGet, Route("product/get")]
        public Product GetProduct(string sessionKey, Guid productId)
        {
            return new Product() { ProductId = productId };
        }

        /// <summary>
        /// 添加产品
        /// </summary>
        /// <param name="product"></param>
        /// <returns></returns>
        [HttpPost, Route("product/add")]
        public Guid AddProduct(string sessionKey, Product product)
        {
            return Guid.NewGuid();
        }

        /// <summary>
        /// 更新产品
        /// </summary>
        /// <param name="productId"></param>
        /// <param name="product"></param>
        [HttpPost, Route("product/update")]
        public void UpdateProduct(string sessionKey, Guid productId, Product product)
        {

        }

        /// <summary>
        /// 删除产品
        /// </summary>
        /// <param name="productId"></param>
        [HttpDelete, Route("product/delete")]
        public void DeleteProduct(string sessionKey, Guid productId)
        {

        }
可以看到我们的ProductController上面加了SessionValidateAttribute, 每个Action参数的第一个位置,加了一个string sessionKey的占位, 这个主要是为了让Swagger.Net能在UI上生成测试窗口
这篇并没有使用OAuth等授权机制,只是简单的实现了登录授权,这种方式适合小项目使用.
这里也只是实现了系统的登录,API访问安全,并不能保证 API系统的绝对安全,我们可以透过 路由的上的HTTP消息拦截, 拦截到我们的API请求,截获密码等登录信息, 因此我们还需要给我们的API增加SSL证书,实现 HTTPS加密传输。
另外在前几天的有看到结合客户端IP地址等后混合生成 Sessionkey来做安全的,但是也具有一定的局限性, 那种方案合适,还是要根据自己的实际项目情况来确定.
由于时间原因, 本篇只是从原理方面介绍了API用户登录与访问身份认证,因为这部分真实的测试设计到数据库交互, Ioc等基础设施的支撑,所以这篇的代码只能出现在SwaggerUI中,但是无法实际测试接口。在接下来的代码中我会完善这部分.
代码: 代码下载(代码托管在CSDN Code)


