跟我一起学WCF(2)——利用.NET Remoting技术开发分布式应用
一、引言
上一篇博文分享了消息队列(MSMQ)技术来实现分布式应用,在这篇博文继续分享下.NET平台下另一种分布式技术——.NET Remoting。
二、.NET Remoting 介绍
2.1 .NET Remoting简介
.NET REmoting与MSMQ不同,它不支持离线可得,另外只适合.NET平台的程序进行通信。它提供了一种允许对象通过应用程序域与另一个对象进行交互的框架。.NET 应用程序都在一个主应用程序域中执行的,在一个应用程序域中的代码不能访问另一个应用程序域的数据,然而在某些情况下,我们需要跨应用程序域,与另外的应用程序域进行通信,这时候就可以采用.NET Remoting技术来实现与另一个程序域中的对象进行交互。
2.2 .NET Remoting基本原理
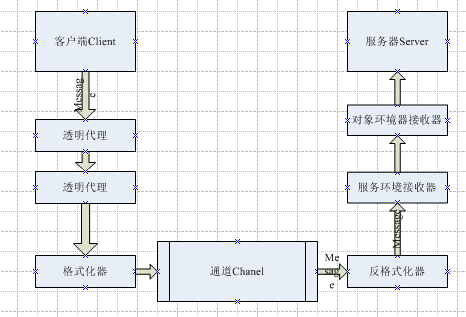
.NET Remoting技术是通过通道来实现两个应用程序之间对象的通信的。首先,客户端通过Remoting技术,访问通道来获得服务器端对象,再通过代理解析为客户端对象,也称作透明代理,此时获得客户端对象只是服务器对象的一个引用。这既保证了客户端和服务端有关对象的松散耦合,同时优化了通信的性能。在这个过程中,当客户端通过透明代理来调用远程对象的方法时,此时会将调用封装到一个消息对象中,该消息对象包括远程对象信息,被调用的方法名和参数,然后透明代理会将调用委托给真实代理(RealProxy对象)的Invoke方法来生成一个IMethodCallMessage,接着通过序列化把这个消息对象序列化成数据流发送到通道,通道会把数据流传送到服务器端。当服务器接收到经过格式化的数据之后,首先从中通过反序列化来还原消息对象,之后在服务器端来激活远程对象,并调用对应的方法,而方法的返回结果过程则是按照之前的方法反向重复一遍,具体的实现原理图如下所示:
2.3 .NET Remoting几个重要概念
上面简单介绍了下.NET Remoting实现分布式应用程序的基本原理,这里介绍下在.NET Remoting中涉及的几个重要概念。
- 远程对象:是运行在服务器端的对象,客户端不能直接调用,由于.NET Remoting传递的对象是以引用的方式,因此所传递的远程对象必须继承MarshalByRefObject类,这个类可以使远程对象在.NET Remoting应用通信中使用,支持对象的跨域边界访问。
- 远程对象的激活方式:在访问服务器端的一个对象实例之前,必须通过一个名为Activation的进程创建它并进行初始化。这种客户端通过通道来创建远程对象的方式称为对象的激活。在.NET Remoting中,远程对象的激活分为两大类:服务器端激活和客户端激活。
- 服务器端激活,又叫做WellKnow(知名对象)激活模式,为什么称为知名对象激活模式呢?是因为服务应用程序在激活对象实例之前会在一个众所周知的统一资源标示符(URI)上发布这个类型,然后该服务器进行会为此类型配置一个WellKnow对象,并根据指定的端口或地址来发布对象。.NET Remoting把服务器端激活又分为SingleTon模式和SingleCall模式两种。
SingleTon模式:此为有状态模式。如果设置为SingleTon激活模式,则.NET Remoting将为所有客户端建立同一个对象实例。当对象处于活动状态时,SingleTon实例会处理所有后来的客户端访问请求,而不管它们是同一个客户端,还是其他客户端。SingleTon实例将在方法调用中一直维护其状态,类似static成员的概念
SingleCall模式:是一种无状态模式。一旦设置为SingleCall模式,则当客户端调用远程对象的方法时,Remoting会为每一个客户端建立一个远程对象实例,对象实例的销毁则是由GC自动管理。类似实例成员的概念。
- 客户端激活:与Wellknow模式不同,。NET Remoting在激活每个对象实例的时候,会给每个客户端激活的类型指派一个URI。客户端激活模式一旦获得客户端的请求,将为每一个客户端都建立一个实例引用。SingleCall模式与客户端激活模式的区别有:首先,对象实例创建的时间不同。客户端激活方式是客户一旦发出调用请求就实例化,而SingleCall则要等到调用对象方法时再创建。其次,SingleCall模式激活的对象是无状态的,对象声明周期由GC管理,而客户端激活的对象是有状态的,其生命周期可自定义。第三,两种激活模式在服务器端和客户端实现的方法不一样,尤其是在客户端,SingleCall模式由GetObject()来激活,它调用对象默认的构造函数,而客户端激活模式,则通过CreateInstance()来激活,它可以传递参数,所以可以调用自定义的构造函数来创建实例。
3. 通道:在.NET Remoting中时通过通道来实现两个应用程序域之间对象的通信。.NET Remoting中包括4中通道类型:
- TcpChannel:Tcp通道使用Tcp协议来跨越.Net Remoting边界来传输序列化的消息流,TcpChannel默认使用二进制格式序列化消息对象,因此具有更高的传输性能,但不提供任何内置的安全功能。
- HttpChannel:Http通道使用Http协议在客户端和服务器之间发生消息,使其在Internet上穿越防火墙来传输序列化的消息流(这里准确讲不能说穿越,主要是因为防火墙都开放了80端口,所以使用Http协议可以穿过防火墙进行数据的传输,如果防火墙限制了80端口,Http协议也照样不能穿越防火墙)。默认情况下,HttpChannel使用Soap格式序列化消息对象,因此它具有更好的互操作性,并且可以使用Http协议中的加密机制来对消息进行加密来保证安全性。因此,通常在局域网内,我们更多地使用TcpChannel,如果要穿越防火墙,则使用HttpChannel。
- IpcChannel:进程间通信,只使用同一个系统进程之间的通信,不需要主机名和端口号。而使用Http通道和Tcp通道都要指定主机名和端口号。
- 自定义通道:自定义的传输通道可以使用任何基本的传输协议来进行通信,如UDP协议、SMTP协议等。
三、利用.NET Remoting技术开发分布式应用三部曲
前面详细介绍了.NET Remoting相关内容,下面具体看看如何使用.NET Remoting技术来开发分布式应用程序。开发.NET Remoting应用分三步走。
第一步:创建远程对象,该对象必须继承MarshalByRefObject对象。具体的示例代码如下:
 1 namespace RemotingObject
 2 {
 3     // 第一步:创建远程对象
 4     // 创建远程对象——必须继承MarshalByRefObject,该类支持对象的跨域边界访问
 5     public class MyRemotingObject :MarshalByRefObject
 6     {
 7         // 用来测试Tcp通道
 8         public int AddForTcpTest(int a, int b)
 9         {
10             return a + b;
11         }
12
13         // 用来测试Http通道
14         public int MinusForHttpTest(int a, int b)
15         {
16             return a - b;
17         }
18
19         // 用来测试IPC通道
20         public int MultipleForIPCTest(int a, int b)
21         {
22             return a * b;
23         }
24     }
25 }
远程对象分别定义3个方法,目的是为了测试3中不同的通道方式的效果。
第二步:创建服务器端,需要添加System.Runtime.Remoting.dll引用,具体实现代码如下所示:
 1 using System;
 2 using System.Runtime.Remoting;
 3 using System.Runtime.Remoting.Channels;
 4 using System.Runtime.Remoting.Channels.Http;
 5 using System.Runtime.Remoting.Channels.Ipc;
 6 using System.Runtime.Remoting.Channels.Tcp;
 7
 8 namespace RemotingServerHost
 9 {
10     // 第二步:创建宿主应用程序
11     class Server
12     {
13         static void Main(string[] args)
14         {
15             // 1.创建三种通道
16
17             // 创建Tcp通道,端口号9001
18             TcpChannel tcpChannel = new TcpChannel(9001);
19
20             // 创建Http通道,端口号9002
21             HttpChannel httpChannel = new HttpChannel(9002);
22
23             // 创建IPC通道,端口号9003
24             IpcChannel ipcChannel = new IpcChannel("IpcTest");
25
26             // 2.注册通道
27             ChannelServices.RegisterChannel(tcpChannel, false);
28             ChannelServices.RegisterChannel(httpChannel, false);
29             ChannelServices.RegisterChannel(ipcChannel, false);
30
31             // 打印通道信息
32             // 打印Tcp通道的名称
33             Console.WriteLine("The name of the TcpChannel is {0}", tcpChannel.ChannelName);
34             // 打印Tcp通道的优先级
35             Console.WriteLine("The priority of the TcpChannel is {0}", tcpChannel.ChannelPriority);
36
37             Console.WriteLine("The name of the HttpChannel is {0}", httpChannel.ChannelName);
38             Console.WriteLine("The priority of the httpChannel is {0}", httpChannel.ChannelPriority);
39
40             Console.WriteLine("The name of the IpcChannel is {0}", ipcChannel.ChannelName);
41             Console.WriteLine("The priority of the IpcChannel is {0}", ipcChannel.ChannelPriority);
42
43             // 3. 注册对象
44             // 注册MyRemotingObject到.NET Remoting运行库中
45             RemotingConfiguration.RegisterWellKnownServiceType(typeof(RemotingObject.MyRemotingObject), "MyRemotingObject", WellKnownObjectMode.Singleton);
46             Console.WriteLine("Press any key to exit");
47             Console.ReadLine();
48         }
49     }
50 }
第三步:创建客户端程序,具体的实现代码如下所示:
 1 using RemotingObject;
 2 using System;
 3
 4 namespace RemotingClient
 5 {
 6     class Client
 7     {
 8         static void Main(string[] args)
 9         {
10             // 使用Tcp通道得到远程对象
11             //TcpChannel tcpChannel = new TcpChannel();
12             //ChannelServices.RegisterChannel(tcpChannel, false);
13             MyRemotingObject proxyobj1 = Activator.GetObject(typeof(MyRemotingObject), "tcp://localhost:9001/MyRemotingObject") as MyRemotingObject;
14             if (proxyobj1 == null)
15             {
16                 Console.WriteLine("连接TCP服务器失败");
17             }
18
19             //HttpChannel httpChannel = new HttpChannel();
20             //ChannelServices.RegisterChannel(httpChannel, false);
21             MyRemotingObject proxyobj2 = Activator.GetObject(typeof(MyRemotingObject), "http://localhost:9002/MyRemotingObject") as MyRemotingObject;
22             if (proxyobj2 == null)
23             {
24                 Console.WriteLine("连接Http服务器失败");
25             }
26
27             //IpcChannel ipcChannel = new IpcChannel();
28             //ChannelServices.RegisterChannel(ipcChannel, false);
29             MyRemotingObject proxyobj3 = Activator.GetObject(typeof(MyRemotingObject), "ipc://IpcTest/MyRemotingObject") as MyRemotingObject;
30             if (proxyobj3 == null)
31             {
32                 Console.WriteLine("连接Ipc服务器失败");
33             }
34             // 输出信息
35             Console.WriteLine("This call object by TcpChannel, 100 + 200 = {0}", proxyobj1.AddForTcpTest(100, 200));
36             Console.WriteLine("This call object by HttpChannel, 100 - 200 = {0}", proxyobj2.MinusForHttpTest(100, 200));
37             Console.WriteLine("This call object by IpcChannel, 100 * 200 = {0}", proxyobj1.MultipleForIPCTest(100, 200));
38             Console.WriteLine("Press any key to exit!");
39             Console.ReadLine();
40         }
41     }
42 }
经过上面的三步,我们就完成了这个分布式应用的开发工作,下面测试下该程序是否可以正常运行,首先,运行服务器端,你将看到如下界面:
在.NET Remoting中,是允许同时创建多个通道的,但是.NET Remoting要求通道的名字必须不同,因为名字是用来标识通道的唯一标识符。但上面代码中,我们并没有指明通道的名字,为什么还可以允许成功呢?从上面图片可知,当我们创建通道时,如果没有为其显式指定通道名,则会使用对应的通道类型作为该通道名,如TcpChannel将会以tcp作为通道名,如果想注册多个Tcp通道则必须显式指定其名字。
下面看看运行客户端所获得的结果,具体客户端运行效果如下图所示:
四、使用配置文件来重写上面的分布式程序
在第三部分中,我们是把服务器的各种通道方式和地址写死在程序中的,这样的实现方式部署起来不方便,下面使用配置文件的方式来配置服务器端的通道类型和服务器地址。 远程对象的定义不需要改变,下面直接看服务器端使用配置文件后的实现代码如下所示:
 1 using System;
 2 using System.Runtime.Remoting;
 3 using System.Runtime.Remoting.Channels;
 4
 5 namespace RemotingServerHostByConfig
 6 {
 7     class Program
 8     {
 9         static void Main(string[] args)
10         {
11             RemotingConfiguration.Configure("RemotingServerHostByConfig.exe.config", false);
12
13             foreach (var channel in ChannelServices.RegisteredChannels)
14             {
15                 // 打印通道的名称
16                 Console.WriteLine("The name of the Channel is {0}", channel.ChannelName);
17                 // 打印通道的优先级
18                 Console.WriteLine("The priority of the Channel is {0}", channel.ChannelPriority);
19             }
20             Console.WriteLine("按任意键退出……");
21             Console.ReadLine();
22         }
23     }
24 }
服务端的配置文件的内容为:
 1 <?xml version="1.0" encoding="utf-8" ?>
 2 <!--服务端App.config的内容-->
 3 <configuration>
 4     <startup>
 5         <supportedRuntime version="v4.0" sku=".NETFramework,Version=v4.5" />
 6     </startup>
 7   <system.runtime.remoting>
 8     <application>
 9       <service>
10         <wellknown  mode="Singleton"
11                     type="RemotingObject.MyRemotingObject,RemotingObject"
12                     objectUri="MyRemotingObject"/>
13       </service>
14       <channels>
15         <channel port="9001" ref="tcp"/>
16         <channel port="9002" ref="http"/>
17         <channel portName="IpcTest" ref="ipc"/> <!--Ipc通道不需要端口号-->
18       </channels>
19     </application>
20   </system.runtime.remoting>
21 </configuration>
此时,客户端程序的实现代码如下所示:
 1 using RemotingObject;
 2 using System;
 3 using System.Runtime.Remoting;
 4
 5 namespace RemotingClientByConfig
 6 {
 7     class Program
 8     {
 9         static void Main(string[] args)
10         {
11             //使用HTTP通道得到远程对象
12             RemotingConfiguration.Configure("RemotingClientByConfig.exe.config", false);
13             MyRemotingObject proxyobj1 = new MyRemotingObject();
14             if (proxyobj1 == null)
15             {
16                 Console.WriteLine("连接服务器失败");
17             }
18
19             Console.WriteLine("This call object by TcpChannel, 100 + 200 = {0}", proxyobj1.AddForTcpTest(100, 200));
20             Console.WriteLine("This call object by HttpChannel, 100 - 200 = {0}", proxyobj1.MinusForHttpTest(100, 200));
21             Console.WriteLine("This call object by IpcChannel, 100 * 200 = {0}", proxyobj1.MultipleForIPCTest(100, 200));
22             Console.WriteLine("Press any key to exit!");
23             Console.ReadLine();
24         }
25     }
26 }
客户端配置文件为:
 1 <?xml version="1.0" encoding="utf-8" ?>
 2 <configuration>
 3     <startup>
 4         <supportedRuntime version="v4.0" sku=".NETFramework,Version=v4.5" />
 5     </startup>
 6   <system.runtime.remoting>
 7     <application>
 8       <client>
 9         <wellknown  type="RemotingObject.MyRemotingObject,RemotingObject"
10                     url="http://localhost:9002/MyRemotingObject" />
11       </client>
12       <channels>
13         <channel ref="tcp" port="0"></channel>
14         <channel ref="http" port="0"></channel>
15         <channel ref="ipc" port="0"></channel>
16       </channels>
17     </application>
18   </system.runtime.remoting>
19 </configuration>
使用配置文件修改后的分布式程序的运行结果与前面的运行结果一样,这里就不一一贴图了。
五、总结
到这里,.NET Remoting技术的分享就结束了,本文只是对.NET Remoting技术做了一个基本的介绍,如果想深入了解.NET Remoting技术的话,推荐大家可以看看下面的专题细细品味C#——.Net Remoting专题。在下一篇文章中,继续为大家分享另一种分布式技术——Web Service。
本文的示例代码文件下载:.NETRemotingSample


