Python单元测试框架之pytest---如何执行测试用例
介绍
pytest是一个成熟的全功能的Python测试工具,可以帮助你写出更好的程序。
适合从简单的单元到复杂的功能测试
- l 模块化parametrizeable装置(在2.3,持续改进)
- l 参数化测试函数(用例)
- l 标记测试功能与属性
- l Skip和xfail:处理不成功的测试用例(在2.4改进)
- l 通过xdist插件分发测试到多个CPU
- l 不断地重新运行失败的测试
- l 灵活约定的Python测试发现
Home Page: http://pytest.org
安装
>pip install -U pytest # 通过pip安装
>py.test --version # 查看pytest版本
This is pytest version 2.7.2, imported from C:\Python27\lib\site-packages\pytest.pyc
简单的测试
让我们创建第一个文件,对个简单的功能进行测试。
#coding=utf-8

# 功能
def func(x): return x + 1

# 测试用例
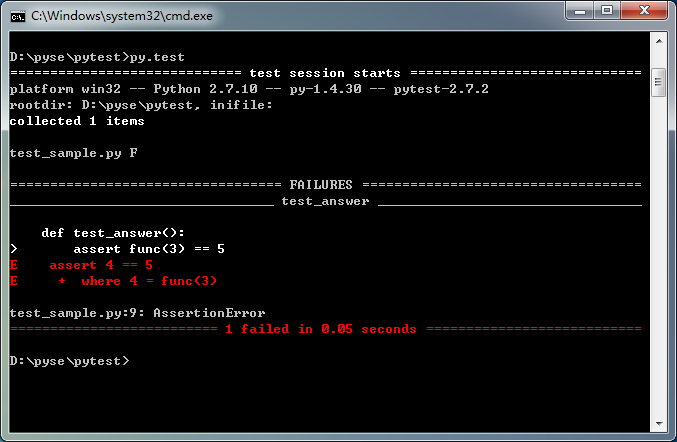
def test_answer(): assert func(3) == 5
切换到测试文件所在的目录,通过“py.test”命令运行测试。
>py.test
执行结果如下图:
===================================================================
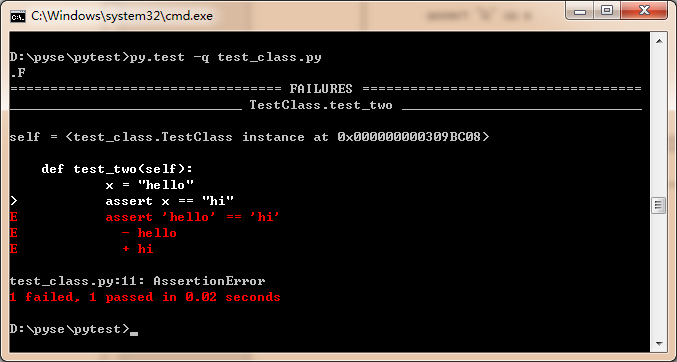
在一个测试类中创建多个测试用例:
#coding=utf-8

class TestClass: def test_one(self): x = "this"
        assert "h" in x def test_two(self): x = "hello"
        assert x == "hi"
运行测试:
>py.test -q test_class.py
-q 为quiet。表示在安静的模式输出报告诉。加不加这个参有什么区别呢? 读者可以对比一下两次输出的日志。其实,就是少了一些pytest的版本信息。
===================================================================
从Python代码中调用pytest
pytest中同样提供了main() 来函数来执行测试用例。
pytest/
├── test_sample.py
├── test_class.py
└── test_main.py
此目录为我们练习的目录,打开test_mian.py
import pytest def test_main(): assert 5 != 5

if __name__ == '__main__': pytest.main()
直接运行该程序,sublime 中按Ctrl+B 运行。结果如下:
============================= test session starts ============================= platform win32 -- Python 2.7.10 -- py-1.4.30 -- pytest-2.7.2 rootdir: D:\pyse\pytest, inifile: collected 4 items test_class.py .F test_main.py F test_sample.py F ================================== FAILURES ===================================
_____________________________ TestClass.test_two ______________________________ self = <test_class.TestClass instance at 0x000000000304F548>

    def test_two(self): x = "hello"
>           assert x == "hi" E assert 'hello' == 'hi' E - hello E + hi test_class.py:11: AssertionError __________________________________ test_main __________________________________

    def test_main(): >       assert 5 != 5 E assert 5 != 5 test_main.py:4: AssertionError _________________________________ test_answer _________________________________

    def test_answer(): >       assert func(3) == 5 E assert 4 == 5 E +  where 4 = func(3) test_sample.py:9: AssertionError ===================== 3 failed, 1 passed in 0.03 seconds ====================== [Finished in 0.3s]
从执行结果看到,main() 默认执行了当前文件所在的目录下的所有测试文件。
那么,如果我们只想运行某个测试文件呢?可以向main()中添加参数,就像在cmd命令提示符下面一样:
#coding=utf-8
import pytest def test_main(): assert 5 != 5

if __name__ == '__main__': pytest.main("-q test_main.py")   # 指定测试文件
运行结果:
F ================================== FAILURES ===================================
__________________________________ test_main __________________________________

    def test_main(): >       assert 5 != 5 E assert 5 != 5 test_main.py:4: AssertionError 1 failed in 0.01 seconds
那如果我想运行某个目录下的测试用例呢?指定测试目录即可。
#coding=utf-8
import pytest def test_main(): assert 5 != 5

if __name__ == '__main__': pytest.main("d:/pyse/pytest/")  # 指定测试目录
创建运行测试脚本
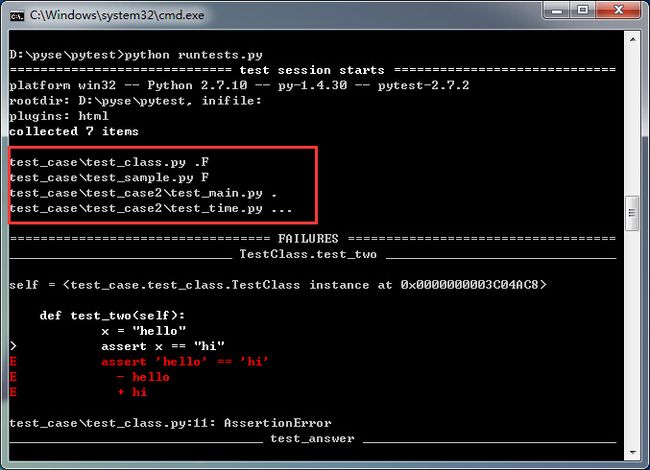
有时候我们的测试用例文件分散在不同的层级目录下,通过命令行的方式运行测试显示不太方便,如何编写一个运行所有测试用例的脚本呢? pytest可以自动帮我们生成这样的脚本。
>py.test --genscript=runtests.py
打开生成的测runtests.py文件:
sources = """ eNrsve2S3EiSIDa3+jhtnvZ293Ra6SSdCZMUF0AzK1nk9OzM1nV2L4dNznKnm6TxY6dX1XVJVAJV halMIAkgWVU3O2d6Ar3CPYQeQn/1QjKTf8UnAplZ7O6ZPTNxpiszgQiPCA8PD3cPD/f/449+9/5H yds/W99M58v6fDqfl1XZzefv/9nbvxuPxxE8Oy+r8+jRy2dREq+bOt8siqaNo6zKo3hRV+1mRb/h a1UsuiKPPpRZdFncXNVN3qYRABmN3v/R23+OLbRd/v6/ePOf/tmPflSu1nXTRe1NOxotllnbRq+7 PKlPfwMw0qNR …… """

import sys import base64 import zlib class DictImporter(object): def __init__(self, sources): self.sources = sources def find_module(self, fullname, path=None): if fullname == "argparse" and sys.version_info >= (2,7): # we were generated with <python2.7 (which pulls in argparse)
            # but we are running now on a stdlib which has it, so use that.
            return None if fullname in self.sources: return self if fullname + '.__init__' in self.sources: return self return None def load_module(self, fullname): # print "load_module:", fullname
        from types import ModuleType try: s = self.sources[fullname] is_pkg = False except KeyError: s = self.sources[fullname + '.__init__'] is_pkg = True co = compile(s, fullname, 'exec') module = sys.modules.setdefault(fullname, ModuleType(fullname)) module.__file__ = "%s/%s" % (__file__, fullname) module.__loader__ = self if is_pkg: module.__path__ = [fullname] do_exec(co, module.__dict__) # noqa
        return sys.modules[fullname] def get_source(self, name): res = self.sources.get(name) if res is None: res = self.sources.get(name + '.__init__') return res if __name__ == "__main__": if sys.version_info >= (3, 0): exec("def do_exec(co, loc): exec(co, loc)\n") import pickle sources = sources.encode("ascii") # ensure bytes
        sources = pickle.loads(zlib.decompress(base64.decodebytes(sources))) else: import cPickle as pickle exec("def do_exec(co, loc): exec co in loc\n") sources = pickle.loads(zlib.decompress(base64.decodestring(sources))) importer = DictImporter(sources) sys.meta_path.insert(0, importer) entry = "import pytest; raise SystemExit(pytest.cmdline.main())" do_exec(entry, locals()) # noqa
好吧!其实, 我也不理解这段代码的含义,但是执行它的可运行测试用例了。
pytest/
├── test_case/
│ ├── test_sample.py
│ ├── test_class.py
│ ├── __init__.py
│ └── test_case2/
│ ├── test_main.py
│ ├── test_time.py
│ └── __init__.py
└── runtests.py
执行runtest.py文件。
>python runtest.py
当然,你也可以打开runtests.py 文件运行它。
===================================================================
* 最后,pytest是如果识别测试用例的呢?它默认使用检查以test_ *.py 或*_test.py命名的文件名,在文件内部查找以test_打头的方法或函数,并执行它们。
pytest还有许多需要讨论的地方,做为这个系列的第一节,先介绍到这里。


