Windows 8.1 低功耗蓝牙开发
1. 概述
在蓝牙4.0发布以前,给大家的直观印象就是蓝牙耳机,它就是用来满足短距离内中等带宽的音频通信需求。然而蓝牙4.0发布之后,用途就大不一样了,特别是现在物联网和可穿戴之风盛行的年代,很多小玩意都使用了它,如心率计、手环、钥匙扣等等物件,最终它能够和用户的手机、Pad以及PC等设备连接,实现五花八门的功能。为什么蓝牙4.0的用途广泛了呢?首先归功于低功耗,运行Bluetooth Low Energy的设备,一节纽扣电池可以支持其半年的时间;其次是低成本,如TI公司的CC2540蓝牙SoC售价是1美元。自iOS和Android支持蓝牙4.0 BLE以后,在今年4月份微软的BUILD 2014大会上,终于官方宣布在Windows 8.1和Windows Phone 8.1中支持蓝牙4.0 BLE,值得注意的是,目前为止,Windows 8.1 只支持GATT Client模式,而不支持GATT Server模式。下面我们就一起来了解一下如何在Windows 8.1平台上开发蓝牙 4.0 BLE的应用。
2. 设备
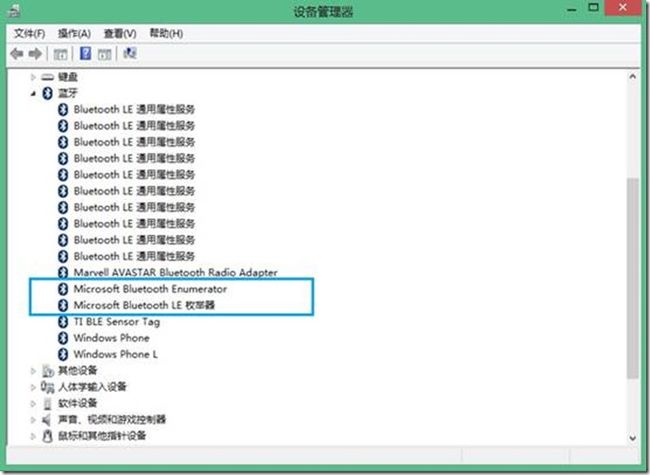
首先是配有蓝牙4.0的Windows 8.1系统的PC或者平板,以Surface Pro 2为例,可以打开“设备管理器”->蓝牙,查看下面的列表,如果里面有“Microsoft Bluetooth LE 枚举器”的话,如下图1所示,就说明是支持蓝牙4.0 LE的,如果没有的话,是无法搜索到蓝牙4.0 LE设备的,这时候就需要去更新系统和蓝牙驱动了。
图1
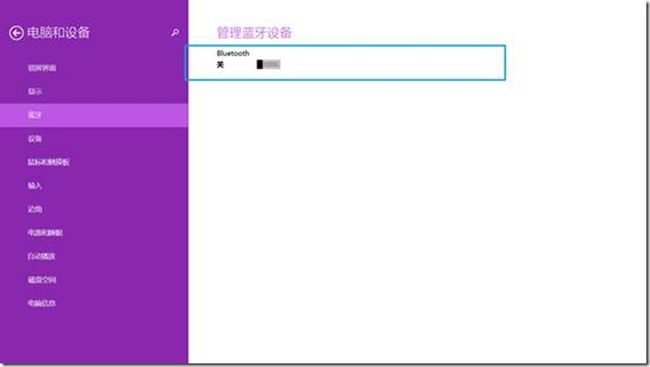
注意,在进行这一步以前,最好先去“设置”->“更改电脑设置”->“电脑和设备”->“蓝牙”中,把蓝牙打开。因为在我测试的时候发现,Surface Pro 2在蓝牙关闭的时候,不会出现“Microsoft Bluetooth LE 枚举器”这一项,如下图2所示,只有在蓝牙打开的情况下才会出现。
图2
其次,就是蓝牙4.0 BLE设备了,目前最流行的应该就是TI的CC2541 Sensor Tag,淘宝上都有卖,价格在200以内。Sensor Tag内部包含了6种传感器:IR temperature Sensor, Humidity Sensor, Pressure Sensor, Accelerometer, Gyroscope, Magnetometer。
3. 准备
如果在Windows设备上第一次使用Sensor Tag,我们还需要手动进行配对工作,这也是在Windows平台上使用蓝牙一贯以来的风格,包括以前的Windows Mobile,Windows CE,也包括现在的Windows Phone。当然,第一次使用配对成功以后,后面就不需要再配对了。首先,需要打开蓝牙开关,等待TI BLE Sensor Tag的出现,然后点击它,首次配对的PIN码为0000。如下图3所示。
图3
之后,系统会自动配置GATT服务,配置完成以后,可以去“设备管理器”->蓝牙那一项看看,你会发现里面多了很多GATT Services。如下图4所示。
图4
有关Sensor Tag提供的服务和对应的UUID,可以参考TI官方的文档:TI Development KIT。
其中用的典型的UUID包括:
Thermometer "f000aa00-0451-4000-b000-000000000000"
Accelerometer "f000aa10-0451-4000-b000-000000000000"
Humidity "f000aa20-0451-4000-b000-000000000000"
Magnetometer "f000aa30-0451-4000-b000-000000000000"
Barometer "f000aa40-0451-4000-b000-000000000000"
Gyroscope "f000aa50-0451-4000-b000-000000000000"
Key Service "0000ffe0-0000-1000-8000-00805f9b34fb"
Generic Access: 00001800-0000-1000-8000-00805f9b34fb
Generic Attribute: 00001801-0000-1000-8000-00805f9b34fb
Device Information: 0000180A-0000-1000-8000-00805f9b34fb
4. 创建应用
创建一个Windows Store应用,然后使用记事本或者在View Code下编辑Package.appxmanifest文件,加入以下Capabilities:
<Capabilities>
<Capability Name="internetClient" />
<m2:DeviceCapability Name="bluetooth.genericAttributeProfile">
<m2:Device Id="any">
<m2:Function Type="serviceId:f000aa00-0451-4000-b000-000000000000"/>
<m2:Function Type="serviceId:F000AA10-0451-4000-B000-000000000000"/>
<m2:Function Type="serviceId:F000AA20-0451-4000-B000-000000000000"/>
<m2:Function Type="serviceId:F000AA30-0451-4000-B000-000000000000"/>
<m2:Function Type="serviceId:F000AA40-0451-4000-B000-000000000000"/>
<m2:Function Type="serviceId:F000AA50-0451-4000-B000-000000000000"/>
<m2:Function Type="serviceId:0000ffe0-0000-1000-8000-00805f9b34fb"/>
<m2:Function Type="serviceId:00001800-0000-1000-8000-00805f9b34fb"/>
<m2:Function Type="serviceId:00001801-0000-1000-8000-00805f9b34fb"/>
<m2:Function Type="serviceId:0000180A-0000-1000-8000-00805f9b34fb"/>
</m2:Device>
</m2:DeviceCapability>
</Capabilities>
然后,使用Generic Access Service来读取Sensor Tag的Device Name,代码如下:
//Find the devices that expose the service
var devices = await Windows.Devices.Enumeration.DeviceInformation.FindAllAsync(GattDeviceService.GetDeviceSelectorFromUuid(GattServiceUuids.GenericAccess));
if (devices.Count==0)
return;
//Connect to the service
var service = await GattDeviceService.FromIdAsync(devices[0].Id);
if (service == null)
return;
//Obtain the characteristic we want to interact with
var characteristic = service.GetCharacteristics(GattCharacteristic.ConvertShortIdToUuid(0x2A00))[0];
//Read the value
var deviceNameBytes=(await characteristic.ReadValueAsync()).Value.ToArray();
//Convert to string
var deviceName=Encoding.UTF8.GetString(deviceNameBytes,0,deviceNameBytes.Length);
接着,我们来看看如何读取加速度传感器等数据:
//Find the devices that expose the service
var devices = await Windows.Devices.Enumeration.DeviceInformation.FindAllAsync(GattDeviceService.GetDeviceSelectorFromUuid(new Guid("F000AA10-0451-4000-B000-000000000000")));
if (devices.Count==0)
return;
//Connect to the service
var accService = await GattDeviceService.FromIdAsync(devices[0].Id);
if (accService == null)
return;
//Get the accelerometer data characteristic
var accData = accService.GetCharacteristics(new Guid("F000AA11-0451-4000-B000-000000000000"))[0];
//Subcribe value changed
accData.ValueChanged += accData_ValueChanged;
//Set configuration to notify
await accData.WriteClientCharacteristicConfigurationDescriptorAsync(GattClientCharacteristicConfigurationDescriptorValue.Notify);
//Get the accelerometer configuration characteristic
var accConfig = accService.GetCharacteristics(new Guid("F000AA12-0451-4000-B000-000000000000"))[0];
//Write 1 to start accelerometer sensor
await accConfig.WriteValueAsync((new byte[]{1}).AsBuffer());
订阅数据变更的notifications,加速度传感器默认的数据更新频率是1秒,这个值我们也可以进行修改。
async void accData_ValueChanged(GattCharacteristic sender, GattValueChangedEventArgs args)
{
var values = (await sender.ReadValueAsync()).Value.ToArray();
var x = values[0];
var y = values[1];
var z = values[2];
}
5. 使用第三方库
大家知道,按照上面的步骤来做,自己需要写很多数据交互的代码。如果你想偷懒,可以参考一下第三方库,SebastianL在codeplex上给出了TI Sensor Tag的开源库,链接地址为:Link。目前的版本是1.2,支持Windows 8.1,据作者说支持Windows Phone 8.1的版本会很快到来。使用这个库很简单:
第一步,在新建Store应用中加入应用的Capabilities,步骤与上面第4节中的一样。
第二步,下载X2CodingLab.SensorTag库,并在项目中添加对X2CodingLab.SensorTag的引用,如下图5所示。
图5
第三步,在需要使用Sensor Tag的页面后台文件中,实例化相应的传感器,以加速度传感器为例:
Accelerometer accelerometer = new Accelerometer();
第四步,初始化传感器,调用封装好的Initialize()方法:
await accelerometer.Initialize();
如果没有配对的Sensor Tag,这里会抛出异常DeviceNotFoundException。
第五步,获取传感器数据,使用EnableSensor和DisableSensor方法来打开获取数据的开关,另外,如果获取数据结束了,最好调用DisableSensor来节省Sensor Tag的功耗。
await accelerometer.EnableSensor();
await accelerometer.DisableSensor();
使用EnableNotifications() 和 DisableNotification()来允许或者禁止数据通知:
private async void Notify()
{
await accelerometer.DisableNotifications();
await accelerometer.EnableNotifications();
accelerometer.SensorValueChanged += accelerometer_SensorValueChanged;
}
void accelerometer_SensorValueChanged(object sender, X2CodingLab.SensorTag.SensorValueChangedEventArgs e)
{
byte[] sensorData = e.RawData;
}
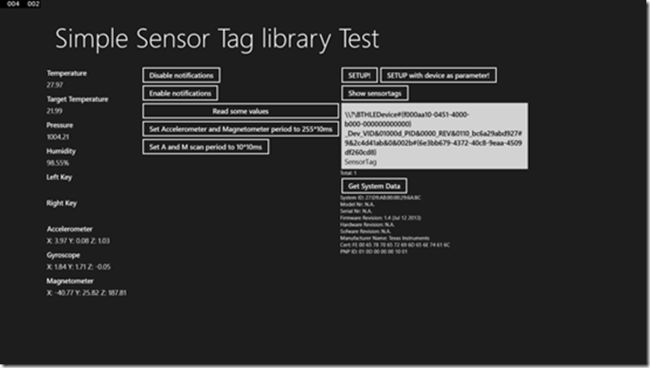
下面是应用运行界面图。
图6
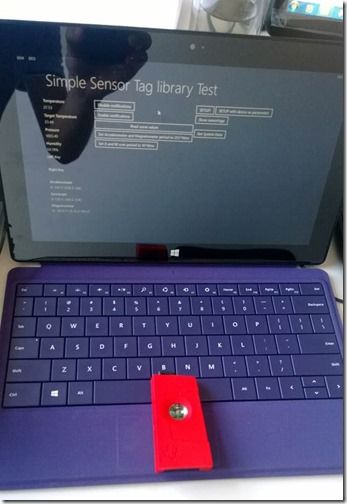
再给出实物的图片吧,红色的是Sensor Tag。
最后,还是给出源代码工程的下载链接:Link。最近OneDrive不能用,用微盘代替一下。


