用Play实现文件上传与下载功能(超简单!)
上传
首先用Activator创建一个play工程,这里就不细说了。工程目录结构如下:
工程创建好了,那么我们做一些准备工作。
首先在工程的public目录下创建一个uploads文件夹,用来存放上传的文件。
接下来在app/controllers/Application.scala中写上传代码。上传采用Form提交,代码如下:
def upload = Action(parse.multipartFormData) { request =>
        request.body.file("picture").map { picture =>

            val filename = picture.filename
            val contentType = picture.contentType
            picture.ref.moveTo(new File(s"public/uploads/$filename"))
            //此处是存储在项目根目录下的public目录下,不能以/(如:/public)开头
            Ok("File uploaded")
        }.getOrElse {
            Redirect(routes.Application.index).flashing(
              "error" -> "Missing file")
        }
    }
}上传代码写好了需要在conf/routes中配置路由:
POST /upload controllers.Application.upload()接下来我们可以创建一个用来提交的页面,页面也非常简单,在views文件夹下创建upload.scala.html并添加:
<!DOCTYPE html>

<html>
    <head>
        <title>upload</title>
        <link rel="stylesheet" media="screen" href="@routes.Assets.at("stylesheets/main.css")">
        <link rel="shortcut icon" type="image/png" href="@routes.Assets.at("images/favicon.png")">
        <script src="@routes.Assets.at("javascripts/hello.js")" type="text/javascript"></script>
    </head>
    <body>
    @helper.form(action = routes.Application.upload, 'enctype -> "multipart/form-data") {

        <input type="file" name="picture">

        <p>
            <input type="submit">
        </p>

    }
    </body>
</html>
到这里上传文件的主要代码就已经完成了。不过我们还需要一个去上传页面的路由:
application.scala中添加:
def toUpload = Action{
    Ok(views.html.upload())
}
routes中添加:
GET /to/upload controllers.Application.toUpload到这里一个完整的上传功能就已经结束了。接下来我们跑一跑试试:
开发模式运行: activator -> run
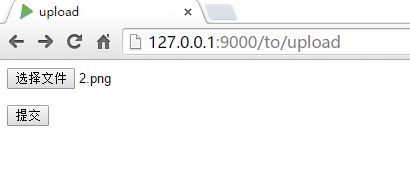
浏览器输入:http://127.0.0.1:9000/to/upload
Chrome中效果图如下:
接着上传一个文件试试:
提交之后:
public/uploads文件夹下:
已经有了刚才上传的文件了,说明上传文件已经成功了。试了一下不同类型的文件也是可以的。
下载
下载也是很简单。
在写下载之前需要先写一个获取当前下载文件夹下面的文件列表。在Application.scala中添加:
def getName(path:String,fileNameListBuffer:ListBuffer[String]): Unit  =  {

    val file = Play.getFile(path)
    if(file.isDirectory){
        val files = file.listFiles()
        if(files.nonEmpty){
            for(f <- files){
                if(f.isDirectory){
                    getName(f.getAbsolutePath,fileNameListBuffer)
                }else{
                    fileNameListBuffer += f.getName
                }
            }
        }
    }
}然后写下载的方法,Application.scala中添加:
def download(file_path:String) = Action {
    Ok.sendFile(new java.io.File(s"public/uploads/$file_path"))
}在routes中添加:
GET /download/:path controllers.Application.download(path:String)下载页面,views中创建download.scala.html并添加:
@(fileList:List[String])
<!DOCTYPE html>
<html>
    <head>
        <title>upload</title>
        <link rel="stylesheet" media="screen" href="@routes.Assets.at("stylesheets/main.css")">
        <link rel="shortcut icon" type="image/png" href="@routes.Assets.at("images/favicon.png")">
        <script src="@routes.Assets.at("javascripts/hello.js")" type="text/javascript"></script>
    </head>
    <body>
    @for(item <- fileList) {
        <li><a href="@routes.Application.download(item)" >@item</a></li>
    }
    </body>
</html>参数是List[String]类型.
接下来同样添加一个去下载页面的路由,并且指定下载路径,同时运行获取文件列表的getName方法:
def toDownload = Action{
    val path = "public/uploads/"
    getName(path,fileNameListBuffer)
    Ok(views.html.download(fileNameListBuffer.toList))
}最后再routes中添加:
GET /to/download controllers.Application.download运行效果:
源码https://github.com/xjpz/mosquito-upload


