用grunt构建seajs项目
重要的链接
关于SeaJS的模块标识
SeaJS的配置
CommonJS模块标识规范
cmdjs spec
SeaJS的一个step by step教程,已经过期,仅供参考
ID和路径匹配原则
为什么有约定和构建工具
模块的加载启动
grunt-cmd-transport官方文档
grunt-cmd-concat官方文档
node的模块加载规则
为了通过对比,加深对seajs模块加载规则的理解,本文也介绍一下node的模块加载规则
node和seajs一样,实现的都是CommonJS的module spec,所以概念上也基本一致。有2种模块标识,分别是top-level identifier和relative identifier
如下代码:
require("http");
require("mongo");
都是top-level,不以../,./,/开头,如果是http这样的核心模块,就从node的lib目录加载,如果是mongo这样的第三方模块,则沿着目录树依次查找node_modules,直到/node_modules,如果没有找到则报错
如下代码:
require("./hello");
require("../hello");
require("/hello");
都是relative,则相对于当前模块的路径查找,比如:
//  /home/test/a.js
require("./b");// 加载/home/test/b.js
上面就是node的模块路径解析规则,非常简单
seajs的模块加载规则和模块标识
关于seajs的模块标识,强烈建议一定要仔细读一下这2篇文档:
seajs模块标识
ID和路径匹配规则
基本上,seajs的模块标识也分为top-level和relative,但是seajs是运行在浏览器环境的module loader,所以比起node,还多了一种解析规则,称为“普通路径”
top-level
类似于这样:
require("path/to/file");
和node中一样,不以../,./,/开头的标识,是顶级标识,将 相对于seajs base路径来解析,seajs base是sea.js文件本身加载的路径,如:
// seajs_test/app/index.html

<script src="../dist/3rd-lib/sea.js"></script>
在index.html页面中加载了sea.js,所以sea.js的加载路径是seajs_test/dist/3rd-lib/sea.js,所以默认的 seajs base是seajs_test/dist/3rd-lib
刚才这段代码:
require("path/to/file");
解析后的路径是seajs_test/dist/3rd-lib/path/to/file.js
不过可以配置seajs base,代码是:
// seajs_test/app/index.html

seajs.config({
        base: "../dist" // set base to seajs_test/dist
})
注意,这里设置的../dist,也是相对于html页面所在路径来说的,而不是相对于sea.js所在路径
relative
类似于:
// path/to/a.js

require("./b");
require("../c");
以./或者../打头的是相对标识,这种标识是 相对于当前模块的路径来解析的,比如上面的例子,解析得到的路径分别是
path/to/b.js,和path/c.js
实际上,相对标识是很方便的,在项目中推荐使用相对标识来相互引用模块
普通路径
普通路径有3种:
require("http://xxx.com/path/to/file");
require("/path/to/file");

seajs.use("./abc");
以http或者file等schema开头的绝对路径,以/开头的根路径,以及传递给seajs.use()函数的相对路径都是普通路径,将会 根据当前html页面的位置来解析
普通路径相对当前页面路径解析这个规则,是seajs特有的,在node里没有这个情况。实际上,我感觉普通路径里唯一有点作用的只有seajs.use(),而且作用也不是特别大,因为可以用top-level代替。绝对路径和根路径用得就更少了。所以,不太需要关注普通路径。一般顶级标识和相对标识就已经够用了
ID即路径
这个规则在seajs里特别重要。对于匿名模块来说,还体现得不明显,如:
// path/to/this/file
define(function(require, exports, module) {
    // code here
})
这是一个匿名模块,只要根据上面说的3种路径解析规则,能够正确地找到这个文件path/to/this/file.js,就可以被seajs加载使用。但是具名模块就不同了:
// path/to/this/file
define("path/to/this/file", [], function(){
    // code here
})
这是一个具名模块,不仅要根据路径解析到此文件,而且
require("path/to/this/file");
模块标识(ID)和路径也一定要相同才可以,否则require的返回值就是null,无法被seajs加载
项目结构
下面提供一个使用grunt构建seajs项目的完整例子,这里没有使用spm,只使用了spm开发的2个grunt task,分别是grunt-cmd-transport和grunt-cmd-concat
目录结构
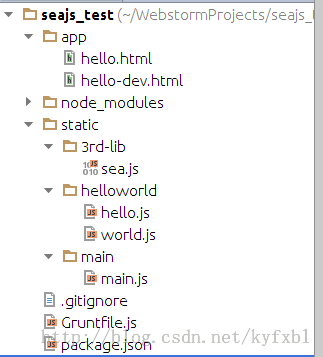
app下放的是html文件,js文件在static目录下,其中3rd-lib目录下放sea.js,jquery.js等第三方库。自己开发的js文件按模块放在各自的子目录下,如这里的helloworld和main。目前还看不到构建后的目录,实际上构建完成之后,构建后的js文件会放在dist目录下
准备grunt插件
将需要的grunt插件写在package.json里,用npm install命令下载,装在node_modules里。注意,node_modules不需要上传到GitHub,只需要上传package.json就可以了
{
  "name": "seajs_test",
  "version": "1.0.0",
  "devDependencies": {
    "grunt": "~0.4.1",
    "grunt-cmd-transport": "~0.3.0",
    "grunt-cmd-concat": "~0.2.5",
    "grunt-contrib-uglify": "~0.2.4",
    "grunt-contrib-clean": "~0.5.0"
  }
}
html内容
<!doctype html>
<html>
<head>
    <meta charset="utf-8">
    <title>Hello Sea.js</title>
</head>
<body>

<div id="thediv">
    <p>hello world</p>
</div>

<!--original base: seajs_test/static/3rd-lib-->
<script src="../static/3rd-lib/sea.js" id="seajsnode"></script>
<script>

    seajs.config({
        base: "../static", // set base to seajs_test/static
        alias: {"main": "main/main"}
    })

    seajs.use("main");// it's a top-level identifier

</script>

</body>
</html>
这个html作为入口,引入了sea.js,后面的id="seajsnode",是官方文档里推荐的最佳实践: 模块加载启动
之后设置了base,因为默认的是seajs_test/static/3rd-lib,不方便用top-level来引用其他模块,所以改成seajs_test/static
最后加载了seajs_test/static/main/main.js作为入口(使用的是top-level)
js文件的内容
// seajs_test/static/main/main.js

define(function (require) {

    var hello = require("helloworld/hello");
    alert(hello.increment(10));

});
// seajs_test/static/helloworld/hello.js

define(function (require, exports) {

    var world = require("./world");

    exports.increment = function (a) {
        return world.add(a, 1);
    };

});
// seajs_test/static/helloworld/world.js

define(function (require, exports) {

    exports.add = function (a, b) {
        return a + b
    };

});
上面的依赖既使用了顶级标识,也使用了相对标识。是有意展示2种加载方式,实际开发中,无论用顶级标识或是相对标识都可以。我觉得用相对标识就挺好
构建过程
下面开始一步步介绍构建的详细过程
为什么要构建
实际上,到此已经可以正常运行了。但是生产环境一般都需要合并和压缩js文件来提高性能,而直接压缩的话,一个js文件会有多个define模块,seajs无法识别用户到底想加载哪个模块,所以需要先提取module_id,变成具名模块。而且由于前面说过的seajs的“ID和路径一致性”的要求,根据传给require()的模块标识,不仅要能找到对应的js文件,而且模块ID还要相同才可以。因此,需要用配套的构建工具来构建,压缩后的js才能被seajs正常解析和加载
网上的帖子大部分都是基于spm来构建,本文介绍用纯grunt的步骤
transport
这是构建的第一步,用的是grunt-cmd-transport插件,Gruntfile.js这部分内容如下:
transport: {
            options: {
                paths: ['static'] // where is the module, default value is ['sea-modules']
            },
            helloworld: {
                options: {
                    idleading: 'helloworld/'
                },
                files: [
                    {
                        cwd: 'static/helloworld',
                        src: '**/*.js',
                        dest: '.build/helloworld'
                    }
                ]
            },
            main: {
                options: {
                    idleading: 'main/'
                },
                files: [
                    {
                        cwd: 'static/main',
                        src: '**/*.js',
                        dest: '.build/main'
                    }
                ]
            }
        }
这里有几个关键点:
首先是paths参数,这里需要配置为"static"(结合目录结构来理解),因为main.js使用顶级标识依赖了hello.js
var hello = require("helloworld/hello");
而前面说过,顶级标识需要根据seajs base来解析,而我们现在在做的事情是静态编译,并没有seajs base存在,默认将设置为sea-modules,所以这里我们要设置成static。我觉得把这个参数改名为base会更好理解
其次是idleading参数,这决定了提取出来的module_id,要和我们最终的目录结构保持一致!执行grunt transport以后,会把提取之后的文件放在临时目录.build里
看下hello.js提取后的样子:
define("helloworld/hello", [ "./world" ], function(require, exports) {
    var world = require("./world");
    exports.increment = function(a) {
        return world.add(a, 1);
    };
});
main.js是:
define("main/main", [ "helloworld/hello", "helloworld/world" ], function(require) {
    var hello = require("helloworld/hello");
    alert(hello.increment(10));
});
基本一样,略有区别是因为原本的文件,一个是用require("./world"),另一个是require("helloworld/hello")。不要紧,两种方式都可以
concat
前面提取之后,接下来的动作是合并,把hello.js和world.js合并成hello.js,用到的插件是grunt-cmd-concat。这里务必注意,合并后的名字不能改,还必须是hello.js,这也是因为前面提到的“ID与路径匹配原则”,我本来不理解,合并成了helloworld.js,结果就加载不到了。另外可以发现,多个文件合并成一个之后,对外就只能暴露一个模块了(这里是hello,world只能内部引用)
concat: {
            options: {
                include: 'self'
            },
            build: {
                files: {
                    'dist/helloworld/hello.js': ['.build/helloworld/hello.js', '.build/helloworld/world.js'],
                    'dist/main/main.js': ['.build/main/main.js']
                }
            }
        }
include参数是合并哪些依赖,可选值有self,relative,all。self只会合并自身,relative会提前合并依赖的文件(不用在运行时多发起一次http请求),all则是会合并依赖的依赖。relative是默认值
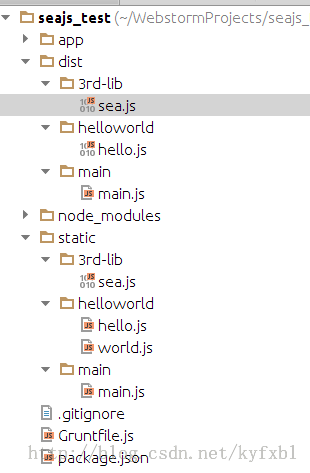
这里就把文件合并放到了dist/helloworld和dist/main目录下,可以发现,目录结构和文件名,都跟构建前完全一致!这个要求非常重要,否则就会发生构建前能正常运行,构建后无法访问的情况
另外,这里我没有管.build目录下的debug文件了,因为感觉没啥作用,稍后在clean task里就会清除掉了
看看合并后的样子:
// dist/helloworld/hello.js

define("helloworld/hello", [ "./world" ], function(require, exports) {
    var world = require("./world");
    exports.increment = function(a) {
        return world.add(a, 1);
    };
});

define("helloworld/world", [], function(require, exports) {
    exports.add = function(a, b) {
        return a + b;
    };
});
// dist/main/main.js

define("main/main", [ "helloworld/hello", "helloworld/world" ], function(require) {
    var hello = require("helloworld/hello");
    alert(hello.increment(10));
});
uglify和clean
容易出错的部分已经结束了,剩下的就是压缩和清理临时目录,没什么特别可说的,用的是grunt-contrib-uglify和grunt-contrib-clean
uglify: {
            main: {
                files: {
                    'dist/helloworld/hello.js': ['dist/helloworld/hello.js'],
                    'dist/main/main.js': ['dist/main/main.js']
                }
            }
        },
clean:  {
            build: ['.build'] // clean .build directory
        }
构建之后的目录结构
这里可以看到,源代码目录static和构建后的目录dist下面的目录结构是完全保持一致的,这点很关键。另外dist里的3rd-lib/sea.js暂时是手工拷过去的,也应该写到Gruntfile里实现自动化,不过这个跟seajs已经关系不大了,也不容易出错,本文就不介绍了
总结
完整的Gruntfile
module.exports = function (grunt) {

    grunt.initConfig({
        transport: {
            options: {
                paths: ['static'] // where is the module, default value is ['sea-modules']
            },
            helloworld: {
                options: {
                    idleading: 'helloworld/'
                },
                files: [
                    {
                        cwd: 'static/helloworld',
                        src: '**/*.js',
                        dest: '.build/helloworld'
                    }
                ]
            },
            main: {
                options: {
                    idleading: 'main/'
                },
                files: [
                    {
                        cwd: 'static/main',
                        src: '**/*.js',
                        dest: '.build/main'
                    }
                ]
            }
        },
        concat: {
            options: {
                include: 'self'
            },
            build: {
                files: {
                    'dist/helloworld/hello.js': ['.build/helloworld/hello.js', '.build/helloworld/world.js'],
                    'dist/main/main.js': ['.build/main/main.js']
                }
            }
        },
        uglify: {
            main: {
                files: {
                    'dist/helloworld/hello.js': ['dist/helloworld/hello.js'],
                    'dist/main/main.js': ['dist/main/main.js']
                }
            }
        },
        clean: {
            build: ['.build'] // clean .build directory
        }
    });

    grunt.loadNpmTasks('grunt-cmd-transport');
    grunt.loadNpmTasks('grunt-cmd-concat');
    grunt.loadNpmTasks('grunt-contrib-uglify');
    grunt.loadNpmTasks('grunt-contrib-clean');

    grunt.registerTask("test","my custom task",function(){
        console.log("hello grunt");
    })

    grunt.registerTask('default', ['transport', 'concat', 'uglify', 'clean','test']);

};
最关键的2个点:
- 构建后得到的部署目录,目录结构要和开发的源代码目录结构保持一致
- 生成的module_id,要和目录结构保持一致
示例工程路径:示例工程GitHub地址
区分开发环境和生产环境
最后,要准备不同的html文件,这个主要是因为开发态和部署态,引的js文件不一样(开发时没有dist目录,部署时没有src目录),要配置的seajs base也不同,暂时没有更好的办法,就准备2份html,分别是index.html和index-dev.html,前者用于生产环境,后者用于开发调试
用于开发:
// index-dev.html

<!doctype html>
<html>
<head>
    <meta charset="utf-8">
    <title>Hello Sea.js</title>
</head>
<body>

<div id="thediv">
    <p>hello world</p>
</div>

<!--original base: seajs_test/static/3rd-lib-->
<script src="../static/3rd-lib/sea.js" id="seajsnode"></script>
<script>

    seajs.config({
        base: "../static", // set base to seajs_test/static
        alias: {"main": "main/main"}
    })

    seajs.use("main");// it's a top-level identifier

</script>

</body>
</html>
用于部署:
// index.html

<!doctype html>
<html>
<head>
    <meta charset="utf-8">
    <title>Hello Sea.js</title>
</head>
<body>

<div id="thediv">
    <p>hello world</p>
</div>

<!--original base: seajs_test/dist/3rd-lib-->
<script src="../dist/3rd-lib/sea.js" id="seajsnode"></script>
<script>

    seajs.config({
        base: "../dist" // set base to seajs_test/dist
    })

    seajs.use("main/main");// it's a top-level identifier

</script>

</body>
</html>


