PullToRefresh使用详解(二)---重写BaseAdapter实现复杂XML下拉刷新
前言:上篇我们讲了怎么初步使用PullToRefresh,但上篇只是几个简单的字符串,在真正的项目中,不可能只是这么简单的,而是复杂的XML的累积,这篇我在前一篇和以前讲的simpleAdapter的基础上,进一步实现复杂XML的下拉刷新
相关文章:
(这篇文章是建立在这三篇文章的基础上,其实是在利用了《List控件使用--SimpleAdapter使用详解(二)》的布局和重写BaseAdapter的代码,然后利用了《PullToRefresh使用详解(一)--构建下拉刷新的ListView》的下拉刷新功能。所以文章的部分代码省略没讲,强烈建议大家先看这三篇。)
1、《List控件使用--SimpleAdapter使用详解(一)》
2、《List控件使用--SimpleAdapter使用详解(二)》
3、《PullToRefresh使用详解(一)--构建下拉刷新的ListView》
其它相关文章
4、《PullToRefresh使用详解(一)--构建下拉刷新的listView》
5、《PullToRefresh使用详解(三)--实现异步加载的下拉刷新列表》
6、《PullToRefresh使用详解(四)--利用回调函数实现到底加载》
7、《PullToRefresh使用详解(五)--下拉刷新的ScrollView》
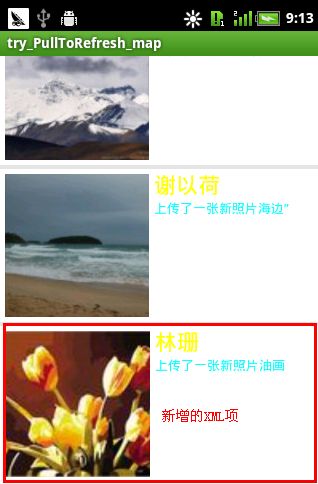
效果图:
正在刷新 刷新后

一、XML代码
1、activity_main.xml
<?xml version="1.0" encoding="utf-8"?>
<LinearLayout xmlns:android="http://schemas.android.com/apk/res/android"
    android:layout_width="fill_parent"
    android:layout_height="fill_parent"
    android:orientation="vertical" >

<!--     The PullToRefreshListView replaces a standard ListView widget. -->

    <com.handmark.pulltorefresh.library.PullToRefreshListView
        android:id="@+id/pull_refresh_list"
        android:layout_width="fill_parent"
        android:layout_height="fill_parent"
        android:cacheColorHint="#00000000"
        android:divider="#19000000"
        android:dividerHeight="4dp"
        android:fadingEdge="none"
        android:fastScrollEnabled="false"
        android:footerDividersEnabled="false"
        android:headerDividersEnabled="false"
        android:smoothScrollbar="true" />

</LinearLayout>
2、数据项XML(item.xml)
与《List控件使用--SimpleAdapter使用详解(二)》布局一样,只是将名字改成了item.xml<?xml version="1.0" encoding="utf-8"?> <LinearLayout xmlns:android="http://schemas.android.com/apk/res/android" android:orientation="horizontal" android:layout_width="fill_parent" android:layout_height="fill_parent"> <ImageView android:id="@+id/img" android:layout_width="wrap_content" android:layout_height="wrap_content" android:layout_margin="5px"/> <LinearLayout android:orientation="vertical" android:layout_width="wrap_content" android:layout_height="wrap_content"> <TextView android:id="@+id/name" android:layout_width="wrap_content" android:layout_height="wrap_content" android:textColor="#FFFFFF00" android:textSize="22px" /> <TextView android:id="@+id/info" android:layout_width="wrap_content" android:layout_height="wrap_content" android:textColor="#FF00FFFF" android:textSize="13px" /> </LinearLayout> </LinearLayout>
二、JAVA代码
先贴出全部代码,然后再慢慢讲。完整代码
package com.example.try_pulltorefresh_map;
//try_PullToRefresh_map
/**
 * 完成了从TXT文本中提取,并向下刷新
 * blog:http://blog.csdn.net/harvic880925/article/details/17708409
 * @author harvic
 * @date  2013-12-31
 *
 */
import java.io.BufferedReader;
import java.io.IOException;
import java.io.InputStream;
import java.io.InputStreamReader;
import java.io.UnsupportedEncodingException;
import java.util.ArrayList;
import java.util.HashMap;
import org.json.JSONArray;

import com.handmark.pulltorefresh.library.PullToRefreshBase;
import com.handmark.pulltorefresh.library.PullToRefreshListView;
import com.handmark.pulltorefresh.library.PullToRefreshBase.Mode;
import com.handmark.pulltorefresh.library.PullToRefreshBase.OnRefreshListener;

import android.os.AsyncTask;
import android.os.Bundle;
import android.app.ListActivity;
import android.content.Context;
import android.graphics.Bitmap;
import android.graphics.BitmapFactory;
import android.text.format.DateUtils;
import android.view.LayoutInflater;
import android.view.View;
import android.view.ViewGroup;
import android.widget.BaseAdapter;
import android.widget.ImageView;
import android.widget.ListView;
import android.widget.TextView;

public class MainActivity extends ListActivity {

	private ArrayList<HashMap<String, Object>> listItem = new ArrayList<HashMap<String, Object>>();
	private PullToRefreshListView mPullRefreshListView;
	MyAdapter adapter=null;

	@Override
	protected void onCreate(Bundle savedInstanceState) {
		super.onCreate(savedInstanceState);
		setContentView(R.layout.activity_main);

		mPullRefreshListView = (PullToRefreshListView) findViewById(R.id.pull_refresh_list);

		//设定下拉监听函数
		mPullRefreshListView.setOnRefreshListener(new OnRefreshListener<ListView>() {
			@Override
			public void onRefresh(PullToRefreshBase<ListView> refreshView) {
				String label = DateUtils.formatDateTime(getApplicationContext(), System.currentTimeMillis(),
						DateUtils.FORMAT_SHOW_TIME | DateUtils.FORMAT_SHOW_DATE | DateUtils.FORMAT_ABBREV_ALL);

				// Update the LastUpdatedLabel
				refreshView.getLoadingLayoutProxy().setLastUpdatedLabel(label);

				// Do work to refresh the list here.
				new GetDataTask().execute();
			}
		});

		mPullRefreshListView.setMode(Mode.PULL_FROM_END);//设置底部下拉刷新模式

		listItem=getData();//获取LIST数据
		adapter = new MyAdapter(this);

		//设置适配器
		ListView actualListView = mPullRefreshListView.getRefreshableView();
		actualListView.setAdapter(adapter);

	}
	private class GetDataTask extends AsyncTask<Void, Void, HashMap<String, Object>> {

		//后台处理部分
		@Override
		protected HashMap<String, Object> doInBackground(Void... params) {
			// Simulates a background job.
			try {
				Thread.sleep(1000);
			} catch (InterruptedException e) {
			}
			HashMap<String, Object> map = new HashMap<String, Object>();
			try {

				map = new HashMap<String, Object>();
				map.put("name", "林珊");
				map.put("info", "上传了一张新照片油画");
				map.put("img","youhua");

			} catch (Exception e) {
				// TODO: handle exception
				setTitle("map出错了");
				return null;
			}

			return map;
		}

		//这里是对刷新的响应,可以利用addFirst()和addLast()函数将新加的内容加到LISTView中
		//根据AsyncTask的原理,onPostExecute里的result的值就是doInBackground()的返回值
		@Override
		protected void onPostExecute(HashMap<String, Object> result) {
			//在头部增加新添内容

			try {
				listItem.add(result);

				//通知程序数据集已经改变,如果不做通知,那么将不会刷新mListItems的集合
				adapter.notifyDataSetChanged();
				// Call onRefreshComplete when the list has been refreshed.
				mPullRefreshListView.onRefreshComplete();
			} catch (Exception e) {
				// TODO: handle exception
				setTitle(e.getMessage());
			}


			super.onPostExecute(result);
		}
	}

	private ArrayList<HashMap<String, Object>> getData() {
		ArrayList<HashMap<String, Object>> list = new ArrayList<HashMap<String, Object>>();
		HashMap<String, Object> map = new HashMap<String, Object>();
		InputStream inputStream;
		try {
			inputStream=this.getAssets().open("my_home_friends.txt");
			String json=readTextFile(inputStream);
			JSONArray array = new JSONArray(json);
			for (int i = 0; i < array.length(); i++) {
				map = new HashMap<String, Object>();
				map.put("name", array.getJSONObject(i).getString("name"));
				map.put("info", array.getJSONObject(i).getString("info"));
				map.put("img",array.getJSONObject(i).getString("photo"));
				list.add(map);
			}
			return list;

		} catch (Exception e) {
			// TODO: handle exception
			e.printStackTrace();
		}


		return list;
	}


	public final class ViewHolder{
		public ImageView img;
		public TextView name;
		public TextView info;
	}

	public class MyAdapter extends BaseAdapter{

		private LayoutInflater mInflater;

		public MyAdapter(Context context){
			this.mInflater = LayoutInflater.from(context);
		}
		@Override
		public int getCount() {
			// TODO Auto-generated method stub
			return listItem.size();
		}

		@Override
		public Object getItem(int arg0) {
			// TODO Auto-generated method stub
			return null;
		}

		@Override
		public long getItemId(int arg0) {
			// TODO Auto-generated method stub
			return 0;
		}

		@Override
		public View getView(int position, View convertView, ViewGroup parent) {

			ViewHolder holder = null;
			if (convertView == null) {

				holder=new ViewHolder();

				convertView = mInflater.inflate(R.layout.item, null);
				holder.img = (ImageView)convertView.findViewById(R.id.img);
				holder.name = (TextView)convertView.findViewById(R.id.name);
				holder.info = (TextView)convertView.findViewById(R.id.info);
				convertView.setTag(holder);

			}else {

				holder = (ViewHolder)convertView.getTag();
			}

			holder.img.setImageBitmap(getHome((String)listItem.get(position).get("img")));
			holder.name.setText((String)listItem.get(position).get("name"));
			holder.info.setText((String)listItem.get(position).get("info"));

			return convertView;
		}

	}


	/**
	 * 根据图片名称获取主页图片
	 */
	public Bitmap getHome(String photo){
		String homeName = photo + ".jpg";
		InputStream is=null;

        try {
        	is=getAssets().open("home/"+homeName);
            Bitmap bitmap = BitmapFactory.decodeStream(is);
            is.close();
            return bitmap;
        } catch (Exception e) {
            e.printStackTrace();
        }

        return null;

	}

	////工具类
	/**
	 *
	 * @param inputStream
	 * @return
	 */
	public String readTextFile(InputStream inputStream) {
		String readedStr = "";
		BufferedReader br;
		try {
			br = new BufferedReader(new InputStreamReader(inputStream, "UTF-8"));
			String tmp;
			while ((tmp = br.readLine()) != null) {
				readedStr += tmp;
			}
			br.close();
			inputStream.close();
		} catch (UnsupportedEncodingException e) {
			e.printStackTrace();
		} catch (IOException e) {
			e.printStackTrace();
		}

		return readedStr;
	}


}
讲解:
执行流程:
看起来代码挺长,其实只看OnCreate()函数就能知道,只是分成了几大块,先贴出OnCreate()函数
	@Override
	protected void onCreate(Bundle savedInstanceState) {
		super.onCreate(savedInstanceState);
		setContentView(R.layout.activity_main);

		mPullRefreshListView = (PullToRefreshListView) findViewById(R.id.pull_refresh_list);

		//设定下拉监听函数
		mPullRefreshListView.setOnRefreshListener(new OnRefreshListener<ListView>() {
			@Override
			public void onRefresh(PullToRefreshBase<ListView> refreshView) {
				String label = DateUtils.formatDateTime(getApplicationContext(), System.currentTimeMillis(),
						DateUtils.FORMAT_SHOW_TIME | DateUtils.FORMAT_SHOW_DATE | DateUtils.FORMAT_ABBREV_ALL);

				// Update the LastUpdatedLabel
				refreshView.getLoadingLayoutProxy().setLastUpdatedLabel(label);

				// Do work to refresh the list here.
				new GetDataTask().execute();
			}
		});

		mPullRefreshListView.setMode(Mode.PULL_FROM_END);//设置底部下拉刷新模式

		listItem=getData();//获取LIST数据
		adapter = new MyAdapter(this);

		//设置适配器
		ListView actualListView = mPullRefreshListView.getRefreshableView();
		actualListView.setAdapter(adapter);

	}
1、首先初始化mPullRefreshListView,然后设定监听函数,监听函数没变,我只是更改了GetDataTask()函数里的部分代码,我相信大家也能看懂,难度不大;
2、设定下拉模式,绑定适配器,对应代码
mPullRefreshListView.setMode(Mode.PULL_FROM_END);//设置底部下拉刷新模式

listItem=getData();//获取LIST数据
adapter = new MyAdapter(this);

//设置适配器
ListView actualListView = mPullRefreshListView.getRefreshableView();
actualListView.setAdapter(adapter);
而这里的适配器是经过重写的,新生成了一个类MyAdapter extends BaseAdapter,关于重写适配器的方法,参考《List控件使用--SimpleAdapter使用详解(二)》;
到这就结束了,由于这篇文章是几篇文章的功能整合,很多东西相关的三篇文章都已经讲过了,也就没必要再讲,所以这里讲的比较粗略。
源码地址:http://download.csdn.net/detail/harvic880925/6790941 (不要分,仅供分享)
请大家尊重原创者版权,转载请标明出处:http://blog.csdn.net/harvic880925/article/details/17708409,谢谢!