JBoss 系列六:JBoss 7/WildFly中配置使用JMS消息队列
内容概要
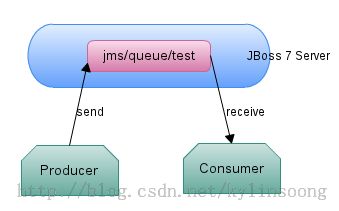
JBoss 系列六主要目的是演示如何在JBoss 7/WildFly中配置使用JMS消息队列,本文章分三部分:在JBoss服务器上创建消息队列,在JBoss服务器上创建安全Application User,使用创建好的消息队列。如下为一简单示意图:
如上图,“jms/queue/test”为JBoss服务器上创建的消息队列;Producer和Consumer连接JBoss服务器需要安全认证;Producer将消息发送到消息队列“jms/queue/test”,Consumer从消息队列“jms/queue/test”中接收消息。
在JBoss服务器上创建消息队列
我们可以使用如下4种方式创建消息队列:
- Management Console
- Management CLI
- 部署*-jms.xml 文件到 deployments目录
- 编辑JBoss配置文件
使用Management Console创建消息队列
1. 启动具有消息功能的JBoss,即启动JBoss时使用-c 或 --server-config= 指向JBoss的配置文件standalone-full.xml
./standalone.sh -c standalone-full.xml
2. 登录到Management Console( http://localhost:9990/console),选择Profile → Messaging → Destinations → default → View,接下来点击Add按钮,创建消息队列“jms/queue/test”
使用Management CLI创建消息队列
1. 连接到JBoss Management CLI(需要JBoss是启动状态)
./jboss-cli.sh
2. 进入到messaging subsystem(需要连接到JBoss,connect目录默认连接到localhost:9999)
cd /subsystem=messaging/hornetq-server=default
3. 执行创建消息队列命令
./jms-queue=testQueue:add(durable=false,entries=["java:jboss/exported/jms/queue/test"])
使用部署*-jms.xml 文件到 deployments目录的方式创建消息队列
1. 创建XML文件,任意命名,比如我们创建sample-jms.xml,内容如下:
<?xml version="1.0" encoding="UTF-8"?>
<messaging-deployment xmlns="urn:jboss:messaging-deployment:1.0">
    <hornetq-server>
        <jms-destinations>
            <jms-queue name="testQueue">
                <entry name="queue/test"/>
                <entry name="java:jboss/exported/jms/queue/test"/>
            </jms-queue>
        </jms-destinations>
    </hornetq-server>
</messaging-deployment>
注意JBOSS_HOME/docs/schema/jboss-as-messaging-deployment_1_0.xsd下为创建消息队列等的schema文件,如上sample-jms.xml就是根据此schema文件创建。
2. 部署sample-jms.xml到JBoss
使用前面系列三使用4种方式部署应用到JBoss7/WildFly中所示的方法中的任意一种部署sample-jms.xml到JBoss
使用编辑JBoss配置文件的方式创建消息队列
1. 打开JBOSS_HOME/standalone/configuration/standalone-full.xml文件
2. 在<subsystem xmlns="urn:jboss:domain:messaging中的</jms-connection-factories> 之后和</hornetq-server>之前添加如下内容:
<jms-destinations>
        <jms-queue name="testQueue">
            <entry name="queue/test"/>
            <entry name="java:jboss/exported/jms/queue/test"/>
        </jms-queue>
</jms-destinations>
3. 保存并关闭打开的文件
在JBoss服务器上创建安全用户
由于JBoss 7不支持匿名连接,所以我们必要创建一个Application User,如下面步骤:
1. 打开命令行终端根据自己操作系统执行创建用户启动脚本。
Linux: JBOSS_HOME/bin/add-user.sh
Windows: JBOSS_HOME\bin\add-user.bat
2. 启动后会有如下输出
What type of user do you wish to add?

a) Management User (mgmt-users.properties)
b) Application User (application-users.properties)
(a):

At the prompt, type: b
3. 创建用户和密码如下
Enter the details of the new user to add.
Realm (ApplicationRealm) :

If we want to specify a realm, type it here. Otherwise, press enter to use the default ApplicationRealm

    When prompted, enter the the Username and Passord.

Username : kylin
Password :
Re-enter Password :
4. 给创建的用户分配guest角色
What roles do you want this user to belong to? (Please enter a comma separated list, or leave blank for none)[ ]: guest
使用创建好的消息队列
本部分包括向上面创建好的消息队列“jms/queue/test”中发送消息,以及从“jms/queue/test”中接收消息,我们使用简单代码模拟。
获取示例代码
根据前面软件安装及资料下载中gituhb安装部分获取示例代码如下:
git clone [email protected]:kylinsoong/csdn.git
cd csdn/6
我们可以将此代码导入eclipse,并添加jboss-client.jar(JBOSS_HOME/bin/client目录下)到classpath,运行HelloWorlsJMS之前需要启动JBoss:
[kylin@localhost bin]$ ./standalone.sh -c standalone-full.xml
运行示例代码
运行HelloWorlsJMS会有如下输出:
Create Local JNDI Context Successful
Attempting to acquire connection factory "jms/RemoteConnectionFactory"
Found connection factory "jms/RemoteConnectionFactory" in JNDI
Attempting to acquire destination "jms/queue/test"
Found destination "jms/queue/test" in JNDI
create Connection Factory successful
create producer successful
create consumer successful
Sending 3 messages with content: Hello World, JMS!
Received message 1 with content [Hello World, JMS!]
Received message 2 with content [Hello World, JMS!]
Received message 3 with content [Hello World, JMS!]
如上显示我们客户端连接到JBoss,基于消息队列“jms/queue/test”创建Producer和Consumer;Producer连续发送了三条消息,消息内容为字符串“Hello World, JMS!”;Consumer也接收到了连续的三条消息。
如下为HelloWorlsJMS的代码明细:
import java.util.Properties;

import javax.jms.Connection;
import javax.jms.ConnectionFactory;
import javax.jms.Destination;
import javax.jms.MessageConsumer;
import javax.jms.MessageProducer;
import javax.jms.Session;
import javax.jms.TextMessage;
import javax.naming.Context;
import javax.naming.InitialContext;
import javax.naming.NamingException;

public class HelloWorlsJMS {


	private Context getContext() throws NamingException{

		 final Properties env = new Properties();
                 env.put(Context.INITIAL_CONTEXT_FACTORY, "org.jboss.naming.remote.client.InitialContextFactory");
                 env.put(Context.PROVIDER_URL, "remote://localhost:4447");
                 env.put(Context.SECURITY_PRINCIPAL, "kylin");
                 env.put(Context.SECURITY_CREDENTIALS, "redhat");

		return new InitialContext(env);
	}

	public void test() throws Exception {

		System.out.println("JMS HelloWorld start");

		Context ctx = getContext();

		System.out.println("Create Local JNDI Context Successful");

		ConnectionFactory connectionFactory = null;
        Connection connection = null;
        Session session = null;
        MessageProducer producer = null;
        MessageConsumer consumer = null;
        Destination destination = null;
        TextMessage message = null;

		try {
			String connectionFactoryString = "jms/RemoteConnectionFactory";
			System.out.println("Attempting to acquire connection factory \"" + connectionFactoryString + "\"");
			connectionFactory = (ConnectionFactory) ctx.lookup(connectionFactoryString);
			System.out.println("Found connection factory \"" + connectionFactoryString + "\" in JNDI");

			String destinationString = "jms/queue/test";
			System.out.println("Attempting to acquire destination \"" + destinationString + "\"");
            destination = (Destination) ctx.lookup(destinationString);
            System.out.println("Found destination \"" + destinationString + "\" in JNDI");

            // Create the JMS connection, session, producer, and consumer
            connection = connectionFactory.createConnection("kylin", "redhat");
            System.out.println("create Connection Factory successful");
            session = connection.createSession(false, Session.AUTO_ACKNOWLEDGE);
            producer = session.createProducer(destination);
            System.out.println("create producer successful");
            consumer = session.createConsumer(destination);
            System.out.println("create consumer successful");
            connection.start();

            int count = 3;
            String content = "Hello World, JMS!";

            System.out.println("Sending " + count + " messages with content: " + content);

            // Send the specified number of messages
            for (int i = 0; i < count; i++) {
                message = session.createTextMessage(content);
                producer.send(message);
            }

            // Then receive the same number of messaes that were sent
            for (int i = 0; i < count; i++) {
                message = (TextMessage) consumer.receive(5000);
                System.out.println("Received message " + (i + 1) + " with content [" + message.getText() + "]");
            }

		} catch (Exception e) {
			throw e;
		} finally {

            // closing the connection takes care of the session, producer, and consumer
            if (connection != null) {
                connection.close();
            }
        }

	}

	public static void main(String[] args) throws Exception {
		new HelloWorlsJMS().test();
	}
}
