ListView滑动删除实现之二——scrollTo、scrollBy详解
前言:一个项目终于要结束了,最最坑的莫过于少估了一个巨复杂的页面的开发时间,队长,你这是要多坑队友才行啊……本来定的一个月要看的内容,看来是高估自己能力了,拖拉严重啊,以后要早起了,把早上的时间也利用起来,一天睡九个小时着时有点多……可趴在床上就想睡这可怎么破……
相关文章:
1、《 ListView滑动删除实现之一——merge标签与LayoutInflater.inflate()》
2、《ListView滑动删除实现之二——scrollTo、scrollBy详解》
3、《 ListView滑动删除实现之三——创建可滑动删除的ListView》
4、《ListView滑动删除实现之四——Scroller类与listview缓慢滑动》
上篇给大家讲了有关merge标签和LayoutInflater的相关内容,这篇就开始接触点实际的东东了,这篇给大家讲讲如何通过scrollTo和scrollBy来移动视图范围。
一、scrollTo及scrollBy的真正意义
1、定义
先来看一下scrollTo和scrollBy的用法和含义。public void scrollTo(int x, int y) public void scrollBy(int x, int y)scrollTo:直接将视图原点其移动到目标位置;
scrollBy:在现在视图所在位置的基础上,再向X,Y位置上移动指定像素
2、简单示例
我们先看一个例子,然后再具体讲解,这两个函数的意义。效果图如下:

在效果图中可以看到:
1、点击scrollTo运行的代码是:scrollTo(100,100),一次将位置移动到指定位置;多次点击无效。
2、点击scrollBy运行的代码是:scrollBy(50,50),在现有位置的基础上一次次移动
3、复位使用代码是:scrollTo(0,0)
大家仔细观察可能会发现一个疑问:为什么scrollTo(100,100),按照正常情况下的坐标正方向来算(向左是X轴正方向,向下是Y轴正方向),不应该往右下方移动吗,为什么这里是往左上方移动呢,正好反过来?
关于这个问题,我们后面再讲,先看看上面效果的代码实现
首先看activity_main.xml布局
<LinearLayout xmlns:android="http://schemas.android.com/apk/res/android"
    xmlns:tools="http://schemas.android.com/tools"
    android:layout_width="match_parent"
    android:layout_height="fill_parent"
    android:orientation="vertical"
    tools:context=".MainActivity" >

    <Button
        android:id="@+id/btn_scroll_to"
        android:layout_width="match_parent"
        android:layout_height="wrap_content"
        android:text="scroll to" />

    <Button
        android:id="@+id/btn_scroll_by"
        android:layout_width="match_parent"
        android:layout_height="wrap_content"
        android:text="scroll by" />

    <Button
        android:id="@+id/btn_scroll_reset"
        android:layout_width="match_parent"
        android:layout_height="wrap_content"
        android:text="复位" />

    <LinearLayout
        android:id="@+id/root"
        android:layout_width="match_parent"
        android:layout_height="match_parent"
        android:gravity="center_vertical|right"
        android:background="#ff00ff"
        android:orientation="vertical">

        <TextView
            android:layout_width="wrap_content"
            android:layout_height="wrap_content"
            android:textSize="20dp"
            android:text="@string/hello_world" />
    </LinearLayout>

</LinearLayout>
根据视图效果得出上面的布局代码难度不大,这里要注意的一点是在底部TextView外面包裹了一层LinearLayout,我们调用scrollTo的并不是TextView而是LinearLayout,这也是为什么在布局中,为LinearLayout设置了ID参数:android:id="@+id/root",而textView却什么都没有的原因。
在MainActivity中的实现如下:
public class MainActivity extends Activity implements View.OnClickListener {

    private Button btnScrollTo, btnScrollBy, btnScrollReset;
    private LinearLayout rootLinLayout;

    @Override
    protected void onCreate(Bundle savedInstanceState) {
        super.onCreate(savedInstanceState);
        setContentView(R.layout.activity_main);

        btnScrollTo = (Button) findViewById(R.id.btn_scroll_to);
        btnScrollBy = (Button) findViewById(R.id.btn_scroll_by);
        btnScrollReset = (Button) findViewById(R.id.btn_scroll_reset);
        rootLinLayout = (LinearLayout) findViewById(R.id.root);

        btnScrollTo.setOnClickListener(this);
        btnScrollBy.setOnClickListener(this);
        btnScrollReset.setOnClickListener(this);
    }

    @Override
    public void onClick(View v) {
        int id = v.getId();
        switch (id) {
            case R.id.btn_scroll_to: {
                rootLinLayout.scrollTo(100, 100);
            }
            break;
            case R.id.btn_scroll_by: {
                rootLinLayout.scrollBy(50, 50);
            }
            break;
            case R.id.btn_scroll_reset: {
                rootLinLayout.scrollTo(0, 0);
            }
            break;
            default:
                break;
        }
    }
}
大家看懂上面的代码难度不大,最关键的是下面几行:
…………
rootLinLayout = (LinearLayout) findViewById(R.id.root);
…………
public void onClick(View v) {
    int id = v.getId();
    switch (id) {
        case R.id.btn_scroll_to: {
            rootLinLayout.scrollTo(100, 100);
        }
        break;
        case R.id.btn_scroll_by: {
            rootLinLayout.scrollBy(50, 50);
        }
        break;
        case R.id.btn_scroll_reset: {
            rootLinLayout.scrollTo(0, 0);
        }
        break;
        default:
            break;
    }
大家从这里可以看到,我们调用scrollTo和scrollBy的是TextView的LinearLayout,那为什么移动的却是它里面的TextView呢,其实这是个错觉。下面具体分析这个代码的移动过程
3、ScrollTo的移动过程
我们着重分析这句代码:
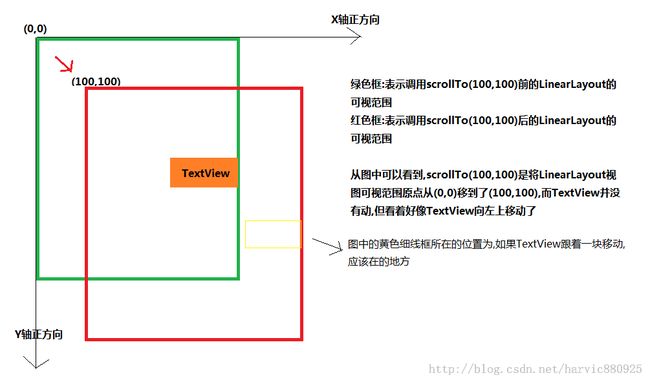
rootLinLayout.scrollTo(100, 100);我们的疑问在于:为什么明明指定的是移动距离是(100,100),即向右移动100,向下移动100,而TextView却明明反过来移动了呢?
看下面这个图:

上面所有的想法都是错误的!!!!我们调用scrollTo的是LinearLayout,那么移动的肯定也是LinearLayout!!!!我们想像一个场景:在一块大布上,你拿着放大镜来回看,随着我们移动放大镜的位置,那显示的区域也就变得不一样。同样的道理,LinearLayout就是我们的一块大画布,而在屏幕上的显示区域就是我们的放大镜!所以我们将放大镜(显示区域)放右下角移动了(100,100),画布是没有变的,也就是说,TextView的位置是没有变的,由于我们的放大镜(显示区域)向右下角移动了(100,100),所以看起来,TextView就向左上方移动的,其实这是个错觉!!!!
那我们又想了,那如果我在原来LinearLayout的右下角有东西的话,而由于显示区域(放大镜)没放在这个位置而没显示出来,那按你这么说,把显示范围往右下角移动了之后,那是不是就可以显示出来了?当然!!我们下面就看个例子!
二、Merge标签的超范围视图显示
先看下示例的效果图:
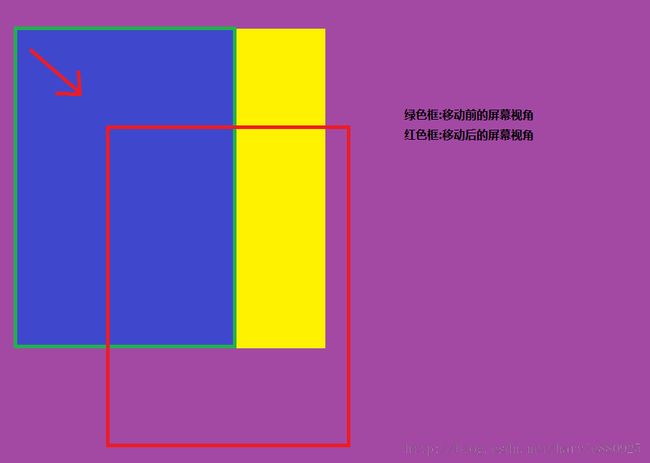
下面显示的是,整个MainActivity的背景色是紫色,然后我们利用merge标签将两个布局合并在一起,刚开始显示全屏的蓝色page 1,在page 1的旁边有一小条黄色的布局,由于在初始化时蓝色的page 1布满全屏,这时候我们点击scrollBy(50, 50),将视角往右下方移动,就可以看到随着我们视角的移动的布局变化:首先就可以看到原来看不到的黄色的一条,当黄色和黄色布局都过去的时候,就可以看到原本的activity_mian的底色(紫色)
我们先看一下代码实现,然后再分析整个实现过程:
1、首先,我们看一下主布局(activity_main.xml):
<LinearLayout xmlns:android="http://schemas.android.com/apk/res/android"
    xmlns:tools="http://schemas.android.com/tools"
    android:layout_width="match_parent"
    android:layout_height="fill_parent"
    android:orientation="vertical"
    tools:context=".MainActivity" >

    <Button
        android:id="@+id/btn_scroll_by"
        android:layout_width="match_parent"
        android:layout_height="wrap_content"
        android:text="scroll by" />

    <com.harvic.com.tryscrolltoscrollby.MyLinearLayout
        android:id="@+id/root"
        android:layout_width="match_parent"
        android:layout_height="match_parent"
        android:background="#ff00ff">

    </com.harvic.com.tryscrolltoscrollby.MyLinearLayout>

</LinearLayout>
布局很简单,一个按钮和一个自定义控件,那我们看看这个自定义控件是什么
2、MyLinearLayout 定义
class MyLinearLayout extends LinearLayout {

    public MyLinearLayout(Context context, AttributeSet attrs) {
        super(context, attrs);
        setOrientation(LinearLayout.HORIZONTAL);
        LayoutInflater inflater = LayoutInflater.from(context);
        inflater.inflate(R.layout.merge_layout,this,true);
    }
}
从代码中非常容易看出来,MyLinearLayout 派生于LinearLayout,我们在这里只做了两件事,第一:把布局方向设为水平方向布局;第二:将R.layout.merge_layout这个布局加载到它里面来,做为它的子布局;因为在inflater.inflate中,我们将布局的根结点设为了MyLinearLayout本身,而且将attachToRoot参数设为了TRUE;有关inflater.inflate(R.layout.merge_layout,this,true);里第三个参数attachToRoot的含义,在第一篇中已经详细讲述,就是把传进去的LAYOUT做为子结点添加到指定的根结点上,而我们这里指定的根结点就是MyLinearLayout它自已。
下面,我们就来看看这个R.layout.merge_layout布局到底是个什么东东。
3、通过merge标签整个布局
首先,在上一篇中,我们提到merge标签能到将它下面的所有控件并列地添加到根结点中,因为我们这里的根结点是MyLinearLayout,所以下面这两个控件会一个个地添加到MyLinearLayout中,我们看一下merge标签,将两个布局整合在一起的代码:<?xml version="1.0" encoding="utf-8"?>
<merge xmlns:android="http://schemas.android.com/apk/res/android"
android:layout_width="match_parent"
android:layout_height="match_parent" >
<LinearLayout
android:id="@+id/view_content"
android:layout_width="match_parent"
android:layout_height="match_parent"
android:background="#0000ff"
android:orientation="horizontal" >
<TextView
android:layout_width="match_parent"
android:layout_height="match_parent"
android:gravity="center"
android:text="page 1"
android:textSize="35dp" />
</LinearLayout>
<LinearLayout
android:id="@+id/holder"
android:layout_width="120dp"
android:layout_height="match_parent"
android:clickable="true"
android:background="#ffff00">
<TextView
android:id="@+id/delete"
android:layout_width="wrap_content"
android:layout_height="wrap_content"
android:layout_centerInParent="true"
android:layout_gravity="center"
android:textColor="#ff0000"
android:text="删除" />
</LinearLayout>
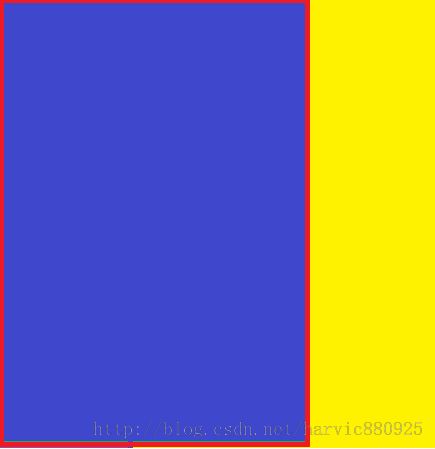
</merge>我们这里定义了两个布局,第一个就是那个背景是蓝色的布局,由于它的layout_width、layout_height参数全部设为match_parent,所以它就直接占据了整个屏幕。而第二个布局,黄色背景的布局,它的宽度设为120dp,高度设为与区域同高。
所以,拼出来图应该是这样子:

红色的框表示MyLinearLayout的显示视角,当我们移动时,它的视角变化就是这样的:
上面就是在视角移动时的,可视区域变化。
当然,最就MainActivity的代码了:
public class MainActivity extends Activity implements View.OnClickListener {
    private Button  btnScrollBy;
    private MyLinearLayout rootLinLayout;
    @Override
    protected void onCreate(Bundle savedInstanceState) {
        super.onCreate(savedInstanceState);
        setContentView(R.layout.activity_main);

        btnScrollBy = (Button) findViewById(R.id.btn_scroll_by);
        rootLinLayout = (MyLinearLayout) findViewById(R.id.root);

        btnScrollBy.setOnClickListener(this);
    }

    @Override
    public void onClick(View v) {
        int id = v.getId();
        switch (id) {
            case R.id.btn_scroll_by: {
                rootLinLayout.scrollBy(50, 50);
            }
            break;
            default:
                break;
        }
    }
}
这里的代码理解起来没什么难度,就是对MyLinearLayout实例调用scrollBy函数,将视角每次同时向右和向下各平移50;
我想通过上面这个例子大家对视角的移动应该都有了较深的认识,下面我们再回过头来看看上面的代码存在什么问题。
4、反思:自定义LinearLayout与merge标签的等价方案
从上面的代码中,我们自定义的控件MyLinearLayout只有这三行代码:
class MyLinearLayout extends LinearLayout {

    public MyLinearLayout(Context context, AttributeSet attrs) {
        super(context, attrs);
        setOrientation(LinearLayout.HORIZONTAL);
        LayoutInflater inflater = LayoutInflater.from(context);
        inflater.inflate(R.layout.merge_layout,this,true);
    }
}
其实它什么也没做啊,就是把布局设为水平,然后添加了几个控件。前面我们也讲过,merge代码的作用就是把merge标签下的东东,并列地添加到指定的根结点中。所以,我们自定义的LinearLayout与merge标签部分跟下面的代码是完全等价的
<LinearLayout xmlns:android="http://schemas.android.com/apk/res/android"
    xmlns:tools="http://schemas.android.com/tools"
    android:layout_width="match_parent"
    android:layout_height="fill_parent"
    android:orientation="vertical"
    tools:context=".MainActivity">

    <Button
        android:id="@+id/btn_scroll_by"
        android:layout_width="match_parent"
        android:layout_height="wrap_content"
        android:text="scroll by" />

    <LinearLayout
        android:id="@+id/root"
        android:layout_width="match_parent"
        android:layout_height="match_parent"
        android:orientation="horizontal"
        android:background="#ff00ff">

        <LinearLayout
            android:id="@+id/view_content"
            android:layout_width="match_parent"
            android:layout_height="match_parent"
            android:background="#0000ff"
            android:orientation="horizontal">

            <TextView
                android:layout_width="match_parent"
                android:layout_height="match_parent"
                android:gravity="center"
                android:text="page 1"
                android:textSize="35dp" />
        </LinearLayout>

        <LinearLayout
            android:id="@+id/holder"
            android:layout_width="120dp"
            android:layout_height="match_parent"
            android:clickable="true"
            android:background="#ffff00">

            <TextView
                android:id="@+id/delete"
                android:layout_width="wrap_content"
                android:layout_height="wrap_content"
                android:layout_centerInParent="true"
                android:layout_gravity="center"
                android:textColor="#ff0000"
                android:text="删除" />
        </LinearLayout>
    </LinearLayout>
</LinearLayout>
这上面我们把scroll_by Button下面的MyLinearLayout换成了这一坨:
<LinearLayout
    android:id="@+id/root"
    android:layout_width="match_parent"
    android:layout_height="match_parent"
    android:orientation="horizontal"
    android:background="#ff00ff">

    <LinearLayout
        android:id="@+id/view_content"
        android:layout_width="match_parent"
        android:layout_height="match_parent"
        android:background="#0000ff"
        android:orientation="horizontal">

        <TextView
            android:layout_width="match_parent"
            android:layout_height="match_parent"
            android:gravity="center"
            android:text="page 1"
            android:textSize="35dp" />
    </LinearLayout>

    <LinearLayout
        android:id="@+id/holder"
        android:layout_width="120dp"
        android:layout_height="match_parent"
        android:clickable="true"
        android:background="#ffff00">

        <TextView
            android:id="@+id/delete"
            android:layout_width="wrap_content"
            android:layout_height="wrap_content"
            android:layout_centerInParent="true"
            android:layout_gravity="center"
            android:textColor="#ff0000"
            android:text="删除" />
    </LinearLayout>
</LinearLayout>
1、首先,把根部的LinearLayout设为水平布局
2、然后把原来merge标签下的所有部分移到这个布局的下面
然后是MainActivity里的操作代码:
public class MainActivity extends Activity implements View.OnClickListener {

    private Button btnScrollBy;
    private LinearLayout rootLinLayout;
    @Override
    protected void onCreate(Bundle savedInstanceState) {
        super.onCreate(savedInstanceState);
        setContentView(R.layout.activity_main);

        btnScrollBy = (Button) findViewById(R.id.btn_scroll_by);
        rootLinLayout = (LinearLayout) findViewById(R.id.root);

        btnScrollBy.setOnClickListener(this);
    }

    @Override
    public void onClick(View v) {
        int id = v.getId();
        switch (id) {
            case R.id.btn_scroll_by: {
                rootLinLayout.scrollBy(50, 50);
            }
            break;
            default:
                break;
        }
    }
}
同样,当点击scrollBy按钮时,一步步向右下角移动id为root的LinearLayout布局的视角。这里的效果与上面效果完全一致。
三、更正
本文中提到了视角的移动,这样理解起来就会更容易一些,但在源码中实际情况并不是这样的,而是在重绘时invalidate()中:
tmpr.set(l - scrollX, t - scrollY, r - scrollX, b - scrollY);
p.invalidateChild(this, tmpr);
直接将scrollX,scrollY作为减数传到重绘区域中(tmpr),然后根据这个坐标来重绘所有子控件,就是是为什么当scrollX为正时,子控件往左移动的根本的原因
更多内容请参考:《Android源码角度分析View的scrollBy()和scrollTo()的参数正负问题》
好了,到这里就结束了,到这有关移动的知识基本就讲完了,下面就来实现滑动删除的效果了,嘿嘿。
如果本文有帮到你,记得加关注哦
源码地址:http://download.csdn.net/detail/harvic880925/8622517
请大家尊重原创者版权,转载请标明出处:http://blog.csdn.net/harvic880925/article/details/45176813 谢谢

