阅读《Android 从入门到精通》(6)——按钮
按钮(Button)
Button 属于 android.widget 包并且继承 android.widget.TextView,同时是 CompoundButton、CheckBox、RadioButton 以及 ToggleButton 的父类。
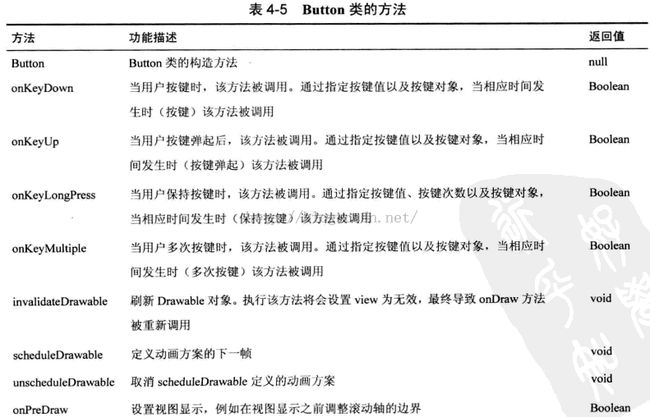
Button 类方法
Button 布局
以后补充
Button 示例
完整工程:http://download.csdn.net/detail/sweetloveft/9105219
下述程序,首先通过 layout/activity_layout.xml 创建界面布局以及相关控件,通过 values/color.xml 创建了颜色表,在 onCreate 中导入了必要资源,程序的功能是:
1.点击不同的按钮,可以通过加载的 values/color.xml 改变 textView 的背景色;
2.按下不同的按键,显示按下状态和松开状态,并在松开时改变 textView 的背景色。
重点要求掌握:
1.明白对象 btn1、btn2、btn3 之前添加修饰符 final 的原因;
2.学会在 values 目录下添加 color.xml,并使用 Resource 加载引入;
3.学会使用 Color 类。
1.MainActivity.java
package com.sweetlover.buttondemo;
import android.app.Activity;
import android.content.res.Resources;
import android.graphics.Color;
import android.graphics.drawable.Drawable;
import android.os.Bundle;
import android.view.KeyEvent;
import android.view.View;
import android.view.View.OnClickListener;
import android.widget.Button;
import android.widget.TextView;

public class MainActivity extends Activity {

	TextView textView;

	@Override
	protected void onCreate(Bundle savedInstanceState) {
		// TODO Auto-generated method stub
		super.onCreate(savedInstanceState);
		setContentView(R.layout.activity_layout);

		Resources res = getBaseContext().getResources();
		textView = (TextView) findViewById(R.id.textView1);
		// 注意:无法在内部类定义的方法里面使用常量对象
		final Button btn1 = (Button) findViewById(R.id.button1);
		final Button btn2 = (Button) findViewById(R.id.button2);
		final Button btn3 = (Button) findViewById(R.id.button3);
		final Drawable drawable_red = res.getDrawable(R.color.RED);
		final Drawable drawable_green = res.getDrawable(R.color.GREEN);
		final Drawable drawable_blue = res.getDrawable(R.color.BLUE);

		btn1.setOnClickListener(new OnClickListener() {

			@Override
			public void onClick(View v) {
				// TODO Auto-generated method stub
				String text = "你点击了" + btn1.getText().toString();
				textView.setText(text);
				if (textView.getBackground() != drawable_red)
					textView.setBackgroundResource(R.color.RED);
			}
		});
		btn2.setOnClickListener(new OnClickListener() {

			@Override
			public void onClick(View v) {
				// TODO Auto-generated method stub
				String text = "你点击了" + btn2.getText().toString();
				textView.setText(text);
				if (textView.getBackground() != drawable_green)
					textView.setBackgroundResource(R.color.GREEN);
			}
		});
		btn3.setOnClickListener(new OnClickListener() {

			@Override
			public void onClick(View v) {
				// TODO Auto-generated method stub
				String text = "你点击了" + btn3.getText().toString();
				textView.setText(text);
				if (textView.getBackground() != drawable_blue)
					textView.setBackgroundResource(R.color.BLUE);
			}
		});
	}

	@Override
	public boolean onKeyDown(int keyCode, KeyEvent event) {
		// TODO Auto-generated method stub
		String text = "你按下了按键!";
		textView.setText(text);
		return super.onKeyDown(keyCode, event);
	}

	@Override
	public boolean onKeyUp(int keyCode, KeyEvent event) {
		// TODO Auto-generated method stub
		String text = "你松开了按键!";
		textView.setText(text);
		textView.setBackgroundColor(Color.WHITE);
		return super.onKeyUp(keyCode, event);
	}

}
2.activity_layout.xml
<?xml version="1.0" encoding="utf-8"?>
<RelativeLayout xmlns:android="http://schemas.android.com/apk/res/android"
    android:layout_width="match_parent"
    android:layout_height="match_parent"
    android:orientation="vertical" >

    <TextView
        android:id="@+id/textView1"
        android:layout_width="wrap_content"
        android:layout_height="wrap_content"
        android:layout_alignParentTop="true"
        android:layout_centerHorizontal="true"
        android:layout_marginTop="95dp"
        android:text="什么也没做……"
        android:background="@color/WHITE"/>

    <Button
        android:id="@+id/button2"
        android:layout_width="wrap_content"
        android:layout_height="wrap_content"
        android:layout_centerHorizontal="true"
        android:layout_centerVertical="true"
        android:text="按钮 2" />

    <Button
        android:id="@+id/button1"
        android:layout_width="wrap_content"
        android:layout_height="wrap_content"
        android:layout_centerVertical="true"
        android:layout_marginRight="14dp"
        android:layout_toLeftOf="@+id/button2"
        android:text="按钮 1" />

    <Button
        android:id="@+id/button3"
        android:layout_width="wrap_content"
        android:layout_height="wrap_content"
        android:layout_centerVertical="true"
        android:layout_marginLeft="14dp"
        android:layout_toRightOf="@+id/button2"
        android:text="按钮 3" />

</RelativeLayout>
3.color.xml
<?xml version="1.0" encoding="utf-8"?>
<resources>
    <!-- ARGB -->
    <color name="BLACK">#FF000000</color>
    <color name="DKGRAY">#FF444444</color>
    <color name="GRAY">#FF888888</color>
    <color name="LTGRAY">#FFCCCCCC</color>
    <color name="WHITE">#FFFFFFFF</color>
    <color name="RED">#FFFF0000</color>
    <color name="GREEN">#FF00FF00</color>
    <color name="BLUE">#FF0000FF</color>
    <color name="YELLOW">#FFFFFF00</color>
    <color name="CYAN">#FF00FFFF</color>
    <color name="MAGENTA">#FFFF00FF</color>
    <color name="TRANSPARENT">#00000000</color>
</resources>
4.AndroidManifest.xml
<manifest xmlns:android="http://schemas.android.com/apk/res/android"
    package="com.sweetlover.buttondemo"
    android:versionCode="1"
    android:versionName="1.0" >

    <uses-sdk
        android:minSdkVersion="8"
        android:targetSdkVersion="19" />

    <application
        android:allowBackup="true"
        android:icon="@drawable/ic_launcher"
        android:label="@string/app_name"
        android:theme="@style/AppTheme" >
        <activity android:name="com.sweetlover.buttondemo.MainActivity">
            <intent-filter>
                <category android:name="android.intent.category.LAUNCHER"/>
                <action android:name="android.intent.action.MAIN"/>
            </intent-filter>
        </activity>
    </application>

</manifest>

