增加Linux系统调用——通过Hack增加内核模块
上一篇文章《增加Linux系统调用——通过增加内核模块》中,介绍了如何通过动态加载内核模块的方式来增加Linux系统调用。但是这种方法有一个缺点是,必须预先在系统调用表中增加一个函数指针,如果新的系统调用和这个函数指针的形式不同,则需要重新编译内核,很不方便。这里将介绍另一种通过动态加载内核模块来增加Linux系统调用的方法。具体解释就不写了,仅贴上代码。
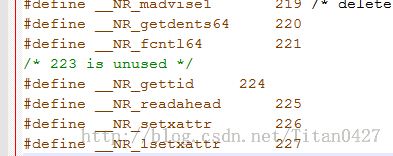
在linux-2.6.30.6/arch/x86/include/asm/unistd_32.h文件中发现,223号系统调用没有被使用,所以这里将新增的系统调用号设为223。
内核模块sys_call.c的代码如下:
/*	sys_call.c	*/
#include <linux/kernel.h>
#include <linux/module.h>
#include <linux/init.h>
#include <linux/sched.h>
#include <asm/unistd.h>

#define _NR_testsyscall 223

unsigned long *sys_call_table=NULL;
asmlinkage int (*orig_mkdir)(const char *,int);

unsigned int orign_cr0 = 0;

unsigned int clear_and_return_cr0(void)
{
	 unsigned int cr0 = 0;
	 unsigned int ret;
	 asm("movl %%cr0, %%eax":"=a"(cr0));
	 ret = cr0;
	 cr0 &= 0xfffeffff;
	 asm("movl %%eax, %%cr0"::"a"(cr0));
	 return ret;
}

void setback_cr0(unsigned int val) //读取val的值到eax寄存器,再将eax寄存器的值放入cr0中
{
	asm volatile("movl %%eax, %%cr0"::"a"(val));
}

struct _idt
{
   unsigned short offset_low,segment_sel;
   unsigned char reserved,flags;
   unsigned short offset_high;
};

unsigned long *getscTable()
{
       unsigned char idtr[6],*shell,*sort;
       struct _idt *idt;
       unsigned long system_call,sct;
       unsigned short offset_low,offset_high;
       char *p;
       int i;

       /* get the interrupt descriptor table */
       __asm__("sidt %0" : "=m" (idtr));

       /* get the address of system_call */
       idt=(struct _idt*)(*(unsigned long*)&idtr[2]+8*0x80);
       offset_low = idt->offset_low;
       offset_high = idt->offset_high;
       system_call=(offset_high<<16)|offset_low;

       shell=(char *)system_call;
       sort="\xff\x14\x85";

       /* get the address of sys_call_table */
       for(i=0;i<(100-2);i++)
            if(shell[i]==sort[0]&&shell[i+1]==sort[1]&&shell[i+2]==sort[2])
                     break;
       p=&shell[i];
       p+=3;
       sct=*(unsigned long*)p;

       return (unsigned long*)(sct);
}

asmlinkage int hacked_mkdir(const char * pathname, int mode){
       printk("PID %d called sys_mkdir !\n",current->pid);
       //return orig_mkdir(pathname,mode);
	   return 7;
}

static int __init find_init(void){
       sys_call_table = getscTable();
	   printk("sys_call_table:%p\n",sys_call_table);
	   orign_cr0 = clear_and_return_cr0();
       orig_mkdir=(int(*)(const char*,int))(sys_call_table[_NR_testsyscall]);
       sys_call_table[_NR_testsyscall]=(unsigned long)hacked_mkdir;
	   setback_cr0(orign_cr0);
       return 0;
}

static void __exit find_cleanup(void){
		orign_cr0 = clear_and_return_cr0();
		sys_call_table[_NR_testsyscall]=(unsigned long)orig_mkdir;
		setback_cr0(orign_cr0);
}


module_init(find_init);
module_exit(find_cleanup);

MODULE_LICENSE("Daul BSD/GPL");
MODULE_AUTHOR("B1305");
MODULE_DESCRIPTION("Kernel memory share module.");
其实中hacked_mkdir()函数为内核模块的功能函数。这里仅返回值7来做为测试。
make并insmod,编写测试代码test.c。
/*	test.c	*/
#include <sys/syscall.h>
#include <stdio.h>
#include <unistd.h>

int main(void)
{
	long pid = 0;
	pid = syscall(223,8);
	printf("%ld\n",pid);
	return 0;
}
执行test文件,会发现输出值7,说明实验成功。
附:强行卸载内核模块。
/*	rmmod_module.c		*/
#include<linux/kernel.h>
#include<linux/init.h>
#include<linux/module.h>
#include<linux/list.h>
#include<linux/cpumask.h>
#include<asm/local.h>
/*
	注意:以下代码不知道内核版本,但模块卸载不掉的原因大致是以下四种


	模块卸载代码,卸载出错情况分为四种
	asmlinkage long sys_delete_module(const char __user *name_user, unsigned int flags)
	{
		...
0.如果其它模块依赖该模块,则不删除
		if (!list_empty(&mod->modules_which_use_me)) {
			 Other modules depend on us: get rid of them first.
			ret = -EWOULDBLOCK;
			goto out;
		}
		...
1.如果模块不是LIVE状态,那么就无法进行下去了,得到的结果是busy
		if (mod->state != MODULE_STATE_LIVE) {
			...
			ret = -EBUSY;
			goto out;
		}
		...
2.如果引用计数不是0,则等待其为0
		if (!forced && module_refcount(mod) != 0) 2.
			wait_for_zero_refcount(mod);
		up(&module_mutex);
3.如果在这个里面阻塞了,那就无法返回了
		mod->exit();
		down(&module_mutex);
		free_module(mod);
		...
	}
*/

static char *module_name = NULL;

/*
	使用 module_param 给内核模块传递参数
	module_param (name,type,perm);
	name: 变量名
	type: 类型 		bool 		一个布尔型( true 或者 false)值(相关的变量应当是 int 类型).
					invbool		颠倒了值, 所以真值变成 false, 反之亦然.
					charp		一个字符指针值. 内存为用户提供的字串分配, 指针因此设置.
					int
					long
					short
					uint
					ulong
					ushort
	perm: 权限掩码,一般设0

	具体内容参考:
	http://blog.chinaunix.net/uid-10747583-id-2920908.html

*/

module_param(module_name,charp,0);

void force(void)
{
}


int __init rm_init(void)
{
        struct module *mod = NULL;
        int i;

		list_for_each_entry(mod,THIS_MODULE->list.prev,list)
		{
			if(strcmp(mod->name,module_name)==0)
			{
				printk(KERN_ALERT"name:%s state:%d refcnt:%lu ",mod->name,mod->state,module_refcount(mod));
				/*
				enum module_state
				{
					MODULE_STATE_LIVE; // 模块存活,0
					MODULE_STATE_COMING; // 正在加载模块,1
					MODULE_STATE_GOING; // 正在卸载模块,2
				};
				模块的三种状态
				为了卸载能进行下去,也就是避开情况1,将模块的状态改变为LIVE
				*/
				mod->state = MODULE_STATE_LIVE;
				/*
				防止原因3
				替换mod的exit。
				再次调用rmmod的时候会调用到sys_delete_module,
				最后会调用 exit回调函数,新的exit当然不会阻塞,成功返回,进而可以free掉module
				*/
				mod->exit = force;
				/*
				减小改变内核模块的引用计数
				防止情况2
				*/
				module_put(mod);
				printk(KERN_ALERT"name:%s state:%d refcnt:%lu ",mod->name,mod->state,module_refcount(mod));
			}
		}

        return 0;
}
void __exit rm_exit(void)
{
	    printk(KERN_ALERT"[rmmod mymod] name:%s state:%d\n",THIS_MODULE->name,THIS_MODULE->state);
}


module_init(rm_init);
module_exit(rm_exit);

MODULE_AUTHOR("B1305");
MODULE_LICENSE("GPL");
MODULE_DESCRIPTION("Rmmod");
可能会有资源泄露,因为要卸载的模块,里面的资源可能得不到释放。

