『HTML5梦幻之旅』-滚动播放的幻灯片效果
很久又没写博客了,一者是因为要上课,平时没有什么零碎的时间研究新东西;二者最近在开发一款塔防游戏,有整块的时间都拿去开发这个项目了。因此最近没有什么好的东西和大家分享。这周末看在游戏快完工的份上,抽出了半天的时间研究了一下html5幻灯片制作,效果还不错,展示如下:
首先是一张《真三国无双7》关云长的头像
其次是《真三国无双7》貂蝉的头像
切换时的效果
怎么样?效果还是很不错,对吧~
测试链接:http://www.cnblogs.com/yorhom/articles/html5_dream_trip_slideshowsample1.html
接下来就来讲一讲制作过程。
一,准备工作
首先,需要下载html5开源引擎lufylegend.js,它是完全免费+开源的,可以下载下来学习一下。
下载地址:http://lufylegend.com/lufylegend
API文档:http://lufylegend.com/lufylegend/api
二,设计原理
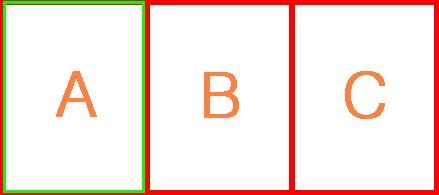
要搞清楚本次开发的原理,我们不妨先画一张示意图:
假设绿色方框内的区域为显示区域,那么,我们可以用到lufylegend中的mask的方法来将整个红色方框裁减为绿色方框的大小,这时,我们只能看到A区域,而B,C被遮盖住了。然后如果我们要显示B区域,我们可以直接将红框区域往左移动一格的距离,绿色区域不动,就能将B显示出来了,就像放映机一样。
但是如果一直播放下去,那么我们播放到C区域时,红色区域再往左移动,那就会显示为空白。解决措施是又移回A区域,但是出现的问题又在于红色区域如果要移到A处,那应该右移动才能到达,但是我们要的是红色区域往左移动,因此就不能直接移回。那该怎么办呢?我想的解决措施就是把最前面的那个区域移动到最后的那个区域的右边。如果是刚才那种情况,那就让A接到C后方,这时候,A变成了最后一个。这时红色区域又往左移动时,取到的就是B,然后将B移动到A后面。
当然,上面我们只提到了向左移动时的处理方式,其实向右也是一样的,只是取的是最后一个区域,然后把这个区域移动到第一个区域的前面罢了。
光说原理只能算是纸上谈兵,接下来就来看看代码。
三,代码讲解
首先我们为了方便起见,建立一个LSlideshowSample1类,因为以后万一要拓展别的幻灯片效果,所以就在这个类的名字后面写上了"Sample1”,名字只是一种代号,我们主要看代码,构造器如下:
function LSlideshowSample1(width,height,isLoop,loopData){
	var self = this;
	base(self,LSprite,[]);

	self._slideshowList = new Array();
	self._slideshowIndex = 0;
	self._currentIndex = self._slideshowIndex;

	self.rangeWidth = width;
	self.rangeHeight = height;
	self.isLoop = isLoop;

	self._toX = 0;

	self.nextChildList = new Array();
	self.previousChildList = new Array();

	self.borderLayer = new LSprite();
	self.borderLayer.graphics.drawRect(0,"",[0,0,width,height],true,"transparent");

	self.contentLayer = new LSprite();
	self.contentLayer.mask = self.borderLayer;
	self.addChild(self.contentLayer);

	if(self.isLoop == true){
		self.loopData = loopData;
		self.frameIndex = 0;
		self.maxFrame = Math.floor(self.loopData.delay*1000/LGlobal.speed);
		self.addEventListener(LEvent.ENTER_FRAME,self.loopPlay);
	}
}
这个类有4个参数,意思分别是:[显示宽度,显示高度,是否自动播放,自动播放方式],如果第三个参数填false,就可以不用添第4个参数。
接下来解释一下构造器中的代码:self._slideshowList原先是用来装每一帧的数据的,后来直接在LSprite的childList中取了,所以它没有什么用,直接忽略掉。
接下来看_slideshowIndex属性,这个属性很怪异,主要用于取出要显示的帧,以后慢慢解释。_currentIndex是用来表示显示位置的,如果往左移动,表示显示位置增加1格,往右移动,表示显示位置减少1格。
self.rangeWidth,self.rangeHeight,self.isLoop是将参数存放起来的属性,后面会用到的。
然后是self._toX,这个表示要移动到的位置,和_currentIndex联用,以后也会提到,到时候慢慢讲。接下来是self.nextChildList和self.previousChildList属性,这两个属性和_slideshowIndex联用,_slideshowIndex主要负责作为这两个数组的取值下标。接下来,我们初始化显示层:
self.borderLayer = new LSprite();
self.borderLayer.graphics.drawRect(0,"",[0,0,width,height],true,"transparent");

self.contentLayer = new LSprite();
self.contentLayer.mask = self.borderLayer;
self.addChild(self.contentLayer);
borderLayer等于上面我们讲解原理时的绿色区域,contentLayer代表红色区域。borderLayer要作为contentLayer的遮罩,因此在contentLayer中写道:
self.contentLayer.mask = self.borderLayer;然后进入判断是否自动播放:
if(self.isLoop == true){
	self.loopData = loopData;
	self.frameIndex = 0;
	self.maxFrame = Math.floor(self.loopData.delay*1000/LGlobal.speed);
	self.addEventListener(LEvent.ENTER_FRAME,self.loopPlay);
}
代码很简单,值得注意的是,我们实例化构造器时,第4个参数是一个json对象,如下格式:
{delay:每帧停留时间(单位s),order:出现时滚动的样式(向右或者向左)}
ok,构造器就讲完了,接下来看看设置帧的setFrame:
LSlideshowSample1.prototype.setFrame = function(o){
	var self = this;
	var cl = self.contentLayer.childList;
	o.x = self.contentLayer.childList.length * self.rangeWidth;
	o.y = 0;
	self.contentLayer.addChild(o);

	self._sortChild();
};
这个函数也有一个参数,是一个LDisplayObject对象。其中代码很简单,就是将加入的这一帧放到最后面。其中调用到一个_sortChild函数,这个函数十分重要,如下:
LSlideshowSample1.prototype._sortChild = function(){
	var self = this;

	self.nextChildList = new Array();
	self.previousChildList = new Array();
	var duplicate = new Array();
	for(var i=0; i<self.contentLayer.childList.length; i++){
		self.nextChildList.push(i);
		duplicate.push(i);
	}
	self.nextChildList = self.nextChildList.sort();
	duplicate.splice(0,1);
	var sortedList = duplicate.sort(function(a,b){
		return b - a;
	});
	self.previousChildList.push(0);
	for(var key in sortedList){
		self.previousChildList.push(sortedList[key]);
	}
};
我们能看到,主要是对self.nextChildList和self.previousChildList两个属性进行操作。也许有朋友不理解为什么要将他们排续,这个就设计到显示时的原理,还是用刚才那张图来讲解:

我们加入ABC后,A在contentLayer中的成员序号是0,B是1,C是2。在self.nextChildList我们将其加入先后顺序排列为[0,1,2],如果我们要显示B区域,那我们就要在contentLayer中取B对象,B对象的序号是1,因此我们要将显示位置往后调一格,于是self._slideshowIndex+=1; self._currentIndex += 1; 然后通过self._slideshowIndex的值来取出contentLayer的成员列表中对应的对象,正好self._slideshowIndex初始值是0,+1后变为1,取出的刚好是B对象。
但是,我们的红色区域如果往右移动时,按理说要显示最后的那一个对象C,C的序号是2,但是self._slideshowIndex - 1 != 2,因此我们要在新建self.previousChildList这个属性来确保往右移动时,能正常地取出对象的序号,因此我们对self.previousChildList里的成员排列做了特殊处理,将其变成了[0,2,1]。但是还是不对啊,self._slideshowIndex - 1 = -1时,应该显示C对象,但是C对象序号在self.previousChildList中对应的下标是1不是-1,怎么办呢?其实很简单,取的时候用self._slideshowIndex的绝对值就ok啦。
比如说我们F5一下界面,回到第一格的位置,然后,我们将红色部分向有移动一格,self._slideshowIndex -= 1; self._currentIndex -= 1; 现在按理说要显示C,这时我们在self.previousChildList中用self._slideshowIndex的绝对值取出要找的对象,self._slideshowIndex这时的值是-1,绝对值就是1,在[0,2,1]中对应的值正好是2,也就是C在contentLayer的成员列表中对应的序号,然后用这个序号取出contentLayer的成员列表中对应的成员,位置移动到响应的地方,然后将其通过LTweenLite缓动类缓缓地显示出来,达到想要的效果。
有了上面的介绍,我们就来看看显示部分的代码next()和previous():
LSlideshowSample1.prototype.next = function(){
	var self = this;

	self._currentIndex += 1;
	self._slideshowIndex += 1;

	if(self._slideshowIndex >= self.contentLayer.childList.length){
		self._slideshowIndex = 0;
	}

	if(self._slideshowIndex < 0){
		var obj = self.contentLayer.getChildAt(self.previousChildList[Math.abs(self._slideshowIndex)]);
	}else{
		var obj = self.contentLayer.getChildAt(self.nextChildList[Math.abs(self._slideshowIndex)]);
	}
	obj.x = self.rangeWidth*self._currentIndex;

	self._toX = -(self._currentIndex*self.rangeWidth);

	var tweenObj = LTweenLite.to(self.contentLayer,1,{
		x:self._toX
	});
};
LSlideshowSample1.prototype.previous = function(){
	var self = this;

	self._currentIndex -= 1;
	self._slideshowIndex -= 1;

	if(self._slideshowIndex < -(self.contentLayer.childList.length-1)){
		self._slideshowIndex = 0;
	}

	if(self._slideshowIndex < 0){
		var obj = self.contentLayer.getChildAt(self.previousChildList[Math.abs(self._slideshowIndex)]);
	}else{
		var obj = self.contentLayer.getChildAt(self.nextChildList[Math.abs(self._slideshowIndex)]);
	}
	obj.x = self.rangeWidth*self._currentIndex;

	self._toX = -(self._currentIndex*self.rangeWidth);

	var tweenObj = LTweenLite.to(self.contentLayer,1,{
		x:self._toX
	});
};
其中用到了LTweenLite,这个是Lufylegend中给的一个用于实现缓动的类,具体方法请移步API文档。
还有一个getChildAt,这是lufylegend中LSprite类的一个成员函数,用于取出参数值在LSprite成员列表中相应的对象。
这个类在设计时为了方便大家使用,还提供了showFrameAt函数,可以直接跳到播放某一帧:
LSlideshowSample1.prototype.showFrameAt = function(index,order){
	var self = this;
	if(self._slideshowIndex < 0){
		if(self.previousChildList[Math.abs(self._slideshowIndex)] == index)return;
	}else{
		if(self.nextChildList[Math.abs(self._slideshowIndex)] == index)return;
	}
	if(order == LSlideshow.LEFTWARD){
		self._currentIndex -= 1;
	}else if(order == LSlideshow.RIGHTWARD){
		self._currentIndex += 1;
	}else{
		self._currentIndex += 1;
	}
	self._slideshowIndex = index;

	var obj = self.contentLayer.getChildAt(index);
	obj.x = self.rangeWidth*self._currentIndex;

	self._toX = -(self._currentIndex*self.rangeWidth);

	var tweenObj = LTweenLite.to(self.contentLayer,1,{
		x:self._toX
	});
};
在上面也提到过自动播放这个功能,我们不妨温习一下调用自动播放的地方:
if(self.isLoop == true){
	self.loopData = loopData;
	self.frameIndex = 0;
	self.maxFrame = Math.floor(self.loopData.delay*1000/LGlobal.speed);
	self.addEventListener(LEvent.ENTER_FRAME,self.loopPlay);
}
在时间轴事件ENTER_FRAME中,我们调用了loopPlay函数,这个函数的代码如下:
LSlideshowSample1.prototype.loopPlay = function(self){
	if(self.contentLayer.childList.length == 0)return;
	if(self.frameIndex++ < self.maxFrame)return;
	self.frameIndex = 0;
	if(self.loopData.order == LSlideshow.RIGHTWARD){
		self.next();
	}else if(self.loopData.order == LSlideshow.LEFTWARD){
		self.previous();
	}else if(self.loopData.order == LSlideshow.RANDOM){
		var index = Math.floor(Math.random()*(self.contentLayer.childList.length-1));
		var order = Math.random() > 0.5 ? LSlideshow.LEFTWARD : LSlideshow.RIGHTWARD;
		self.showFrameAt(index,order);
	}
};
其中我们能看到了LSlideshow.RIGHTWAR,LSlideshow.LEFTWARD,LSlideshow.RANDOM这几种播放方式,它们分别是在LSlideshow静态类中得到定义的。如下:
var LSlideshow = function(){throw "LSlideshow cannot be instantiated";};
LSlideshow.type = "LSlideshow";
LSlideshow.RIGHTWARD = "rightward";
LSlideshow.LEFTWARD = "leftward";
LSlideshow.RANDOM = "random";
LSlideshow.RIGHTWAR代表向右滚动,LSlideshow.LEFTWARD代表向左滚动,LSlideshow.RANDOM代表随机滚动。
最后还加了一个getFrameIndex的函数,是用于取当前帧的序号的:
LSlideshowSample1.prototype.getFrameIndex = function(){
	var self = this;
	if(self._slideshowIndex < 0){
		var v = self.previousChildList[Math.abs(self._slideshowIndex)];
	}else{
		var v = self.nextChildList[Math.abs(self._slideshowIndex)];
	}
	return v;
};
ok,幻灯片类就搞定了~只要搞清楚原理,其实还是挺简单的,不是吗?接下来是使用举例:
<!DOCTYPE html>
<html>
<head>
<meta charset="UTF-8">
<title>幻灯片效果</title>
</head>
<body>
<div id="mylegend">loading......</div>
<script type="text/javascript" src="./lufylegend-1.8.0.min.js"></script>
<script type="text/javascript" src="./lufylegend.ui-0.2.0.min.js"></script>
<script type="text/javascript" src="./LSlideshow.js"></script>
<script type="text/javascript" src="./LSlideshowSample1.js"></script>
<script>
init(50,"mylegend",980,609,main);
var backLayer,slideshowObj;
var loadData = [
	{name:"caocao",path:"./images/cao_cao.jpg"},
	{name:"diaochan",path:"./images/diao_chan.jpg"},
	{name:"guanyu",path:"./images/guan_yu.jpg"},
	{name:"zhaoyun",path:"./images/zhao_yun.jpg"},
	{name:"sunshangxiang",path:"./images/sun_shang_xiang.jpg"}
];
var datalist = {};
function main(){
	LStage.setDebug(true);
	if(LGlobal.canTouch){
		LGlobal.stageScale = LStageScaleMode.EXACT_FIT;
		LSystem.screen(LStage.FULL_SCREEN);
	}

	var loadingLayer = new LoadingSample5();
	addChild(loadingLayer);

	LLoadManage.load(
		loadData,
		function(p){
			loadingLayer.setProgress(p);
		},
		function(r){
			datalist = r;
			removeChild(loadingLayer);
			initPage();
		}
	);
}
function initPage(){
	backLayer = new LSprite();
	addChild(backLayer);

	slideshowObj = new LSlideshowSample1(971,609,true,{delay:3,order:LSlideshow.RANDOM});
	backLayer.addChild(slideshowObj);

	slideshowObj.setFrame(new LBitmap(new LBitmapData(datalist["caocao"])));
	slideshowObj.setFrame(new LBitmap(new LBitmapData(datalist["diaochan"])));
	slideshowObj.setFrame(new LBitmap(new LBitmapData(datalist["guanyu"])));
	slideshowObj.setFrame(new LBitmap(new LBitmapData(datalist["zhaoyun"])));
	slideshowObj.setFrame(new LBitmap(new LBitmapData(datalist["sunshangxiang"])));

	addButton();
}
function addButton(){
	var next_btn = new LButtonSample2(">",20,"黑体","white");
	next_btn.backgroundCorl = "#008800";
	next_btn.x = LStage.width-next_btn.getWidth()-40;
	next_btn.y = (LStage.height-next_btn.getHeight())*0.5;
	backLayer.addChild(next_btn);
	next_btn.addEventListener(LMouseEvent.MOUSE_DOWN,function(){
		slideshowObj.next();
	});

	var last_btn = new LButtonSample2("<",20,"黑体","white");
	last_btn.backgroundCorl = "#008800";
	last_btn.x = 20;
	last_btn.y = (LStage.height-last_btn.getHeight())*0.5;
	backLayer.addChild(last_btn);
	last_btn.addEventListener(LMouseEvent.MOUSE_DOWN,function(){
		slideshowObj.previous();
	});

	for(var i=0; i<5; i++){
		var page_btn = new LButtonSample2(i+1,20,"黑体","white");
		page_btn.backgroundCorl = "#008800";
		page_btn.x = 50*i+600;
		page_btn.y = LStage.height-page_btn.getHeight()-40;
		backLayer.addChild(page_btn);
		page_btn.addEventListener(LMouseEvent.MOUSE_DOWN,function(event,o){
			var textObj = o.getChildAt(1).getChildAt(0);
			var toIndex = parseInt(textObj.text)-1;
			slideshowObj.showFrameAt(toIndex,LSlideshow.LEFTWARD);
		});
	}
}
function ondown(event){
	if(event.offsetX <= 100){
		slideshowObj.previous();
	}else if(event.offsetX >= LStage.width-100){
		slideshowObj.next();
	}
}
</script>
</body>
</html>
运行代码后,就得到了本文最上面展示的效果。
四,源代码
上面讲解得有些乱,大家可以把源代码下载下来看看。
最后,奉上源代码:http://files.cnblogs.com/yorhom/Slideshow_source.zip
本章就到此为止,以上就是本篇所有内容,欢迎大家交流。
----------------------------------------------------------------
欢迎大家转载我的文章。
转载请注明:转自Yorhom's Game Box
http://blog.csdn.net/yorhomwang
欢迎继续关注我的博客

