【BLE】CC2541之添加特征值
一、简介
本篇介绍从机如何添加一个可读、可写、可通知的特征值char6。
(为了方便copy代码,就不大量使用截图了)
二、特征值有什么用?
它是一个变量或者一个数组,主从机之间传输应用层数据,都是通过特征值。
比如添加一个char6[5],它的值初始化为1、2、3、4、5,
当char6具有读、写属性时,主机可以通过GATT_ReadCharValue和GATT_WriteCharValue读写从机的这个char6。
当char6具有notify通知属性时,从机可以将char6的值通知给主机。(通知的两种方式可参见本博客的《CC2541的notify通知》)
三、版权声明
博主:甜甜的大香瓜
声明:喝水不忘挖井人,转载请注明出处。
原文地址:http://blog.csdn.net/feilusia
联系方式:[email protected]
技术交流QQ群:127442605
四、添加步骤
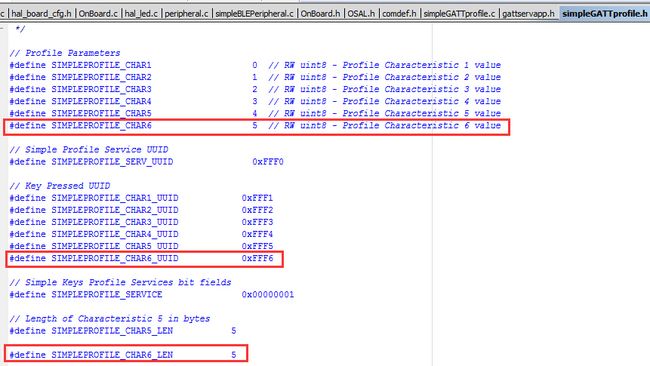
1、修改simpleGATTprofile.h 的宏定义
2、添加char6的UUID
将16位的UUID拆成2个字节放到数组里。
3、添加char6的设置属性
// Simple Profile Characteristic 6 Properties
static uint8 simpleProfileChar6Props = GATT_PROP_READ | GATT_PROP_WRITE | GATT_PROP_NOTIFY;

// Characteristic 6 Value
static uint8 simpleProfileChar6[SIMPLEPROFILE_CHAR6_LEN] = {0};

// Simple Profile Characteristic 6 Configuration Each client has its own
// instantiation of the Client Characteristic Configuration. Reads of the
// Client Characteristic Configuration only shows the configuration for
// that client and writes only affect the configuration of that client.
static gattCharCfg_t simpleProfileChar6Config[GATT_MAX_NUM_CONN];

// Simple Profile Characteristic 6 User Description
static uint8 simpleProfileChar6UserDesp[17] = "Characteristic 6\0";
由于属性包含GATT_PROP_NOTIFY方式,所以必须要有个通知开关simpleProfileChar6Config。
4、属性表修改
1)修改属性表的大小
在simpleGATTprofile.c中将属性表大小由17改成21(增加上面定义的char6的4个属性变量):
#define SERVAPP_NUM_ATTR_SUPPORTED 21
      // Characteristic 6 Declaration
      {
        { ATT_BT_UUID_SIZE, characterUUID },
        GATT_PERMIT_READ,
        0,
        &simpleProfileChar6Props
      },


      // Characteristic Value 6
      {
        { ATT_BT_UUID_SIZE, simpleProfilechar6UUID },
        GATT_PERMIT_READ | GATT_PERMIT_WRITE,
        0,
        simpleProfileChar6
      },


      // Characteristic 6 configuration
      {
        { ATT_BT_UUID_SIZE, clientCharCfgUUID },
        GATT_PERMIT_READ | GATT_PERMIT_WRITE,
        0,
        (uint8 *)simpleProfileChar6Config
      },

      // Characteristic 6 User Description
      {
        { ATT_BT_UUID_SIZE, charUserDescUUID },
        GATT_PERMIT_READ,
        0,
        simpleProfileChar6UserDesp
      },
此处注意两点:
第一点,
读、写属性的只有3个变量,而含有notify属性的特征值会多一个开关config,所以是4个变量。
第二点,
大多数新手搞不清楚特征值属性的“GATT_PROP_READ”与属性表的“GATT_PERMIT_READ”的区别:
打个比方说明,
属性表是一列火车,它有SERVAPP_NUM_ATTR_SUPPORTED这么多节车厢,GATT_PERMIT_READ是每节车厢的钥匙。
此时第18节~21节车厢装的是宝箱char6,GATT_PROP_READ是宝箱char6的钥匙。
虽然两把都是钥匙,但是作用的对象不一样。
实际上GATT_PERMIT_READ是针对属性表使用的,而GATT_PROP_READ是针对特征值使用的。
5、修改参数函数
1)在SimpleProfile_SetParameter中添加
    case SIMPLEPROFILE_CHAR6:
      if ( len == SIMPLEPROFILE_CHAR6_LEN )
      {
        VOID osal_memcpy( simpleProfileChar6, value, SIMPLEPROFILE_CHAR6_LEN );


        // See if Notification has been enabled
        GATTServApp_ProcessCharCfg( simpleProfileChar6Config, simpleProfileChar6, FALSE,
                                    simpleProfileAttrTbl, GATT_NUM_ATTRS( simpleProfileAttrTbl ),
                                    INVALID_TASK_ID );
      }
      else
      {
        ret = bleInvalidRange;
      }
      break;
从机可通过此函数写数值到char6中。
每次写char6的值时都会通过GATTServApp_ProcessCharCfg函数把数据notify出来。
PS:此函数使用请参看博文《CC2541的notify通知》。
2)在SimpleProfile_GetParameter中添加
    case SIMPLEPROFILE_CHAR6:
      VOID osal_memcpy( value, simpleProfileChar6, SIMPLEPROFILE_CHAR6_LEN );
      break;
从机可通过此函数读出char6的值。
6、修改读写特征值函数
1)在simpleProfile_ReadAttrCB中添加
      case SIMPLEPROFILE_CHAR6_UUID:
        *pLen = SIMPLEPROFILE_CHAR6_LEN;
        VOID osal_memcpy( pValue, pAttr->pValue, SIMPLEPROFILE_CHAR6_LEN );
        break;
特征值被主机读取时,从机会自动调用此回调函数。
        case SIMPLEPROFILE_CHAR6_UUID:

        //Validate the value
        // Make sure it's not a blob oper
        if ( offset == 0 )
        {
          if ( len != SIMPLEPROFILE_CHAR6_LEN )
          {
            status = ATT_ERR_INVALID_VALUE_SIZE;
          }
        }
        else
        {
          status = ATT_ERR_ATTR_NOT_LONG;
        }

        //Write the value
        if ( status == SUCCESS )
        {
          VOID osal_memcpy( pAttr->pValue, pValue, SIMPLEPROFILE_CHAR6_LEN );
          notifyApp = SIMPLEPROFILE_CHAR6;
        }

        break;
特征值被主机写入时,从机会自动调用此回调函数。
3)在simpleProfile_WriteAttrCB中修改
      case GATT_CLIENT_CHAR_CFG_UUID:
        if ( pAttr->handle == simpleProfileAttrTbl[ATTRTBL_CHAR4_CCC_IDX].handle )//CHAR4 NOTIFY
        {
          // BloodPressure Notifications
          status = GATTServApp_ProcessCCCWriteReq( connHandle, pAttr, pValue, len,
                                                   offset, GATT_CLIENT_CFG_NOTIFY );
        }
        else if ( pAttr->handle == simpleProfileAttrTbl[ATTRTBL_CHAR6_CCC_IDX].handle )//CHAR6 NOTIFY
        {
          // BloodPressure Notifications
          status = GATTServApp_ProcessCCCWriteReq( connHandle, pAttr, pValue, len,
                                                   offset, GATT_CLIENT_CFG_NOTIFY );
        }

        else
        {
          status = ATT_ERR_INVALID_HANDLE;
        }

        break;
再添加两个CCC的宏
#define ATTRTBL_CHAR4_CCC_IDX               12
#define ATTRTBL_CHAR6_CCC_IDX               19
7、修改回调函数simpleProfileChangeCB
static void simpleProfileChangeCB( uint8 paramID )
{
  uint8 newValue;
  uint8 Char6_Value[5];

  switch( paramID )
  {
    case SIMPLEPROFILE_CHAR1:
      SimpleProfile_GetParameter( SIMPLEPROFILE_CHAR1, &newValue );

      #if (defined HAL_LCD) && (HAL_LCD == TRUE)
        HalLcdWriteStringValue( "Char 1:", (uint16)(newValue), 10,  HAL_LCD_LINE_3 );
      #endif // (defined HAL_LCD) && (HAL_LCD == TRUE)

      break;

    case SIMPLEPROFILE_CHAR3:
      SimpleProfile_GetParameter( SIMPLEPROFILE_CHAR3, &newValue );

      #if (defined HAL_LCD) && (HAL_LCD == TRUE)
        HalLcdWriteStringValue( "Char 3:", (uint16)(newValue), 10,  HAL_LCD_LINE_3 );
      #endif // (defined HAL_LCD) && (HAL_LCD == TRUE)

      break;

    case SIMPLEPROFILE_CHAR6:
      SimpleProfile_GetParameter( SIMPLEPROFILE_CHAR6, &Char6_Value );

      #if (defined HAL_LCD) && (HAL_LCD == TRUE)
        HalLcdWriteStringValue( "Char 6:", (uint16)(Char6_Value), 10,  HAL_LCD_LINE_3 );
      #endif // (defined HAL_LCD) && (HAL_LCD == TRUE)

      break;

    default:
      // should not reach here!
      break;
  }
}
实际上在特征值被主机修改后,先调用了simpleProfile_WriteAttrCB,并且在函数末尾再调用了simpleProfileChangeCB。
simpleProfileChangeCB函数才是真正做“特征值改变后的处理”的地方,simpleProfile_WriteAttrCB只是作为中介。
在此处我只做了个简单处理,一旦char6的值改变了,则把char6的值显示在LCD上(前提当然是LCD能用)。
8、修改周期函数performPeriodicTask
static void performPeriodicTask( void )
{
  uint8 valueToCopy;
  uint8 stat;
  uint8 char6_value[SIMPLEPROFILE_CHAR6_LEN]={0};

  SimpleProfile_GetParameter( SIMPLEPROFILE_CHAR6, char6_value);                               //读出char6的值
  SimpleProfile_SetParameter( SIMPLEPROFILE_CHAR6, SIMPLEPROFILE_CHAR6_LEN, char6_value);      //将char6的值notify给主机

  // Call to retrieve the value of the third characteristic in the profile
  stat = SimpleProfile_GetParameter( SIMPLEPROFILE_CHAR3, &valueToCopy);

  if( stat == SUCCESS )
  {
    /*
     * Call to set that value of the fourth characteristic in the profile. Note
     * that if notifications of the fourth characteristic have been enabled by
     * a GATT client device, then a notification will be sent every time this
     * function is called.
     */
    SimpleProfile_SetParameter( SIMPLEPROFILE_CHAR4, sizeof(uint8), &valueToCopy);
  }
}
每5秒钟就会把char6的值通知一次。(需要BTOOL中打开通知开关)
9、修改应用层初始化SimpleBLEPeripheral_Init
  // Setup the SimpleProfile Characteristic Values
  {
    uint8 charValue1 = 1;
    uint8 charValue2 = 2;
    uint8 charValue3 = 3;
    uint8 charValue4 = 4;
    uint8 charValue5[SIMPLEPROFILE_CHAR5_LEN] = { 1, 2, 3, 4, 5 };
    uint8 charValue6[SIMPLEPROFILE_CHAR6_LEN] = { 1, 2, 3, 4, 5 };
    SimpleProfile_SetParameter( SIMPLEPROFILE_CHAR1, sizeof ( uint8 ), &charValue1 );
    SimpleProfile_SetParameter( SIMPLEPROFILE_CHAR2, sizeof ( uint8 ), &charValue2 );
    SimpleProfile_SetParameter( SIMPLEPROFILE_CHAR3, sizeof ( uint8 ), &charValue3 );
    SimpleProfile_SetParameter( SIMPLEPROFILE_CHAR4, sizeof ( uint8 ), &charValue4 );
    SimpleProfile_SetParameter( SIMPLEPROFILE_CHAR5, SIMPLEPROFILE_CHAR5_LEN, charValue5 );
    SimpleProfile_SetParameter( SIMPLEPROFILE_CHAR6, SIMPLEPROFILE_CHAR6_LEN, charValue6 );
  }
特征值在定义时初始化的值都是0,在此处才是正式初始化数值。
10、修改SimpleProfile_AddService(有notify属性才需要此步骤)
bStatus_t SimpleProfile_AddService( uint32 services )
{
  uint8 status = SUCCESS;

  // Initialize Client Characteristic Configuration attributes
  GATTServApp_InitCharCfg( INVALID_CONNHANDLE, simpleProfileChar4Config );
  GATTServApp_InitCharCfg( INVALID_CONNHANDLE, simpleProfileChar6Config );

  // Register with Link DB to receive link status change callback
  VOID linkDB_Register( simpleProfile_HandleConnStatusCB );

  if ( services & SIMPLEPROFILE_SERVICE )
  {
    // Register GATT attribute list and CBs with GATT Server App
    status = GATTServApp_RegisterService( simpleProfileAttrTbl,
                                          GATT_NUM_ATTRS( simpleProfileAttrTbl ),
                                          &simpleProfileCBs );
  }

  return ( status );
}
初始化特征值配置时用的是INVALID_CONNHANDLE,此时任何连接的主机都不能开关从机的通知功能。(此处待定!!!!)
(后续验证:发现此处不修改也可以开从机的通知功能。)
10、修改simpleProfile_HandleConnStatusCB(有notify属性才需要此步骤)
static void simpleProfile_HandleConnStatusCB( uint16 connHandle, uint8 changeType )
{
  // Make sure this is not loopback connection
  if ( connHandle != LOOPBACK_CONNHANDLE )
  {
    // Reset Client Char Config if connection has dropped
    if ( ( changeType == LINKDB_STATUS_UPDATE_REMOVED )      ||
         ( ( changeType == LINKDB_STATUS_UPDATE_STATEFLAGS ) &&
           ( !linkDB_Up( connHandle ) ) ) )
    {
      GATTServApp_InitCharCfg( connHandle, simpleProfileChar4Config );
      GATTServApp_InitCharCfg( connHandle, simpleProfileChar6Config );
    }
  }
}
当连接改变时,重新将新的连接句柄和通知开关对应起来,此时只有当前连接机子才能开关通知。(此处待定!!!!)
(后续验证:发现此处不修改也可以开从机的通知功能。)
此时就可以用BTOOL、手机进行测试读、写、通知功能了。

