NDN路由--OSPFN安装与配置
现在的IP网络的问题已经暴露的很多了,各种改进的网络架构与设想非常多,但其中以基于内容为中心的网络发展最为迅速,其中,NDN的架构最为完整,代码也比较成熟。OSPFN是基于CCNX的,所以之前要安装CCNX,简单的./configure make make install 就可以安装完成,自带很多例子可以跑跑。接下来安装OSPFN,由于还要配置,所以把过程记录在下面。
1.OSPFN安装
最开始需要安装一些必备软件:
sudo apt-get install flex
sudo apt-get install bison
sudo apt-get install m4
sudo apt-get install libssl-dev
sudo apt-get install libexpat-dev
sudo apt-get install libpcap-dev
sudo apt-get install ant
sudo apt-get install openjdk-7-jdk
sudo apt-get install gawk
sudo apt-get install dia
sudo apt-get install texinfo
首先新建一个用户,并在/usr/local/etc下建两个目录:
$ sudo useradd quagga
$ cd /usr/local/etc/
$ sudo mkdir quagga
$ sudo chown quagga:quagga quagga
$ sudo chmod 775 quagga
$ sudo mkdir quagga-state
$ sudo chown quagga:quagga quagga-state
$ sudo chmod 775 quagga-state
之后,运行./configure,这里要注意,ubuntu12.04下,/var/run路径每次重启里面新建的quagga-state文件夹会消失,费了好长时间才发现这个问题,修改的./configure如下:
./configure --enable-opaque-lsa --disable-ipv6 --disable-ripd --disable-ripngd --disable-ospf6d --disable-bgpd --disable-bgp-announce --sysconfdir=/usr/local/etc/quagga --localstatedir=/usr/local/etc/quagga-state
然后,执行make 和install:
make
make install
至此,OSPFN安装完毕。
2.OSPFN配置
首先要得到GRE隧道的IP,由于没有加入到他们的testbed中,所以自己设置一个就好了。
Public IP: 141.225.11.150                    Public IP:150.135.82.77
________________________  10.0.1.10  10.0.1.9 ___________________
|netlogic.cs.memphis.edu |___________________|hobo.cs.arizona.edu|
------------------------                      -------------------
上图是官网配的图,NDN testbed使用的是10.x.x.x的私有IP地址,因为没有加入进去,所以就还使用它们就好了。Public IP就是本机的IP,由于本地路由器,IP也是10.x.x.x的。。。但还是可以区分出来的~
sudo modprobe ip_gre
之后,在/etc/network/interfaces文件中添加如下:
auto lo
iface lo inet loopback

auto netlogic
iface netlogic inet static
	address 10.0.1.9
	netmask 255.255.255.0
	broadcast 10.0.1.255
	up ifconfig netlogic multicast
	pre-up iptunnel add netlogic mode gre local 10.0.0.104  remote 10.0.0.108 ttl 255
	pointopoint 10.0.1.10
	post-down iptunnel del netlogic
这里,本机IP是10.0.0.104,另一台机子IP是10.0.0.108,相应的两个隧道IP是10.0.1.9和10.0.1.10。现在ifconfig一下:
lo        Link encap:本地环回
          inet 地址:127.0.0.1  掩码:255.0.0.0
          inet6 地址: ::1/128 Scope:Host
          UP LOOPBACK RUNNING  MTU:16436  跃点数:1
          接收数据包:134812 错误:0 丢弃:0 过载:0 帧数:0
          发送数据包:134812 错误:0 丢弃:0 过载:0 载波:0
          碰撞:0 发送队列长度:0
          接收字节:7722612 (7.7 MB)  发送字节:7722612 (7.7 MB)

netlogic  Link encap:未指定  硬件地址 C0-A8-00-66-30-30-30-30-00-00-00-00-00-00-00-00
          inet 地址:10.0.0.10  点对点:10.0.0.9  掩码:255.255.255.255
          inet6 地址: fe80::5efe:c0a8:66/64 Scope:Link
          UP POINTOPOINT RUNNING NOARP MULTICAST  MTU:1476  跃点数:1
          接收数据包:0 错误:0 丢弃:0 过载:0 帧数:0
          发送数据包:0 错误:20 丢弃:0 过载:0 载波:20
          碰撞:0 发送队列长度:0
          接收字节:0 (0.0 B)  发送字节:0 (0.0 B)

wlan0     Link encap:以太网  硬件地址 00:1f:3a:28:df:41
          inet 地址:10.0.0.104  广播:10.0.0.255  掩码:255.255.255.0
          inet6 地址: fe80::21f:3aff:fe28:df41/64 Scope:Link
          UP BROADCAST RUNNING MULTICAST  MTU:1500  跃点数:1
          接收数据包:715225 错误:0 丢弃:0 过载:0 帧数:0
          发送数据包:474374 错误:0 丢弃:0 过载:0 载波:0
          碰撞:0 发送队列长度:1000
          接收字节:785890455 (785.8 MB)  发送字节:60896981 (60.8 MB)
发现有了netlogic。然后配置ospfd.conf文件。内容如下:
hostname netlogic_kl
password pwd
enable password pwd
log file /var/log/quagga/ospfd.log
!
!
!
interface netlogic
 description link to netlogic_zero
!
access-list ospfn permit 10.0.0.0/8
access-list ospfn deny any
!
router ospf
 ospf router-id 10.0.0.104
 redistribute connected
 distribute-list ospfn out connected
 network 10.0.1.8/30 area 0.0.0.0
 capability opaque
!
line vty
!
!end of configuration file hereog stdout
这个基本上就是官方文档的例子,只是把IP给改成相应的IP。
最后就是最关键的ospfn.conf文件。这个官网的说明文档中没有详细说明,我就把它放在/usr/local/etc/quagga目录下,经测试完全可用。目前OSPFN支持两个命令:ccnname和logdir。说明如下:
1. ccnname name_prefix op_id

name_prefix : a name prefix, in URI format, to be advertised by this router.
op_id : the desired ID for this name LSA.  The op_id must be unique among
the name prefixes advertised by the same router.

2. logdir dir

dir : directory to write log files to
我的ospfn.conf内容如下:
ccnname /ndn/ustc.edu/1318/ 1
ccnname /ndn/ustc.edu/1316/ 2
logdir /usr/local/etc/
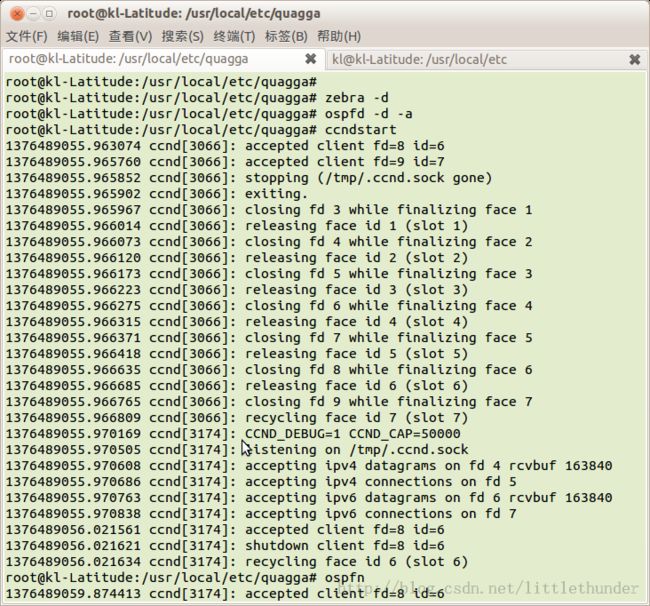
最后,开启应用:
$ sudo zebra -d

$ sudo ospfd -d -a

$ ccndstart

$ ospfn
截图如下:
在/usr/local/etc里生成了log,log内容如下:
20130814220419:Connecting to OSPF daemon ............
20130814220419:Connection to OSPF established.
20130814220419:ccnname /ndn/ustc.edu/1318/ 1
20130814220419: OpaqueData:19/ndn/ustc.edu/1318/|||
20130814220419:Originating/updating LSA with counter=0...
20130814220419:done, return code is -7
20130814220419:ccnname /ndn/ustc.edu/1316/ 2
20130814220419: OpaqueData:19/ndn/ustc.edu/1316/|||
20130814220419:Originating/updating LSA with counter=1...
20130814220419:done, return code is -7
20130814220419:logdir /usr/local/etc/
20130814220419:lsa_read called
20130814220419:lsa_update_callback:
20130814220419:ifaddr: 0.0.0.0
20130814220419:area: 0.0.0.0
20130814220419:is_self_origin: 1
20130814220419:  LSA Header
20130814220419:    LS age 0
20130814220419:    Options 2 (*|-|-|-|-|-|E|*)
20130814220419:    LS type 1 (router-LSA)
20130814220419:    Link State ID 10.0.0.104
20130814220419:    Advertising Router 10.0.0.104
20130814220419:    LS sequence number 0x80000001
20130814220419:    LS checksum 0xd577
20130814220419:    length 36
20130814220419:  Router-LSA
20130814220419:    # links 1
20130814220419:    Link ID 10.0.1.10
20130814220419:    Link Data 255.255.255.255
20130814220419:    Type 3
20130814220419:    TOS 0
20130814220419:    metric 10
20130814220419:lsa_read called
20130814220419:lsa_update_callback:
20130814220419:ifaddr: 0.0.0.0
20130814220419:area: 0.0.0.0
20130814220419:is_self_origin: 1
20130814220419:  LSA Header
20130814220419:    LS age 0
20130814220419:    Options 2 (*|-|-|-|-|-|E|*)
20130814220419:    LS type 5 (AS-external-LSA)
20130814220419:    Link State ID 10.0.0.0
20130814220419:    Advertising Router 10.0.0.104
20130814220419:    LS sequence number 0x80000002
20130814220419:    LS checksum 0x5ae6
20130814220419:    length 36
20130814220419:lsa_read called
20130814220419:lsa_update_callback:
20130814220419:ifaddr: 0.0.0.0
20130814220419:area: 0.0.0.0
20130814220419:is_self_origin: 1
20130814220419:  LSA Header
20130814220419:    LS age 0
20130814220419:    Options 2 (*|-|-|-|-|-|E|*)
20130814220419:    LS type 5 (AS-external-LSA)
20130814220419:    Link State ID 10.0.1.10
20130814220419:    Advertising Router 10.0.0.104
20130814220419:    LS sequence number 0x80000002
20130814220419:    LS checksum 0xea4b
20130814220419:    length 36
转载请注明:转自:http://blog.csdn.net/littlethunder/article/details/9971469
