走近SSH之Hibernate--Hibernate创建数据表并向表中写入数据(Hibernate+MySql)
上篇博客《 走近SSH之Hibernate--Hibernate环境搭建(MyEclipse+MySql)》我们已为Hibernate开发做好了准备,接下来我们简单的用Hibernate+MySql做个小例子,来看下Hibernate的工作流程是怎样的。
实例说明:
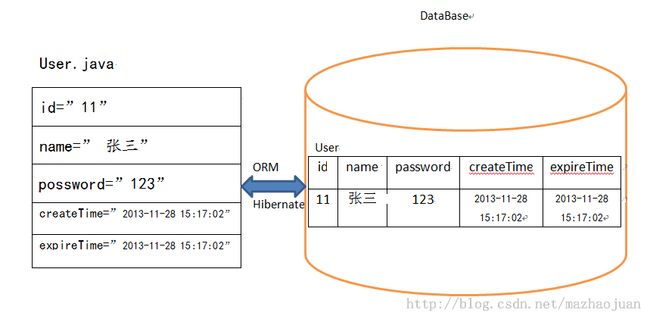
Hibernate和MySql相结合,Hibernate利用SchemaExport创建数据表,并利用类文件向创建的数据表中添加数据。
注:对象与表对应;属性与列对应!
实例过程:
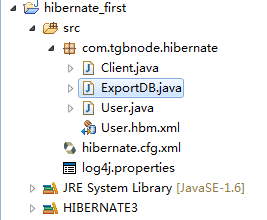
先看一下hibernate项目目录情况
1.创建用户类:User.java
在src下创建包com.tgbnode.hibernate,在包中创建一个User类,主要是用户的属性:id,用户名,密码,创建时间,失效时间。
package com.tgbnode.hibernate;

import java.util.Date;

public class User {
	//id
	private String id;
	//用户名
	private String name;
	//密码
	private String password;
	//创建时间
	private Date createTime;
	//失效时间
	private Date expireTime;

	public String getId() {
		return id;
	}

	public void setId(String id) {
		this.id = id;
	}

	public String getName() {
		return name;
	}

	public void setName(String name) {
		this.name = name;
	}

	public String getPassword() {
		return password;
	}

	public void setPassword(String password) {
		this.password = password;
	}

	public Date getCreateTime() {
		return createTime;
	}

	public void setCreateTime(Date createTime) {
		this.createTime = createTime;
	}

	public Date getExpireTime() {
		return expireTime;
	}

	public void setExpireTime(Date expireTime) {
		this.expireTime = expireTime;
	}
}
2.创建User.hbm.xml文件
利用此xml文件,使User.java生成相应的数据库表及字段。
<?xml version="1.0"?>
<!DOCTYPE hibernate-mapping PUBLIC
	"-//Hibernate/Hibernate Mapping DTD 3.0//EN"
	"http://hibernate.sourceforge.net/hibernate-mapping-3.0.dtd">
<hibernate-mapping>
	<!--默认把类的名称映射为相同名字的表名,可使用table属性修改表名-->
	<class name="com.tgbnode.hibernate.User">
		<!-- 主键采用uuid生成 -->
		<id name="id">
			<generator class="uuid"/>
		</id>
		<!--默认把类的变量映射为相同名字的表字段,可使用column属性修改表字段-->
		<property name="name"/>
		<property name="password"/>
		<property name="createTime"/>
		<property name="expireTime"/>
	</class>
</hibernate-mapping>
3.在src下创建hibernate.cfg.xml文件
此配置文件说明了采用的数据库及映射文件。
<!DOCTYPE hibernate-configuration PUBLIC
	"-//Hibernate/Hibernate Configuration DTD 3.0//EN"
	"http://hibernate.sourceforge.net/hibernate-configuration-3.0.dtd">

<hibernate-configuration>
	<session-factory>
		<!-- 数据库驱动 -->
		<property name="hibernate.connection.driver_class">com.mysql.jdbc.Driver</property>
		<!-- 指定使用数据库为hibernate_first,注意这里的端口号3306要与安装MySql时设置的端口号相同 -->
		<property name="hibernate.connection.url">jdbc:mysql://localhost:3306/hibernate_first</property>
		<!-- 连接数据库的用户名 -->
		<property name="hibernate.connection.username">root</property>
		<!-- 连接MySql使用的密码 -->
		<property name="hibernate.connection.password">123456</property>
		<!-- 选择使用的方言 -->
		<property name="hibernate.dialect">org.hibernate.dialect.MySQLDialect</property>
		<!-- 设置是否显示生成sql语句 -->
		<property name="hibernate.show_sql">true</property>

		<!--映射文件-->
		<mapping resource="com/tgbnode/hibernate/User.hbm.xml"/>
	</session-factory>
</hibernate-configuration>
4.建立ExportDB类
通过运行此类创建相应的数据表。
package com.tgbnode.hibernate;

import org.hibernate.cfg.Configuration;
import org.hibernate.tool.hbm2ddl.SchemaExport;


/**
 * 将hbm生成ddl
 * @author azj
 *
 */
public class ExportDB {

	public static void main(String[] args) {

		//默认读取hibernate.cfg.xml文件
		Configuration cfg = new Configuration().configure();
	    //SchemaExport工具类接收配置对象(Configuration)导成DDL,把对象类导成表
		SchemaExport export = new SchemaExport(cfg);
		//打印到控制台,并输入到数据库
		export.create(true, true);
	}
}
5.添加log4j.propertes文件
提示给开发者相应的错误信息,使开发变得简单!
### direct log messages to stdout ###
log4j.appender.stdout=org.apache.log4j.ConsoleAppender
log4j.appender.stdout.Target=System.out
log4j.appender.stdout.layout=org.apache.log4j.PatternLayout
log4j.appender.stdout.layout.ConversionPattern=%d{ABSOLUTE} %5p %c{1}:%L - %m%n

### direct messages to file hibernate.log ###
#log4j.appender.file=org.apache.log4j.FileAppender
#log4j.appender.file.File=hibernate.log
#log4j.appender.file.layout=org.apache.log4j.PatternLayout
#log4j.appender.file.layout.ConversionPattern=%d{ABSOLUTE} %5p %c{1}:%L - %m%n

### set log levels - for more verbose logging change 'info' to 'debug' ###

log4j.rootLogger=warn, stdout
6.创建类Client类
通过运行此类,向创建好的用户表中添加数据信息。
package com.tgbnode.hibernate;
import java.util.Date;

import org.hibernate.Session;
import org.hibernate.SessionFactory;
import org.hibernate.cfg.Configuration;

public class Client {
   public static void main(String[] args) {

		//读取hibernate.cfg.xml文件
		Configuration cfg = new Configuration().configure();

		//建立SessionFactory
		SessionFactory factory = cfg.buildSessionFactory();

		//取得session
		Session session = null;
		try {
			session = factory.openSession();
			//开启事务
			session.beginTransaction();
			User user = new User();
			user.setName("张三");
			user.setPassword("123");
			user.setCreateTime(new Date());
			user.setExpireTime(new Date());

			//保存User对象
			session.save(user);

			//提交事务
			session.getTransaction().commit();
		}catch(Exception e) {
			e.printStackTrace();
			//回滚事务
			session.getTransaction().rollback();
		}finally {
			if (session != null) {
				if (session.isOpen()) {
					//关闭session
					session.close();
				}
			}
		}
	}
}
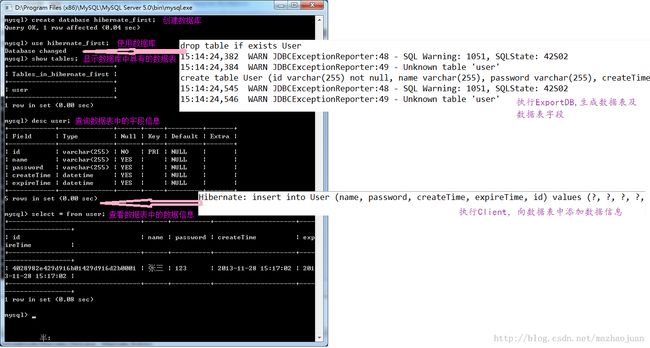
下面我们来测试一下,运行MySql的dos文件:
至此Hibernate第一个实例就做完了,不知道您对Hibernate是否有了一定的了解了呢,知识就是在反复的折腾中弄懂的,至今我对Hibernate也只有皮毛的理解,还需要通过项目来达到熟练,继而精通!不管如何只要相信就会成功!


