【android基础学习之三】——基础控件Toast,EditText,RadioGroup,RadioButton
声明:学习的书籍《Android应用开发揭秘》,这里记录学习该书籍的日志,引用的相关代码与总结描述,没有商业的用途,完全是自我学习的一个记录,刚刚学习不可避免会出现很多问题,若是有错误还请大家多多批评。
继续基础控件的学习;
一、提示Toast控件
该控件在Android中,主要用于显示信息。比如:当退出程序时,用来提示玩家“需要更新”等信息,在输入框中输入文本时,提示玩家“最多能输入10字符”等。
实例分析:用显示当收到短信息的时候,使用Toast控件显示发送短信的内容。
【关注点】:1. Toast控件的使用;2. 如何发送短信并监控短信的收发。
【遇到问题】:
1. 在打开模拟器运行程序时,报:emulator-5554 disconnected! Cancelling……错误。即连接不上模拟器
遇到这个问题,在google里找了一下,主要由三个解决方法
1. emulator -avd -wipe-data
2. reset abd
3. restarting the eclipse again
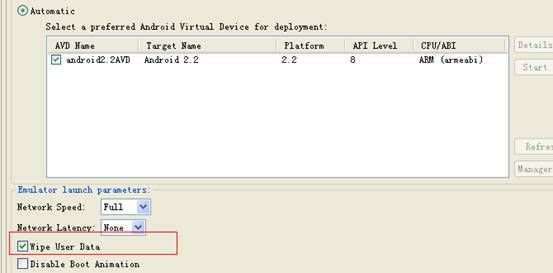
解决方法1:【当前方法成功解决我的问题】
在eclipse里面改变一下你run的时候的设置就好了.
右点你的工程后run里面有一个run configrations,
在里面有一个选项每次运行都檫掉记录 wipe....的,选上就好了

emulator -wipe-data
或者选择“wipe out user data”
该解决方法参考网上:http://ophone8.com/thread-4046-1-1.html
同样;
http://androidforums.com/application-development/5398-android-help-emulator-5554-disconnected.html
First, close (or force close) your current AVD.
Open Android SDK and AVD Manager, choose your virtual device, click "Start..." then check the "wipe user data" mode then click "Launch".
问题出现原因,分析是手动关掉AVD以后出现的,AVD没启动完你就关掉了,当然出现“连接失败”(disconnected!),然后就取消中....
实例重要源码:
1. 若是想收发短信,必须创建一个继承BroadcastReceiver的类,重写其onReceive方法,当收到短信时就会触发该方法。
public class SMSReceiver extends BroadcastReceiver {

	//收到短信时,就会触发此方法
	public void onReceive(Context context, Intent intent) {
		/*Bundle:API中:A mapping from String values to various Parcelable types.
		 * Bundle类用作携带数据,它类似于Map,用于存放key-value名值对形式的值。
		 * 相对于Map,它提供了各种常用类型的putXxx()/getXxx()方法,如:putString()/getString()和putInt()/getInt(),
		 * putXxx()用于往Bundle对象放入数据,getXxx()方法用于从Bundle对象里获取数据。
		 * Bundle的内部实际上是使用了HashMap<String, Object>类型的变量来存放putXxx()方法放入的值:
		 * 在调用Bundle对象的getXxx()方法时,方法内部会从该变量中获取数据,然后对数据进行类型转换,转换成什么类型由方法的Xxx决定,getXxx()方法会把转换后的值返回。
		 */
		Bundle bundle = intent.getExtras();
		Object message[] = (Object[]) bundle.get("pdus");

		SmsMessage smsMessage[] = new SmsMessage[message.length];

		for(int n = 0;n < message.length; n++){
			smsMessage[n] = SmsMessage.createFromPdu((byte[]) message[n]);
			/*
 			Create an SmsMessage from a raw PDU.  SmsMessage类中该createFromPdu方法的源码:
  			public static SmsMessage createFromPdu(byte[] pdu) {
   				SmsMessageBase wrappedMessage;
				int activePhone = TelephonyManager.getDefault().getPhoneType();

   				if (PHONE_TYPE_CDMA == activePhone) {
      				wrappedMessage = com.android.internal.telephony.cdma.SmsMessage.createFromPdu(pdu);
  				} else {
		        	wrappedMessage = com.android.internal.telephony.gsm.SmsMessage.createFromPdu(pdu);
     			}
				return new SmsMessage(wrappedMessage);
			}
			 */
		}

		//产生一个Toast
		Toast toast = Toast.makeText(context, "短信内容:"+smsMessage[0].getMessageBody(), Toast.LENGTH_LONG);
		/*
		 public String getMessageBody ()
		 Returns the message body as a String, if it exists and is text based.
		 */

		//设置toast显示的位置
		//toast.setGravity(Gravity.TOP|Gravity.LEFT, 0, 200);
		//显示该Toast
		toast.show();
	}
以上是专门用于处理短信接收的触发类,但是需要配置成监听服务
<uses-permission android:name="android.permission.RECEIVE_SMS"/>
    <application android:icon="@drawable/ic_launcher" android:label="@string/app_name" >
        <activity android:label="@string/app_name" android:name=".Examples_04_05Activity" >
            <intent-filter >
                <action android:name="android.intent.action.MAIN" />
                <category android:name="android.intent.category.LAUNCHER" />
            </intent-filter>
        </activity>
        <receiver android:enabled="true" android:name="SMSReceiver">
            <intent-filter>
                <action android:name="android.provider.Telephony.SMS_RECEIVED"/>
            </intent-filter>
        </receiver>
    </application>
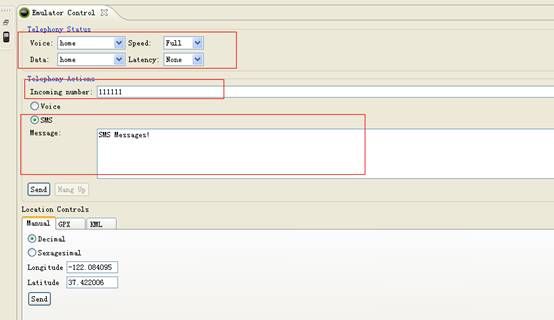
程序在运行时,需要模拟发送短信,切换到DDMS模式,如下图:

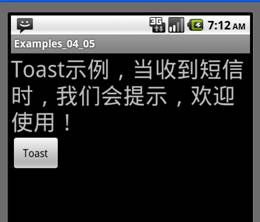
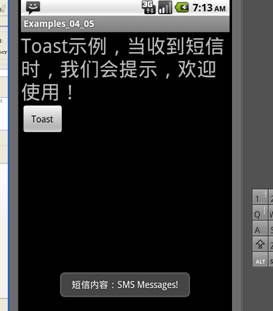
运行效果如下:左图为程序启动效果,右图为发送了短信之后的效果

一、编辑框EditText控件
针对EditText控件,可以为其设置事件监听setOnKeyListener,并实现onKey方法,当用户按键时便会触发这个事件,从而可以通过getText()获取控件里面的内容。
用户没有输入数据的情况下,使用EditText.setHint(“请输入账号!”);来实现信息的提示。
二、 单项选择(RadioGroup,RadioButton)
要是实现一个单选按钮组的效果,必须使用RadioGroup与RadioButton组合使用,如:
<RadioGroup
    android:id="@+id/RadioGroup01"
    android:layout_width="wrap_content"
    android:layout_height="wrap_content"
    android:orientation="vertical"
    android:layout_x="3px"
    android:layout_y="54px" >
    <RadioButton
      android:id="@+id/RadioButton1"
      android:layout_width="wrap_content"
      android:layout_height="wrap_content"
      android:text="@string/RadioButton1"
    />
    <RadioButton
      android:id="@+id/RadioButton2"
      android:layout_width="wrap_content"
      android:layout_height="wrap_content"
      android:text="@string/RadioButton2"
    />
</RadioGroup>
界面上选择按钮由RadioButton来控制,单选按钮组的答案由RadioGroup来控制,在定义RadioGroup时,在监听RadioGroup的setOnCheckedChangeListener事件时:
/* 设置事件监听  */
m_RadioGroup.setOnCheckedChangeListener(new RadioGroup.OnCheckedChangeListener() {
	@Override
	public void onCheckedChanged(RadioGroup group, int checkedId){
		// TODO Auto-generated method stub
		if (checkedId == m_Radio2.getId()){
		   DisplayToast("正确答案:" + m_Radio2.getText() + ",恭喜你,回答正确!");
		}else{
			DisplayToast("请注意,回答错误!");
		}

});
今天学习到P69页,继续加油