三大框架整合ssh(一)-----持久层搭建
这一节其实就是搭建hibernate开发环境,如果你可以自己搭建就跳过吧。但我还是把不做贴出来,并把可能出问题的方法指出来。
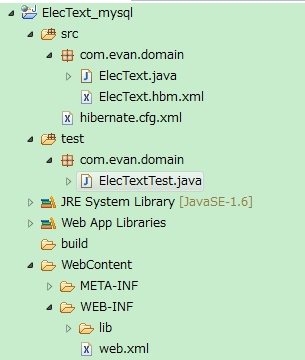
下面是这个项目的持久层目录图:
这一步主要是关于数据的操作,但是这时候你在数据只用一句话就可以了。create database evan(创建一个名称为evan的数据库),持久层的表我会在配置文件中让它自动生成。
下面就是关于java的代码编写:
一、编写与数据库表对应的实体类。ElecText.java
public class ElecText {
 private String textID;
 private String textName;
 private Date textDate;
 private String textRemark;

 public String getTextID() {
  return textID;
 }

 public void setTextID(String textID) {
  this.textID = textID;
 }

 public String getTextName() {
  return textName;
 }

 public void setTextName(String textName) {
  this.textName = textName;
 }

 public Date getTextDate() {
  return textDate;
 }

 public void setTextDate(Date textDate) {
  this.textDate = textDate;
 }

 public String getTextRemark() {
  return textRemark;
 }

 public void setTextRemark(String textRemark) {
  this.textRemark = textRemark;
 }

}
二、编写与数据库表的映射文件(ElecText.hbm.xml) (一定要记得和实体类在同一包下)
<!DOCTYPE hibernate-mapping PUBLIC
    "-//Hibernate/Hibernate Mapping DTD 3.0//EN"
    "http://hibernate.sourceforge.net/hibernate-mapping-3.0.dtd">

<hibernate-mapping>
 <class name="com.evan.domain.ElecText" table="elec_text">
  <id name="textID" column="TEXTID" type="java.lang.String">
   <!-- 主键的生产策略 -->
   <generator class="uuid"></generator>
  </id>
  <property name="textName" column="textName" type="java.lang.String"></property>
  <property name="textDate" column="textDate" type="java.util.Date"></property>
  <property name="textRemark" column="textRemark" type="java.lang.String"></property>
 </class>

 </hibernate-mapping>
三、编写与数据库连接的映射文件(hibernate.cfg.xml)
小知识:sessionFactory.getCurrentSession()可以完成一系列的工作,当调用时, hibernate将session绑定到当前线程,事务结束后,hibernate
将session从当前线程中释放,并且关闭session。当再次调用getCurrentSession ()时,将得到一个新的session,并重新开始这一系列工作。
<!DOCTYPE hibernate-configuration PUBLIC
	"-//Hibernate/Hibernate Configuration DTD 3.0//EN"
	"http://hibernate.sourceforge.net/hibernate-configuration-3.0.dtd">

<hibernate-configuration>
	<session-factory>
		<property name="connection.driver">com.mysql.jdbc.Driver</property>
		<property name="connection.url">jdbc:mysql://localhost:3306/evan</property>
		<property name="connection.username">root</property>
		<property name="connection.password">123456</property>

		<!-- 与当前线程绑定 -->
		<property name="current_session_context_class">thread</property>

		<!-- 如果数据库中表不存在就创建表 -->
		<property name="hbm2ddl.auto">update</property>

                 <!--配置数据库方言 -->
                 <property name="dialect">org.hibernate.dialect.MySQLDialect</property>
		<property name="show_sql">true</property>
		<property name="format_sql">true</property>

		<mapping resource="com/evan/domain/ElecText.hbm.xml" />

	</session-factory>
</hibernate-configuration>
四、编写测试类(ElecTextTest.java)
public class ElecTextTest {

 @Test
 public void saveTest() {
  Configuration config = new Configuration();
  config.configure();

  SessionFactory sessionFactory = config.buildSessionFactory();
  Session session = sessionFactory.getCurrentSession();
  session.beginTransaction();

  ElecText elecText = new ElecText();
  elecText.setTextName("持久层测试");
  elecText.setTextDate(new Date());
  elecText.setTextRemark("这里就是搭建hibernate的环境,并不涉及其它框架");

  session.save(elecText);

  session.getTransaction().commit();

 }
}
就这样数据以及持久层已经搭建好了。下面是DAO层搭建,也是hibernate与spring整合的开始。
下一篇的地址:
三大框架整合ssh(二)------DAO层
