Spark修炼之道(基础篇)——Linux大数据开发基础:第四节:Linux文件系统(二)
本节主要内容
- 访问控制列表ACL
- 链接
- 压缩和归档文件
- 其他日常管理实用程序
1. 访问控制列表ACL
在实际使用使用过程中,可能linux系统自身权限控制不能满足要求,还需要进一步细化,此时可以用ACL( Access Control List )进行,它主要提供 owner,group,others 的 read,write,execute 权限之外的细部权限配置。它可以针对单一使用者,单一文件或目录来进行 r,w,x 的权限规范,对于需要特殊权限的使用状况非常有帮助。
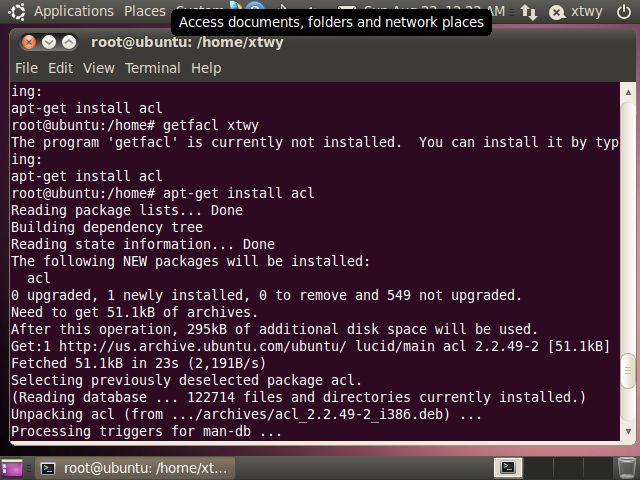
Ubuntu操作系统要使用ACL,需要手动去安装,安装方法如下:
使用apt-get install acl命令进行ACL的安装
(1)获取文件的acl
采用getfacl来获取文件的ACL详细信息,当文件不包含acl时,所显示的信息与ls -l命令相同
root@ubuntu:/home/xtwy# ls -l hello1.txt
-rw---x--x 1 xtwy xtwy 47 2015-08-22 23:43 hello1.txt

root@ubuntu:/home/xtwy# getfacl hello1.txt
# file: hello1.txt
# owner: xtwy
# group: xtwy
user::rw-
group::--x
other::--x
(2)设置文件的acl
采用setfacl命令进行文件精细权限的设置,命令格式如下:
setfacl --modify(-m) ugo:name:permissions file-list其中ugo分别是u或g或o,分别对应设置用户、组及其他用户对文件的访问权限。name为用户或组名,如果是o则无需指定,permissions是为待设置的权限,file-list,使用例如下:
//下列命令给组xtwy添加读权限,给组root添加读写执行权限
//给o也添加读写、执行权限
root@ubuntu:/home/xtwy# setfacl -m g:xtwy:r,g:root:rwx,o::rwx hello1.txt
//显示acl信息
root@ubuntu:/home/xtwy# getfacl hello1.txt
# file: hello1.txt
# owner: xtwy
# group: xtwy
user::rw-
group::--x
group:root:rwx
group:xtwy:r--
mask::rwx
other::rwx
//ls -l显示的权限信息
root@ubuntu:/home/xtwy# ls -l hello1.txt
//文件权限部分多了个+号
-rw-rwxrwx+ 1 xtwy xtwy 47 2015-08-22 23:43 hello1.txt
(3)获取目录或文件的acl
root@ubuntu:/home/xtwy# mkdir acltest
root@ubuntu:/home/xtwy# ls -ld acltest/
drwxr-xr-x 2 root root 4096 2015-08-23 00:50 acltest/

//获取目录的acl,与文件操作一致
root@ubuntu:/home/xtwy# getfacl acltest/
# file: acltest/
# owner: root
# group: root
user::rwx
group::r-x
other::r-x
给目录添加acl
root@ubuntu:/home/xtwy# groupadd groupacl
//采用-d命令,这是与普通文件之间的区别
root@ubuntu:/home/xtwy# setfacl -d -m g:groupacl:r-x acltest/
root@ubuntu:/home/xtwy# getfacl acltest/
# file: acltest/
# owner: root
# group: root
user::rwx
group::r-x
other::r-x
default:user::rwx
default:group::r-x
default:group:groupacl:r-x
default:mask::r-x
default:other::r-x

//ls -ld 命令显示,目录权限多了个+号
root@ubuntu:/home/xtwy# ls -ld acltest/
drwxr-xr-x+ 2 root root 4096 2015-08-23 00:50 acltest/


//在设置好的acl目录中创建文件与没有设置acl的目录中创建文件,有以下区别

oot@ubuntu:/home/xtwy# echo "file acl in acltst" > test1.txt
root@ubuntu:/home/xtwy# ls -l test1.txt
-rw-r--r-- 1 root root 19 2015-08-23 00:58 test1.txt
root@ubuntu:/home/xtwy# getfacl test1.txt
# file: test1.txt
# owner: root
# group: root
user::rw-
group::r--
other::r--


root@ubuntu:/home/xtwy# cd acltest/
root@ubuntu:/home/xtwy/acltest# echo "file acl in acltst" > test1.txt
//权限后面也有+
root@ubuntu:/home/xtwy/acltest# ls -l test1.txt
-rw-r--r--+ 1 root root 19 2015-08-23 00:59 test1.txt
//显示创建文件的acl信息
root@ubuntu:/home/xtwy/acltest# getfacl test1.txt
# file: test1.txt
# owner: root
# group: root
user::rw-
group::r-x          #effective:r--
group:groupacl:r-x      #effective:r--
mask::r--
other::r--
上面的代码说明,如果在acl目录中没有指定文件的acl信息,则会使用目录对应默认acl。
2. 链接
(1) 硬链接
linux中的硬链接另一个文件的形式出现在文件结构中,如果硬链接与被链接文件在同一个目录中,则名字必须不一样,不在同一个目录的话,可以没有此要求
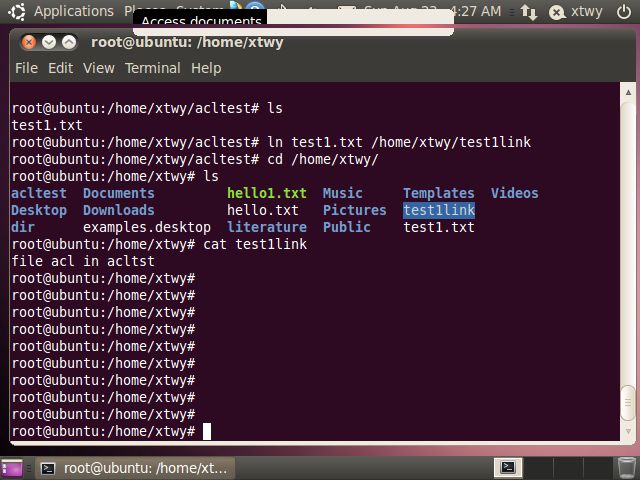
root@ubuntu:/home/xtwy/acltest# ls
test1.txt
//利用ln命令创建一个test1.txt文件的硬链接
root@ubuntu:/home/xtwy/acltest# ln test1.txt /home/xtwy/test1link
root@ubuntu:/home/xtwy/acltest# cd /home/xtwy/
root@ubuntu:/home/xtwy# ls
acltest  Documents         hello1.txt  Music     Templates  Videos
Desktop  Downloads         hello.txt   Pictures  test1link
dir      examples.desktop  literature  Public    test1.txt
//利用cat命令查看test1link文件的内容,它其实是链接到test1.txt文件
//然后显示相应内容
root@ubuntu:/home/xtwy# cat test1link
file acl in acltst
//创建完硬链接后,链接数+1
root@ubuntu:/home/xtwy/acltest# ls -l
total 4
-rw-r--r--+ 2 root root 19 2015-08-23 00:59 test1.txt
//再创建一个硬链接
root@ubuntu:/home/xtwy/acltest# ln test1.txt /home/xtwy/test1link2
//链接数+1
root@ubuntu:/home/xtwy/acltest# ls -l
total 4
-rw-r--r--+ 3 root root 19 2015-08-23 00:59 test1.txt
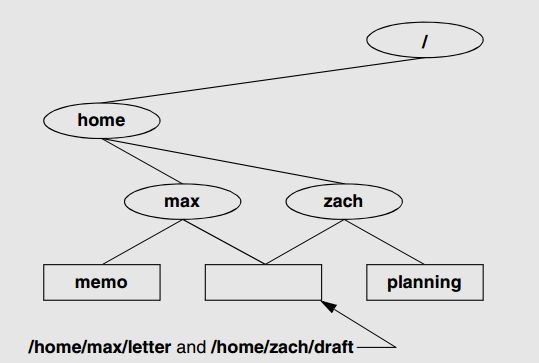
硬链接以文件形式存在,但它实质上指向的是同一个文件,只不过是创建了指向目标文件的指针,即ln命令不会创建文件的副本,即它与cp命令有着本质的区别,如下图所示:
(2) 软链接
linux操作系统除了支持硬链接之外,还支持符号链接(symbolic link)或软链接(soft link)。硬链接是直接指向文件的指针,它除了可以创建文件的符号链接之外,还可以创建目录的符号链接。先看几个例子:
//不能创建目录的硬链接
root@ubuntu:/home/xtwy# ln Music softlink_Music
ln: `Music': hard link not allowed for directory

//创建目录的符号链接
root@ubuntu:/home/xtwy# ln --symbolic Music softlink_Music
//链接数并没有增加,还是1
root@ubuntu:/home/xtwy# ls -l softlink_Music
lrwxrwxrwx 1 root root 5 2015-08-23 05:01 softlink_Music -> Music


//创建普通文件的符号链接
root@ubuntu:/home/xtwy# echo "soft link test" >> soft.txt
root@ubuntu:/home/xtwy# ln -s soft
softlink_Music/ soft.txt
root@ubuntu:/home/xtwy# ln -s soft.txt softlink_txtfile
//通过下面的命令可以看到, 符号链接文件的大小为8
//它与原始文件大小不一样,其大小是目标文件路径名中的字符数
root@ubuntu:/home/xtwy# ls -l softlink_txtfile
lrwxrwxrwx 1 root root 8 2015-08-23 05:02 softlink_txtfile -> soft.txt
root@ubuntu:/home/xtwy# cat softlink_txtfile
soft link test
使用cd命令切换到目录的符号连接时,路径名中显示的是符号链接名称
root@ubuntu:/home/xtwy# cd softlink_Music
//路径名显示是符号链接
root@ubuntu:/home/xtwy/softlink_Music# ls
root@ubuntu:/home/xtwy/softlink_Music# cd ..
root@ubuntu:/home/xtwy# cd Music/
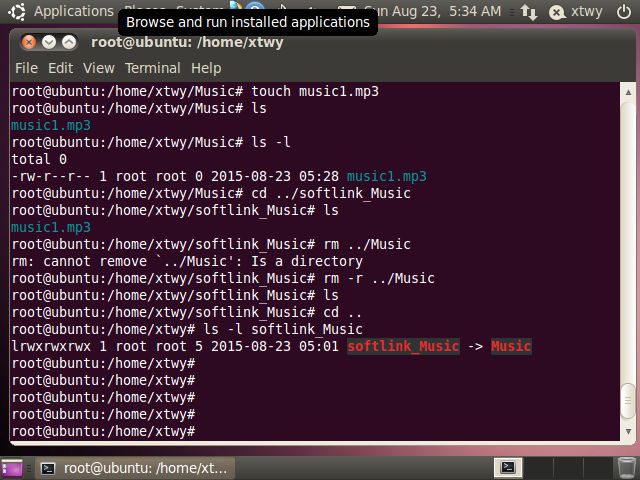
root@ubuntu:/home/xtwy/Music# touch music1.mp3
root@ubuntu:/home/xtwy/Music# ls
music1.mp3
root@ubuntu:/home/xtwy/Music# ls -l
total 0
-rw-r--r-- 1 root root 0 2015-08-23 05:28 music1.mp3
root@ubuntu:/home/xtwy/Music# cd ../softlink_Music
//目录内容与Music目录一致
root@ubuntu:/home/xtwy/softlink_Music# ls
music1.mp3
root@ubuntu:/home/xtwy/softlink_Music#
符号链接可以指向一个不存在的文件,例如
//删除Music目录
root@ubuntu:/home/xtwy/softlink_Music# rm -r ../Music
//删除后内容为空
root@ubuntu:/home/xtwy/softlink_Music# ls
root@ubuntu:/home/xtwy/softlink_Music# cd ..
//符号链接仍然存在
root@ubuntu:/home/xtwy# ls -l softlink_Music
lrwxrwxrwx 1 root root 5 2015-08-23 05:01 softlink_Music -> Music
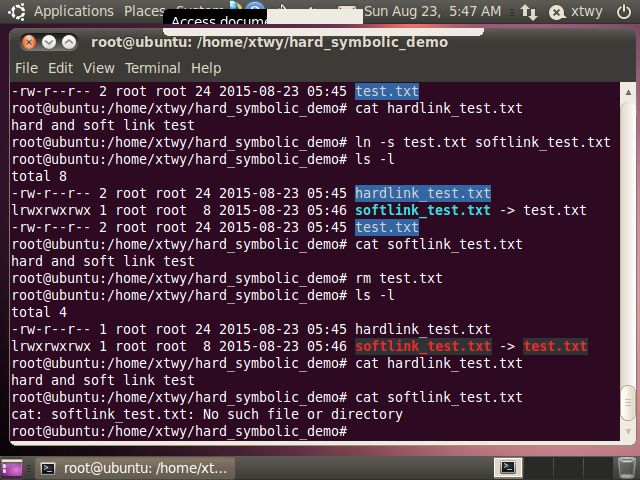
硬链接由于采用的是指针的方式,如果文件删除,它将一直指向已删除的文件,而软链接总是指向新创建的文件
//生成test文件
root@ubuntu:/home/xtwy/hard_symbolic_demo# echo "hard and soft link test" > test.txt
//生成硬链接
root@ubuntu:/home/xtwy/hard_symbolic_demo# ln test.txt hardlink_test.txt
root@ubuntu:/home/xtwy/hard_symbolic_demo# ls -l
total 8
-rw-r--r-- 2 root root 24 2015-08-23 05:45 hardlink_test.txt
-rw-r--r-- 2 root root 24 2015-08-23 05:45 test.txt
root@ubuntu:/home/xtwy/hard_symbolic_demo# cat hardlink_test.txt
hard and soft link test
//创建符号链接
root@ubuntu:/home/xtwy/hard_symbolic_demo# ln -s test.txt softlink_test.txt
root@ubuntu:/home/xtwy/hard_symbolic_demo# ls -l
total 8
-rw-r--r-- 2 root root 24 2015-08-23 05:45 hardlink_test.txt
lrwxrwxrwx 1 root root  8 2015-08-23 05:46 softlink_test.txt -> test.txt
-rw-r--r-- 2 root root 24 2015-08-23 05:45 test.txt
root@ubuntu:/home/xtwy/hard_symbolic_demo# cat softlink_test.txt
hard and soft link test
//删除test.txt文件
root@ubuntu:/home/xtwy/hard_symbolic_demo# rm test.txt
root@ubuntu:/home/xtwy/hard_symbolic_demo# ls -l
total 4
-rw-r--r-- 1 root root 24 2015-08-23 05:45 hardlink_test.txt
lrwxrwxrwx 1 root root  8 2015-08-23 05:46 softlink_test.txt -> test.txt
//hardlink_test.txt仍然指向删除的文件,只有当该链接也被删除的时候
//文件才被删除
root@ubuntu:/home/xtwy/hard_symbolic_demo# cat hardlink_test.txt
hard and soft link test
//符号链接已经失效
root@ubuntu:/home/xtwy/hard_symbolic_demo# cat softlink_test.txt
cat: softlink_test.txt: No such file or directory
root@ubuntu:/home/xtwy/hard_symbolic_demo#
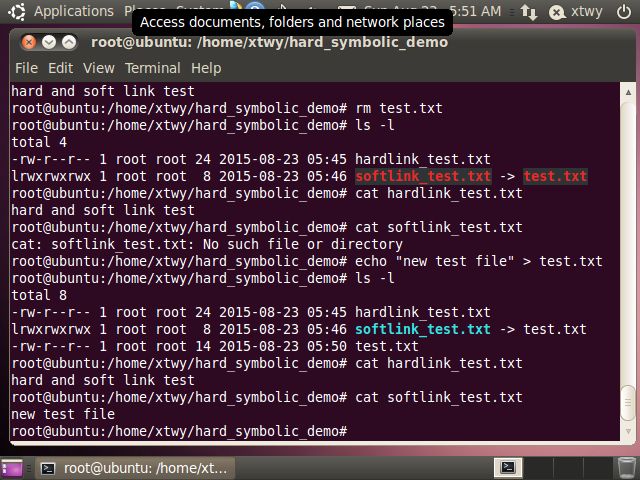
创建新的test.txt文件之后,符号链接指向新文件,硬链接仍然指向被删除的文件
root@ubuntu:/home/xtwy/hard_symbolic_demo# echo "new test file" > test.txt
root@ubuntu:/home/xtwy/hard_symbolic_demo# ls -l
total 8
-rw-r--r-- 1 root root 24 2015-08-23 05:45 hardlink_test.txt
lrwxrwxrwx 1 root root  8 2015-08-23 05:46 softlink_test.txt -> test.txt
-rw-r--r-- 1 root root 14 2015-08-23 05:50 test.txt
root@ubuntu:/home/xtwy/hard_symbolic_demo# cat hardlink_test.txt
hard and soft link test
root@ubuntu:/home/xtwy/hard_symbolic_demo# cat softlink_test.txt
new test file
删除符号链接或硬链接与删除其它文件是一样的,例如:
root@ubuntu:/home/xtwy/hard_symbolic_demo# rm hardlink_test.txt
root@ubuntu:/home/xtwy/hard_symbolic_demo# ls -l
total 4
lrwxrwxrwx 1 root root  8 2015-08-23 05:46 softlink_test.txt -> test.txt
-rw-r--r-- 1 root root 14 2015-08-23 05:50 test.txt
root@ubuntu:/home/xtwy/hard_symbolic_demo# rm softlink_test.txt
root@ubuntu:/home/xtwy/hard_symbolic_demo# ls -l
total 4
-rw-r--r-- 1 root root 14 2015-08-23 05:50 test.txt
3. 压缩和归档文件
如果文件较大的话,占用大量的磁盘空间或网络流量,常常会对文件进行压缩存储或网络传送,本节将介绍几种常用的文件压缩和归档方法
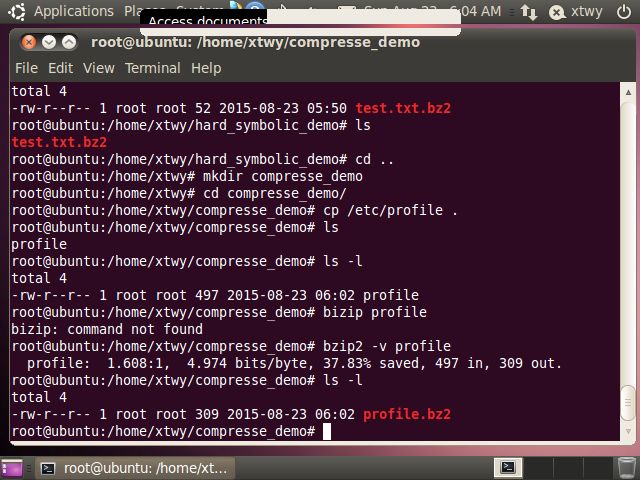
(1) bzip2压缩
root@ubuntu:/home/xtwy# mkdir compresse_demo
root@ubuntu:/home/xtwy# cd compresse_demo/
root@ubuntu:/home/xtwy/compresse_demo# cp /etc/profile .
root@ubuntu:/home/xtwy/compresse_demo# ls
profile
root@ubuntu:/home/xtwy/compresse_demo# ls -l
total 4
-rw-r--r-- 1 root root 497 2015-08-23 06:02 profile
root@ubuntu:/home/xtwy/compresse_demo# bizip profile
bizip: command not found
root@ubuntu:/home/xtwy/compresse_demo# bzip2 -v profile
  profile:  1.608:1,  4.974 bits/byte, 37.83% saved, 497 in, 309 out.
root@ubuntu:/home/xtwy/compresse_demo# ls -l
total 4
-rw-r--r-- 1 root root 309 2015-08-23 06:02 profile.bz2
(2) bz2文件解压缩
//bunzip2 解压缩
root@ubuntu:/home/xtwy/compresse_demo# bunzip2 profile.bz2
root@ubuntu:/home/xtwy/compresse_demo# ls -l
total 4
-rw-r--r-- 1 root root 497 2015-08-23 06:02 profile


root@ubuntu:/home/xtwy/compresse_demo# bzip2 -v profile
  profile:  1.608:1,  4.974 bits/byte, 37.83% saved, 497 in, 309 out.
//bzcat查看文件压缩文件内容,原文件不会改变
root@ubuntu:/home/xtwy/compresse_demo# bzcat profile.bz2 | tail -10
  else
    if [ "`id -u`" -eq 0 ]; then
      PS1='# '
    else
      PS1='$ '
    fi
  fi
fi

umask 022
(3) tar打包文件
采用tar -cvf命令进行目录或文件的打包, c表示create,v表示verbose,显示详细信息,f表示从一个文件进行读写,打包好的文件以tar作为扩展名结尾
root@ubuntu:/home/xtwy/compresse_demo# tar -cvf test.tar profile
profile
root@ubuntu:/home/xtwy/compresse_demo# ls
profile  test.tar
(4) tar解包文件
root@ubuntu:/home/xtwy/compresse_demo# rm profile
//按表枨方式显示打包文件内容,t表示表格
root@ubuntu:/home/xtwy/compresse_demo# tar -tvf test.tar
-rw-r--r-- root/root       497 2015-08-23 06:02 profile
root@ubuntu:/home/xtwy/compresse_demo# ls
test.tar
//解包文件,使用-x(extract)
root@ubuntu:/home/xtwy/compresse_demo# tar -xvf test.tar
profile
(5) gzip压缩与解压缩文件
//压缩文件,压缩后的文件以.gz结尾
root@ubuntu:/home/xtwy/compresse_demo# gzip profile
root@ubuntu:/home/xtwy/compresse_demo# ls
profile.gz  test.tar
//解压缩文件
root@ubuntu:/home/xtwy/compresse_demo# gunzip profile.gz
root@ubuntu:/home/xtwy/compresse_demo# ls
profile  test.tar
(6) tar.gz文件解压缩
在网络上传输的文件通常都是经过gzip压缩后,再由tar归档后的文件,如下图所示:
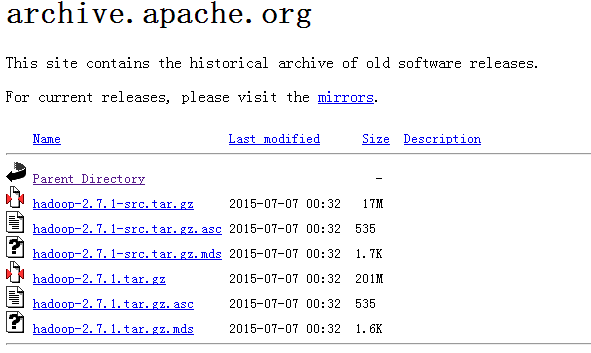
使用tar -zxvf命令进行解压缩
tar -zxvf hadoop-2.7.1.tar.gz4. 其他日常管理实用程序
(1) whereis命令
在标准路径下搜索与名称相关的文件,whereis将所有搜索到的文件都显示
root@ubuntu:/home/xtwy/compresse_demo# whereis tar
tar: /bin/tar /usr/include/tar.h /usr/share/man/man1/tar.1.gz /usr/share/man/man5/tar.5.gz
(2) which命令
which在设定的搜索路径下进行目录搜索,只显示搜索到的第一个文件
root@ubuntu:/home/xtwy/compresse_demo# which tar
/bin/tar
(3) locate命令
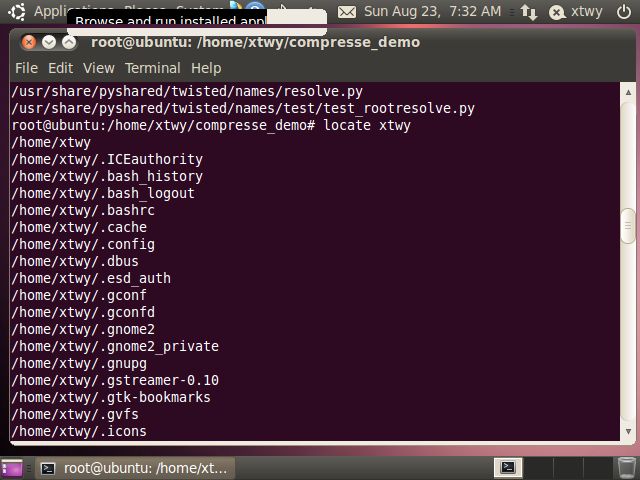
locate命令用于在本地文件系统上进行文件搜索,下面的例子给出了与xtwy相关的所有系统文件,包括隐藏文件:
root@ubuntu:/home/xtwy/compresse_demo# locate xtwy
更多which whereis locate命令相关内容,在后期讲linux中的正则表达式时仍然会有所涉及,此时大家只要会简单使用前面讲述的三个命令即可。
