Fluent Nhibernate之旅(五)--利用AutoMapping进行简单开发
Fluent Nhibernate(以下简称FN)发展到如今,已经相当成熟了,在Nhibernate的书中也相应的推荐了使用FN来进行映射配置,之前写的FN之旅至今还有很多人会来私信我问题,说来惭愧,从FN之旅四至今已经4年多,至今还未更新过此系列,原因有很多,最大的就是懒惰,哈。
安装
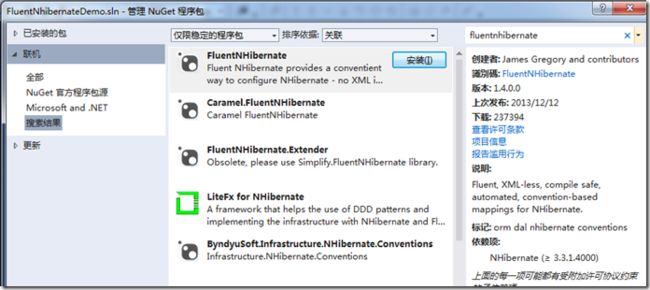
现在在项目中使用FN很方便,使用Nuget管理就可以了,但我还是建议大家,可以下载源代码,自己可以详细了解下。
当然,您也可以用命令台来进行安装。说个题外话,NuGet真心不错,至少已经做新项目的时候不用到处去整理lib包了,从NuGet进行下载、更新、卸载都很方便,而且还能自搭建自己公司的服务器,不过目前还是有些问题,有时候在下载最新包无法使用的情况下,无法自动降低版本,还得自己去手动控制台下载,非常不便。
在NuGet下载FluentNhibernate后,会自动下载安装Nhibernate及Iesi。
配置
准备工作完成,今天我们要说下FN的AutoMapping,之前呢我们都是用了FluentMapping进行手动的Map映射,如果可以的话,请大家还是使用之前的映射方式,因为AutoMapping有很多契约,您需要按照一定的规范编写您的对象。
我们先看下ISessionFactory中的Mapping配置:
    private static ISessionFactory CreateSessionFactory()
        {
            return Fluently.Configure()
               .Database(MsSqlConfiguration.MsSql2005
                    .ConnectionString(s => s.Server(".")
                        .Database("MyNHibernate")
                        .TrustedConnection()))
                .Mappings(m => m.FluentMappings.Add<Store>())
                .BuildSessionFactory();
        }
这是我们手动映射,Mapping()中指定了用FluentMappings进行映射,我们只要把它改成AutoMapping:
    private static ISessionFactory CreateSessionFactory()
        {
            return Fluently.Configure()
               .Database(MsSqlConfiguration.MsSql2005
                    .ConnectionString(s => s.Server(".")
                        .Database("MyNHibernate")
                        .TrustedConnection()))
                .Mappings(m => m.AutoMappings.Add(AutoMap.AssemblyOf<Store>()))
                .BuildSessionFactory();
        }
红色字体为不同之处,Store是我们需要映射的实体类,可能您会用为何不能像FluentMapping一样Add<T>()呢?因为这里考虑到一些契约的问题,它的Add参数为AutoPersistenceModel类型,接下来会说的。
数据库结构
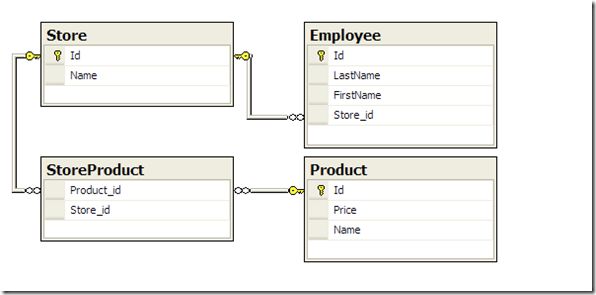
接下来,我们设计一个数据库结构,简单点:
员工,仓库,产品,对应关系也全部到位了
实体类代码
我们来编写对应的Model代码:
public class Store
    {
        public Store()
        {
            Products = new List<Product>();
        }

        public virtual int Id { get; set; }

        public virtual string Name { get; set; }

        public virtual IEnumerable<Product> Products { get; set; }
    }

    public class UserName
    {
        public string FirstName { get; set; }

        public virtual string LastName { get; set; }
    }

    public class Employee
    {
        public virtual int Id { get; set; }

        public virtual UserName Name { get; set; }

        public virtual Store Store { get; set; }
    }

    public class Product
    {
        public Product()
        {
            Stores = new List<Store>();
        }

        public virtual int Id { get; set; }

        public virtual float Price { get; set; }

        public virtual string Name { get; set; }

        public virtual IEnumerable<Store> Stores { get; set; }
    }
好了,代码编写完毕,接下来是映射吗???No,无需映射了,因为我们用了AutoMapping,一切交给FN吧,我们接下来只要编写测试代码即可。
测试
我们先配置ISessionFactory:
     private static string dbfile = ConfigurationManager.AppSettings["dbfile"];
        private static ISessionFactory CreateSessionFactory()
        {
            return Fluently.Configure()
                .Database(SQLiteConfiguration.Standard.UsingFile(dbfile))
                .Mappings(m => m.AutoMappings.Add(AutoMap.AssemblyOf<Store>()))
                .ExposeConfiguration(BuildSchema) //利用Nhibernate的SchemaExport创建数据库及其架构
                .BuildSessionFactory();
        }

        private static void BuildSchema(NHibernate.Cfg.Configuration obj)
        {
            //delete the existing db on each run
            if (File.Exists(dbfile))
                File.Delete(dbfile);

            new SchemaExport(obj).Create(false, true);
        }
在这里,我用了Sqlite做为我们的数据库,ORM最大的好处就是我们可以随意的变更我们的数据库类型,不需要考虑其类型,这是我选择Nhibernate的原因,EF虽然通过扩展能够支持其他数据库,但我相信用EF使用其他数据库的人很少吧。用ExposeConfiguration方法委托Nhibernate的SchemaExport来创建数据库架构,相信很多NH玩家都会用吧。不过不建议把它用在稍大的项目里,我们的项目数据库会随着项目需求的增加和改变会经常修改的,建议用专业的数据库管理,比如Migrator,有兴趣下次可以开篇介绍下,用下来还是不错的。
[Fact]
        public void DemoTest()
        {
            using (var session = CreateSessionFactory().OpenSession())
            {
                new PersistenceSpecification<Employee>(session)
                    .CheckProperty(c => c.Id, 1)
                    .CheckProperty(c => c.Name.FirstName, "James")
                    .CheckProperty(c => c.Name.LastName, "YinG")
                    .CheckReference(c => c.Store, new Store() { Name = "MyStore" })
                    .VerifyTheMappings();
            }
        }
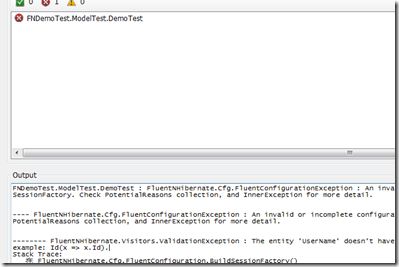
我们利用XUnit进行测试下,您会发现报错:
这是为什么呢?这个其实就是AutoMapping在处理映射的时候,都是按照一定的规则去映射的,细心的朋友可能发现,我们的索引字段的字段名都是Id,这就是AutoMapping的约定,我们也可以自己来进行配置。
刚我们的测试报错,是因为Employee中的Name是个UserName类,Nhibernate的Component,我在FN之旅四(上)中有介绍到,默认情况下映射根据字段映射到数据库的,所以上面的测试会报错,接下来我们自己配置下:
编写一个类,继承DefaultAutomappingConfiguration:
public class CustomConfiguration : DefaultAutomappingConfiguration
    {
        public override bool IsComponent(Type type)
        {
            return type == typeof(UserName);
        }
    }
重写IsComponent方法,简单吧,核对下类型即可,写完自己的规则后,我们需要在建立SessionFactory的时候引入此配置:
.Mappings(m => m.AutoMappings.Add(AutoMap.AssemblyOf<Store>(new CustomConfiguration())))
现在您还无法测试通过,因为我用了PersistenceSpecification进行测试的,在进行常规的测试时是没有问题的,但遇到Component或者Reference之类的,都需要我们自己来写一个IEqualityComparer的实现:
public class UserNameComparer : IEqualityComparer
    {
        public new bool Equals(object x, object y)
        {
            var username_x = x as UserName;
            if (username_x == null) return false;
            var username_y = y as UserName;
            if (username_y == null) return false;

            return username_x.FirstName.Equals(username_y.FirstName) &&
                username_x.LastName.Equals(username_y.LastName);
        }

        public int GetHashCode(object obj)
        {
            throw new NotImplementedException();
        }
    }

    public class StoreComparer : IEqualityComparer
    {
        public new bool Equals(object x, object y)
        {
            var Store_x = x as Store;
            if (Store_x == null) return false;
            var Store_y = y as Store;
            if (Store_y == null) return false;

            return Store_x.Id == Store_y.Id;
        }

        public int GetHashCode(object obj)
        {
            throw new NotImplementedException();
        }
    }
好,修改下我们的测试代码:
[Fact]
        public void DemoTest()
        {
            using (var session = CreateSessionFactory().OpenSession())
            {
                new PersistenceSpecification<Employee>(session)
                     .CheckProperty(c => c.Id, 1)
                     .CheckProperty(c => c.UserName, new UserName{
                         FirstName = "James", LastName = "YinG"
                     }, new UserNameComparer())
                     .CheckReference(c => c.Store, new Store() { Name = "MyStore" }, new StoreComparer())
                     .VerifyTheMappings();
            }
        }
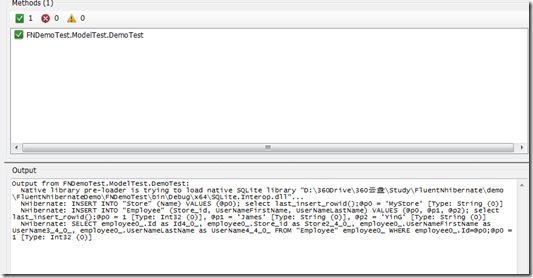
在进行下测试,这下我们通过了:
这里我只测试了Employee和Store两个实体,对于多对多还未测试,时间有限,等有时间下篇继续下。今天介绍了AutoMapping简单的介绍,但在使用中您要时刻注意,AutoMapping是有很多限制的,比如Id,比如Component等,当然我们可以通过重写DefaultAutomappingConfiguration的一些方法来进行合适的一些配置,如果您要对持久类有一些要求,不对一对多的LazyLoad或者Cascade之类的,您需要通过实现IReferenceConvention,IHasManyConvention,IHasManyToManyConvention进行配置,今天就不多讲了,下次吧。
Fluent Nhibernate确实是个好东西,让我在开发上省去了很多时间,今天虽然介绍了AutoMapping,但我不推荐您在您的项目中使用,用起来没手感(个人感觉),需要约定的东西太多了,对于数据库结构也得按照他的契约来,否则就得自己重写一些方法,实现一些类,有点累人。但在开发一些小工具时,又要用到小型存储数据的话,不妨可以试试这种方式。
PS:今天本来心情不错,没想到有客人来拉横幅,一直在公司吵闹,害的我无法集中精力,估计在文章中会有错的地方,大家见谅了。


