【MVC 4】1.第一个 MVC 应用程序
作者:[美]Adam Freeman 来源:《精通ASP.NET MVC 4》
ASP.NET MVC 是微软的一个 Web开发框架,它整合了“模型—视图—控制器(MVC)”架构的高效与整洁、敏捷开发的最新的思想与技术以及当前ASP.NET 平台的精华部分。ASP.NET MVC 可以完全替代传统的 ASP.NET Form,除了一些微不足道的 Web 小项目之外,在各种 Web 开发项目中都有明显的优势。
废话不多说,开始第一个MVC应用程序吧。
1.准备工作站:
Visual Studio 2012,初学的话也可以使用微软提供的免费版 Visual Studio Express 2012 For Web 。
2.创建 ASP.NET MVC 新项目
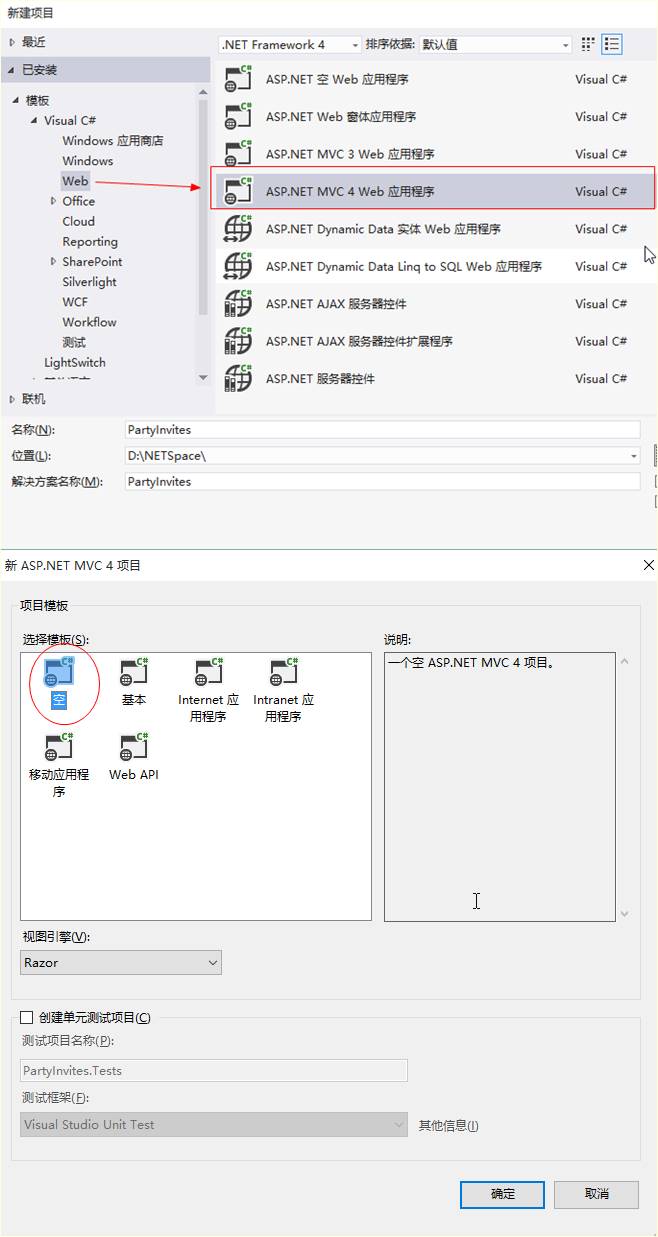
(1)创建 ASP.NET MVC 新项目 PartyInvites,模板为 Empty 。【 New(新建) -> Project(项目) -> New Project(新项目)】
(2).添加第一个控制器,命名为 HomeController 【右击Controller文件夹 -> Add(添加) -> Controller(控制器)】
(3). VS 会在Controller 文件夹中创建一个 HomeController.cs 文件
using System;
using System.Collections.Generic;
using System.Linq;
using System.Web;
using System.Web.Mvc;

namespace PartyInvites.Controllers
{
    public class HomeController : Controller
    {
        public ActionResult Index()
        {
            return View();
        }
    }
}
(4).修改代码代码如下:
    public class HomeController : Controller
    {
        public string Index()
        {
            return "Hello,MVC";
        }
    }
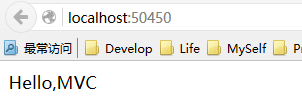
(5).按 F5 调试,显示效果如下:
3.渲染 Web 页面
上面输出的只是一个字符串"Hello,MVC"。为了产生一个队浏览器请求进行相应的HTML,需要创建一个视图(View)。
(1)首先修改 Index 动作方法
    public class HomeController : Controller
    {
        /*在MVC体系架构中,传入的请求是由控制器(Controller)处理的。
         在控制器中的每一个 public 方法都称为一个动作方法 (Action Method),即可以用某个 URL 通过 Web 来调用它,以执行一个动作*/
        public ViewResult Index()
        {
            //这里返回一个视图。
            //视图是通过命名约定与动作方法相关联的。这个动作叫做"Index",控制器叫做"Home"。
            return View();
        }
    }
(2)这时运行调试,MVC会视图在"Views"文件夹中查找有这个名字的不同文件。
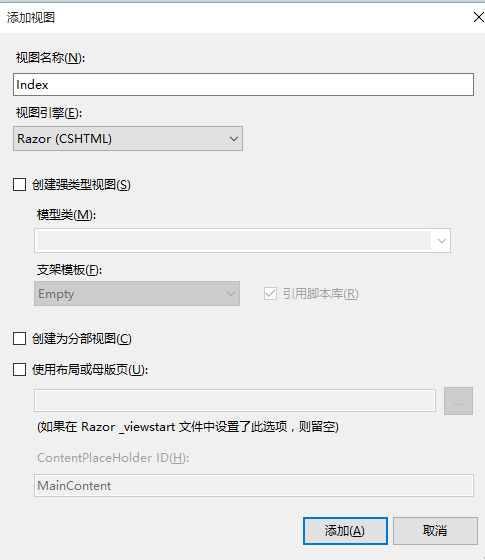
(3)创建视图文件 Index.cshtml 【右击 Index 动作方法(在方法名上或者方法体内) -> 添加视图】
(4)简单修改视图文件,显示文字 "Hello,MVC (Form the view)"
@{
    Layout = null;
}

<!DOCTYPE html>

<html>
<head>
    <meta name="viewport" content="width=device-width" />
    <title>Index</title>
</head>
<body>
    <div>
        Hello,MVC (Form the view)
    </div>
</body>
</html>
(5)运行效果如下
(6)添加动态输出,修改HomeController.cs 文件 Index 方法
        public ViewResult Index()
        {
            int hour = DateTime.Now.Hour;
            //ViewBag 是一种动态对象,Greeting 属性知道给其赋值的那一刻才会存在,其属性名 Greeting 可以用任意属性名来替代它,它会一样工作
            //这里将一个值给 ViewBag.Greeting 属性时,便是为视图提供数据。
            ViewBag.Greeting = hour < 12 ? "Good morning" : "Good afternoon";
            return View();
        }
(7)修改 Index.cshtml 文件
@{
    Layout = null;
}

<!DOCTYPE html>

<html>
<head>
    <meta name="viewport" content="width=device-width" />
    <title>Index</title>
</head>
<body>
    <div>
        Hello,MVC @ViewBag.Greeting (Form the view)
    </div>
</body>
</html>
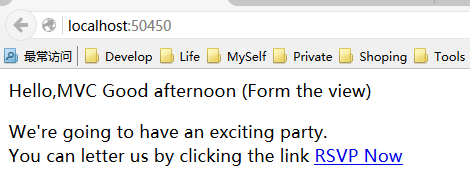
(8)运行效果如下
PS:Web 页面从服务器到浏览器的整个呈现的过程分为三步:
4. 创建一个简单的数据录入应用程序
(1)设置场景如下:
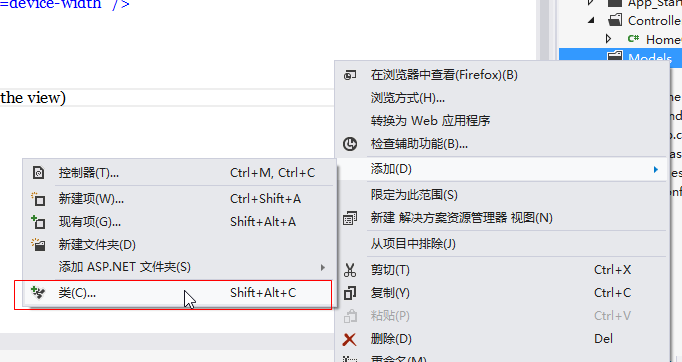
(2)添加模型类 GuestResponse 【右击 Models 文件夹 -> "添加" -> "类"】
    public class GuestResponse
    {
        public string Name { get; set; }
        public string Email { get; set; }
        public string Phone { get; set; }
        //这里设置WillAttend为一个 可空的的bool类型,意味着它可以是 true、false、null
        public bool? WillAttend { get; set; }
    }
(3)链接动作方法
a.添加一个指向 RSVP 表单的链接
@{
    Layout = null;
}

<!DOCTYPE html>

<html>
<head>
    <meta name="viewport" content="width=device-width" />
    <title>Index</title>
</head>
<body>
    <div>
        Hello,MVC @ViewBag.Greeting (Form the view)
        <p>We're going to have an exciting party.<br />
            You can letter us by clicking the link @Html.ActionLink("RSVP Now","RsvpForm")</p>
    </div>
</body>
</html>
PS:Html.ActionLink 是一个 HTML 辅助器方法,其作用是渲染一个超链接的 HTML 标记
b.如果现在点击这个链接,会看到404错误,这是因为还没有创建与这个/Home/RsvpForm 地址所对应的方法。可以把一个名为"RsvpForm"的方法加到 HomeController 类。
    public class HomeController : Controller
    {
        public ViewResult Index()
        {
            int hour = DateTime.Now.Hour;
            ViewBag.Greeting = hour < 12 ? "Good morning" : "Good afternoon";
            return View();
        }

        public ViewResult RsvpForm()
        {
            return View();
        }
    }
c.添加一个强类型视图 RsvpForm 【右击方法名 -> 添加视图】
@model PartyInvites.Models.GuestResponse

@{
    Layout = null;
}

<!DOCTYPE html>

<html>
<head>
    <meta name="viewport" content="width=device-width" />
    <title>RsvpForm</title>
</head>
<body>
    <div>

    </div>
</body>
</html>
PS: 强类型视图意在渲染一个特定的域类型,如果指定了想使用的类型,MVC将能够创建便于使用这个类型的便捷手段。
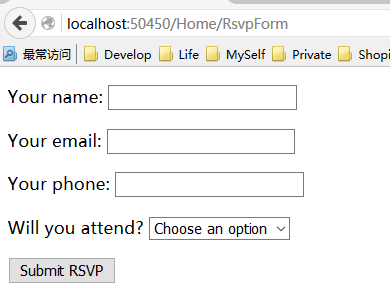
(4)建立表单,修改 RsvpForm.cshtml 视图文件如下
@model PartyInvites.Models.GuestResponse

@{
    Layout = null;
}

<!DOCTYPE html>

<html>
<head>
    <meta name="viewport" content="width=device-width" />
    <title>RsvpForm</title>
</head>
<body>
    @using (Html.BeginForm())
    {
        <p>Your name:@Html.TextBoxFor(x => x.Name)</p>
        <p>Your email:@Html.TextBoxFor(x => x.Email)</p>
        <p>Your phone:@Html.TextBoxFor(x => x.Phone)</p>
        <p>
            Will you attend?
            @Html.DropDownListFor(x => x.WillAttend, new[] {
           new SelectListItem() { Text = "Yes, I'll be there", Value = bool.TrueString },
           new SelectListItem() { Text = "No, I can't come", Value = bool.FalseString } },
           "Choose an option")
        </p>
        <input type="submit" value="Submit RSVP" />
    }
</body>
</html>
(5)处理表单
a.在 HomeController 控制器类中添加一个支持POST请求的动作方法
using PartyInvites.Models;
using System;
using System.Collections.Generic;
using System.Linq;
using System.Web;
using System.Web.Mvc;

namespace PartyInvites.Controllers
{
    public class HomeController : Controller
    {
        public ViewResult Index()
        {
            int hour = DateTime.Now.Hour;
            ViewBag.Greeting = hour < 12 ? "Good morning" : "Good afternoon";
            return View();
        }

        [HttpGet]
        //GET 请求是某人点击一个链接时浏览器正常发出的请求。
        //当有人第一次访问/Home/RsvpForm 时,这个动作版本负责显示最初的空白表单
        public ViewResult RsvpForm()
        {
            return View();
        }

        [HttpPost]
        //默认情况下,用 Html.BeginForm() 渲染的表单是由浏览器作为一个 POST 请求递交的。
        //这个动作版本负责接受所递交的数据,并决定用它做什么。
        public ViewResult RsvpForm(GuestResponse guestResponse)
        {
            //TODO:对晚会的组织者发送 Email 响应
            //这个View 方法的调用告诉MVC,查找一个名为"Thanks"的视图,并把GuestResponse 对象传递给这个视图
            return View("Thanks",guestResponse);
        }
    }
}
b.右击方法名创建强类型视图 Thanks
c.修改视图文件Thanks.cshtml
@model PartyInvites.Models.GuestResponse

@{
    Layout = null;
}

<!DOCTYPE html>

<html>
<head>
    <meta name="viewport" content="width=device-width" />
    <title>Thanks</title>
</head>
<body>
    <div>
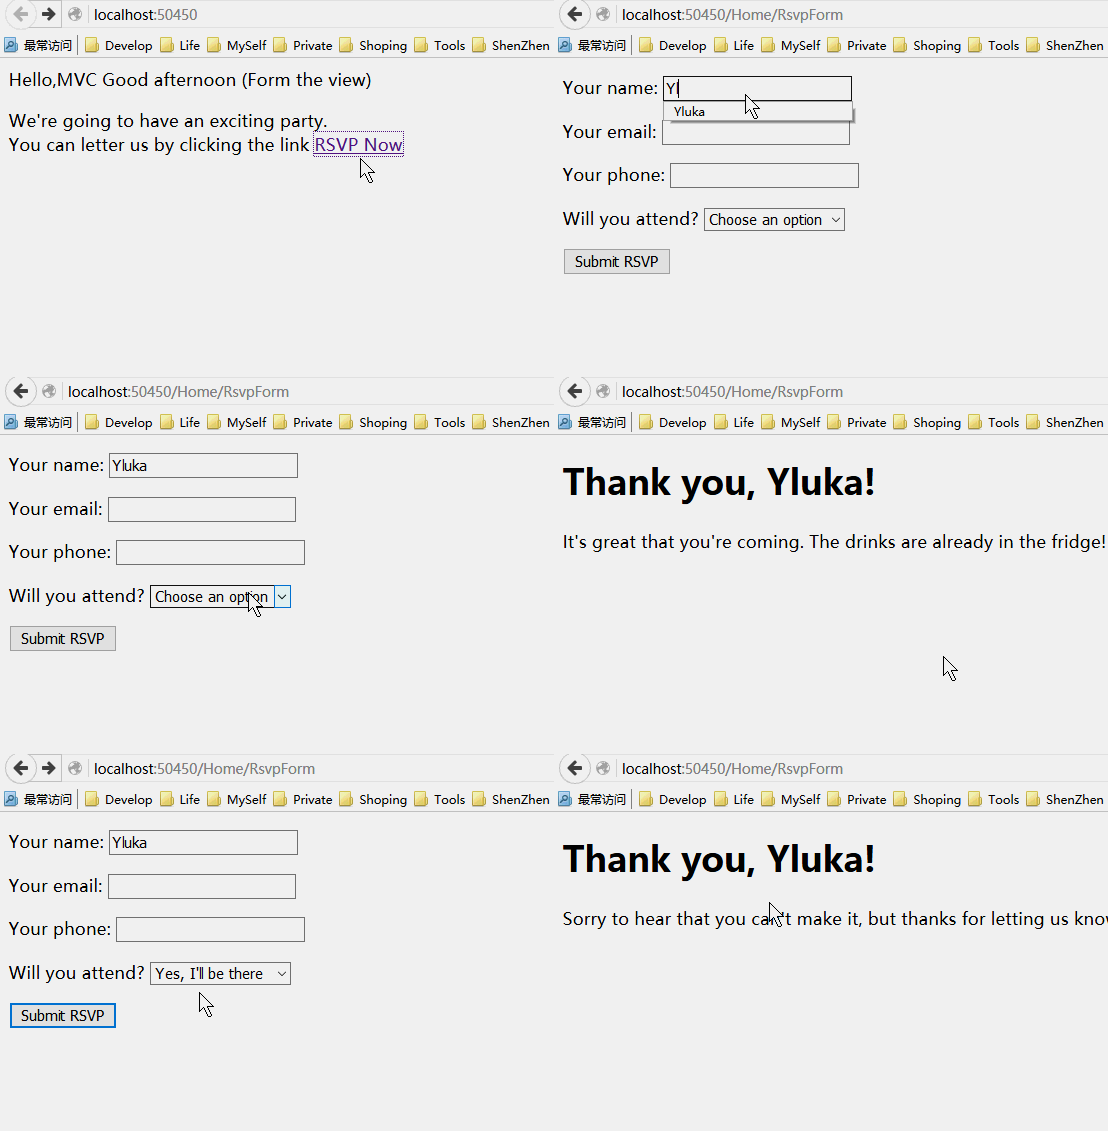
        <h1>Thank you, @Model.Name!</h1>
        @if (Model.WillAttend == true)
        {
            @:It's great that you're coming. The drinks are already in the fridge!
        }
        else
        {
            @:Sorry to hear that you can't make it, but thanks for letting us know.
        }
    </div>
</body>
</html>
d.运行程序,效果如下:
(6)添加验证。现在,到了对应用程序添加验证的时候了。如果不做此事,用户可能会输入无意义的数据,甚至递交一个空白表单。
ASP.NET MVC 支持验证规则声明,验证规则是以 System.ComponentModel.DataAnnotations 命名空间中的注解属性进行定义的。
a.修改 GuestResponse 模型类如下:
using System.ComponentModel.DataAnnotations;

namespace PartyInvites.Models
{
    public class GuestResponse
    {
        [Required(ErrorMessage="Please enter your name")]
        public string Name { get; set; }

        [Required(ErrorMessage="Please enter your email address")]
        [RegularExpression(".+\\@.+\\..+",ErrorMessage="Please enter a valid email address")]
        public string Email { get; set; }

        [Required(ErrorMessage = "Please enter your phone number")]
        public string Phone { get; set; }

        [Required(ErrorMessage = "Please specify whether you'll attend")]
        //WillAttend 属性使用了一个可空的 bool 类型就是为了可以运用 Required 验证注解属性
        public bool? WillAttend { get; set; }
    }
}
b.修改 RsvpForm 的POST 方法
        [HttpPost]
        public ViewResult RsvpForm(GuestResponse guestResponse)
        {
            if (ModelState.IsValid)
            {
                return View("Thanks", guestResponse);
            }
            else
            {
                //有验证错误
                return View();
            }
        }
c.在 RsvpForm 视图中使用 Html.ValidationSummary (验证摘要)辅助器方法可以完成这种工作。
<body>
    @using (Html.BeginForm())
    {
        @Html.ValidationSummary() <p>Your name: @Html.TextBoxFor(x => x.Name)</p>
        <p>Your email: @Html.TextBoxFor(x => x.Email)</p>
        <p>Your phone: @Html.TextBoxFor(x => x.Phone)</p>
        <p>
            Will you attend?
            @Html.DropDownListFor(x => x.WillAttend, new[] {
           new SelectListItem() { Text = "Yes, I'll be there", Value = bool.TrueString },
           new SelectListItem() { Text = "No, I can't come", Value = bool.FalseString } },
           "Choose an option")
        </p>
        <input type="submit" value="Submit RSVP" />
    }
</body>
d.运行效果如下:
e.一般我们需要高亮无效字段,这里用CSS文件实现,新建文件夹 Content ,并在文件夹中新建样式文件 Site.css 如下,并引用
field-summary-error {
    color: #f00;
}
field-summary-valid {
    display: none;
}
.input-validation-error {
    border: 1px solid #f00;
    background-color: #fee;
}
.validation-summary-errors {
    font-weight: bold;
    color: #f00;
}
validation-summary-valid {
    display: none;
}
(7)完成示例
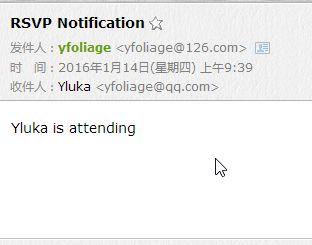
这个示例应用程序的最后需求是,将完成了的 RSVP 用电子邮件发给邀请的宾客和晚会的组织者。可以添加一个动作方法,使用.NET 框架的 E-mail 类来创建并发送一份邮件消息,以完成这一任务。
a.这里使用 WebMail 辅助器,修改 thanks.cshtml 视图文件如下:
@model PartyInvites.Models.GuestResponse

@{
    Layout = null;
}

<!DOCTYPE html>

<html>
<head>
    <meta name="viewport" content="width=device-width" />
    <title>Thanks</title>
</head>
<body>
    <div>
        @{
            try
            {
                WebMail.SmtpServer = "smtp.example.com";//传送电子邮件的 STMP 服务器的名称
                WebMail.SmtpPort = 587; //SMTP 事务的端口
                WebMail.EnableSsl = true;//设置在发送电子邮件时使用安全套接字层(SSL)来加密链接
                WebMail.UserName = "mySmtpUsername";//用于发送电子邮件的电子邮件账户名
                WebMail.Password = "mySmtpPassword";//设置发件人电子邮件账户的密码
                WebMail.From = "[email protected]";//设置发件人的电子邮件地址

                WebMail.Send("[email protected]","RSVP Notification",Model.Name+" is "+((Model.WillAttend??false)?"":"not")+" attending");
            }
            catch (Exception)
            {
                @:<b> Sorry - We couldn't send the email to confire your RSVP.</b>
            }
            }
        <h1>Thank you, @Model.Name!</h1>
        @if (Model.WillAttend == true)
        {
            @:It's great that you're coming. The drinks are already in the fridge!
        }
        else
        {
            @:Sorry to hear that you can't make it, but thanks for letting us know.
        }
    </div>
</body>
</html>
b.运行程序,收到消息邮件如下
(8) 源代码:PartyInvites.zip
