Genesis2000 GUI界面编程基础
《Genesis2000 GUI界面编程基础》
——南京信息职业技术学院 张先永
前言:
为什么需要CAM自动化,世上没有一个人是用同一样的方法来做同一件事的。每一个厂商都用很不同的方法来使用CAM系统。举个例子:在排板的时候,每一个厂商都用很不同的符号、靶标、字符等,放在不同的板边位置。这就是为什么CAM系统只能提供基本的功能,让用户加入这些资料而没有自动化的功能。
CAM工序自动化所带来的好处
第一、提升产量:无论有多少层的排板,自动化可以把一小时的排板时间缩短到三分钟。
第二、资料质量:所有资料都用同一种方法来处理。
第三、操作者的培训:当大部分的工序已经自动化时,培训一个新的操作人员是一件很容易的事情。
而Genesis2000 在开发的时候就给客户留下了,二次开发的空间PCB板厂可以根据自己厂内的RULE来定义各类自动化的参数。利用Script 编写厂内需要的自动化程序。自动化的程序员可以利用简单的脚本语言如(C-shell ,Perl 等),来编写程序而完成大的功能。而编写程序。这些程序需要按照程序员的想法去跑,那必须要得到一些相关变量。比如坐标值,Job、Step、Layer等。输入的变量无非就两种最基本的形式。一个是通过鼠标。一个是通过键盘。而这些数据的交互就是GUI (Graphic User Interface) 用户图形编辑接口。
下面我写的东西全部是个人学习总结的一些资料使用的脚本使用的C-Shell,学习资料的原版出自于Frontline 公司的自动化培训教材《GENESIS 2000 Automation Training Guide》,与网友刘才林的博客《gui界面编写》。
一、 如何调通GUI编程环境
1.1录入一个简单的代码
使用记事本或者写字板写入下边的内容,保存的格式后缀可以是TXT、 无、或者其它。保存到路径C:/genesis/sys/scripts下面当然你的可能不在C:盘。
代码如下:
set gui_out = /tmp/gui_out.$$
set gui_in = /tmp/gui_in.$$
echo "BW 2" >> $gui_in
echo "FG 000000" >> $gui_in
echo "BG 328068" >> $gui_in
echo "WIN 100 100" >> $gui_in
echo "LABEL GENESIS" >> $gui_in
/genesis/e91/all/gui $gui_in > $gui_out
source $gui_out
运行Script 点击:File-->Script--> RUN 在Script 选择 新建的文本。
将会出现下面的界面。
代码效果:
1.2 出现问题如何解决
如果没有出现这个界面需要分二种情况来判断:
一、没反应:(画面如下没有出现界面,并且提示程序运行结束了)
这用情况大多数 GUI没有指定对。可能原因是你的版本不一样的缘故。你可以修改一下
/genesis/e91/all/gui $gui_in > $gui_out
例如:你的90版本的你需要下面的才行:
/genesis/e90/all/gui $gui_in > $gui_out
注意:
/genesis/e90/all/gui为GUI的路径
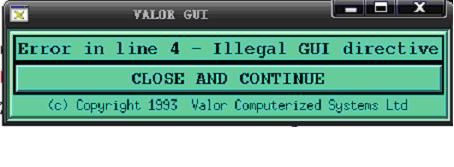
二、语法错误:(画面如下)
这种情况,以前开始写 这个代码 也老是遇到。后来才发现原来是代码利用的符号,有中文的符号。
二、 基本界面编写
从这个DEMO 开始解释 GUI界面的编写
set gui_out = /tmp/gui_out.$$
set gui_in = /tmp/gui_in.$$
echo "BW 2" >> $gui_in
echo "FG 000000" >> $gui_in
echo "BG 328068" >> $gui_in
echo "WIN 100 100" >> $gui_in
echo "LABEL GENESIS" >> $gui_in
/genesis/e91/all/gui $gui_in > $gui_out
source $gui_out
2.1、命令存放路径设置
set gui_out = /tmp/gui_out.$$ #设置代码零时存放路径
set gui_in = /tmp/gui_in.$$
2.2、echo "WIN 100 100" > $gui_in
#这是一个关键字:定义窗口的起始位置。
WIN xposition yposition (E文版注释)
Defines the position of the popup window (top left corner)starting from the top left
corner of the screen. WIN must be the first command of the directive file and must
be used just once.
Example:
WIN 200 200
2.3、echo "LABEL GENESIS" >> $gui_in
#命令字 标题 GENESIS
LABEL string
Creates a centred label with the given string. If the string represents a legal path to
a X11 bitmap, preceded by the @ character, the bitmap will be displayed instead.
LABEL Panelization Script
LABEL元素也可以显示格式为“xbm”和“xpm”的图片,其格式为“LABEL @path”
其中“path”为图片的路径,如“LABEL @/genesis/sys/scripts/xx.xpm”则会在GUI界面中显示路径/genesis/sys/scripts/下名为xx.xpm的图片。
2.4、/genesis/e91/all/gui $gui_in > $gui_out
读取$gui_in 文件
#这行是GUI文件指向的命令,也就是 如果这个地址不对的话将导致文件不能不执行。
2.5、 FG colour (前景颜色)
Sets the foreground colour for all the following widgets. Valid until the next FG
command is met. Colour can be either a number representing a colour in rrggbb
(e.g. “990000” for red ; “999999” for white and “000000” for black) or a colour
name (“red”; ”aquamarine”; etc…). Colour names can only be used if the rgb.txt
file is present in your disk under the /etc/X11directory (on HP) 。default value
is“000000”
Example:
| FG |
000099 |
2.6、BG color (背景颜色)
Sets the background color for all the following widgets. Valid until the next BG
command is met . Color can be either a number representing a color in rrggbb
(e.g. “990000” for red ; “999999” for white and “000000” for black) or a color
name (“red”; ”aquamarine”; etc…). Color names can only be used if the rgb.txt
file is present in your disk under the /etc/X11 on HP。 default value is“328068”
Example:
| BG |
999999 |
2.7、FONT font_name (设置字体)
Sets the current font for all the following widgets (default = tbr14). Valid until the
next FONT command is met. Font_name is of the form xyznn where:
x = c(ourier), h(elvetica) or t(imes) #字型
y = b(old) or m(edium) #粗细(黑体,适中)
z = r(egular) or i(talic) #字体(正常,斜体)
nn = 8,10,12,14,18,24 (size)
(e.g. “tbi14” for times-bold-italic-14)
Example:
| FONT |
cbr12 |
2.8、BW width
GUI界面中设置边缘宽度的语法为“BW width” ,其中“BW”为表示本条语句设置GUI界面边框的宽度, “width”为宽度值,取值范围为1~10,默认的值为1
Defines the width of the border surrounding each widget. Width is a number
between 1 and 10 (in pixels).
Example: echo "BW 2" >> $gui_in
| BW |
1 |
2.9、CLABEL string (关闭窗口 字符显示)
Sets the label that appears on the “Close” button in the bottom of the popup window
(if not set, uses the default label→ “CLOSE AND CONTINUE”).
| CLABEL |
Click here to Confirm |
三、数据交互界面设计
3.1、Txst 对话框输入
命令格式: TEXT field_name [length] string
Creates an input text field centered label with the given string. If the string
represents a legal path to a X11 bitmap, preceded by the @ character, the bitmap
will be displayed instead. 例如: @/genesis/sys/scripts/xx.xpm
TEXT step_name 14 ENTER STEP NAME ()
结合例子的语法分析:TEXT field_name [length] string
例子:echo "TEXT step_name 12 ENTER_STEP_NAME " >> $gui_in
其中
TEXT:为文字输入命令
Step_name :为需要赋值的变量名
14:为字符串长度
ENTER_STEP_NAME:为标题,当然也是可以为 图片
我写的例子:
#==========================================================
#GUI基本设置 可移植
set gui_out = /tmp/gui_out.$$
set gui_in = /tmp/gui_in.$$
echo "WIN 100 100" >> $gui_in
#==========================================================
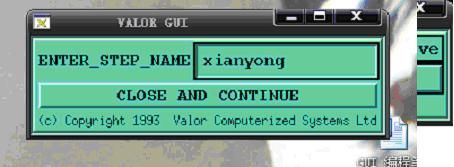
echo "TEXT step_name 12 ENTER_STEP_NAME " >> $gui_in #txst值输入
echo "DTEXT step_name zhangxianyong " >> $gui_in #默认值
#==========================================================
#GUI基本设置 可移植
/genesis/e91/all/gui $gui_in > $gui_out
source $gui_out
#==========================================================
例子效果图:
NOTE:DTxst 默认值预写入
命令格式:DTEXT field_name string
例子:
echo "TEXT step_name 12 ENTER_STEP_NAME " >> $gui_in
echo "DTEXT step_name zhangxianyong " >> $gui_in
3.2、List选项卡编辑
field_name disp_num S/M start_pos #语法格式为“LIST name visnum S/M start”
Entry1 # field_name为变量的名称。disp_num可见数目
Entry2 # S/M: single or multi change。Pos:开始行
…
Entryn
END #千万别忘记
代码例子:
#==========================================================
#List元素输入部分代码
echo "LIST step_name 2 s 1" >> $gui_in
echo "pcb 1" >> $gui_in
echo "custpan" >> $gui_in
echo "prodpanel" >> $gui_in
echo "END" >> $gui_in
#==========================================================
代码效果图:
3.3、RADIO选项卡编辑
RADIO field_name title V/H col_num sel_color # field_name变量名 title:提示字符 需加 ' '
Entry1 #V/H:表示按钮是显示是垂直还是水平方向。
Entry2 # col_num:为一栏显示按钮的个数
… # sel_color: 选中后颜色
Entryn
END
代码DEMO:
#==========================================================
#RADIO 选项卡部分代码
echo "RADIO num_layers 'Number of Layers:' H 1 990000" >> $gui_in
echo "1" >> $gui_in
echo "2" >> $gui_in
echo "4" >> $gui_in
echo "6" >> $gui_in
echo "10" >> $gui_in
echo "END" >> $gui_in
#==========================================================
代码效果:
3.4、OPTION选项卡编程
OPTION field_name title
Entry1
Entry2
…
Entryn
END
代码DEMO
#==========================================================
#OPTION 选项卡部分代码
echo "OPTION type_layers 'Type of Layers provided:' " >> $gui_in
echo "Signal" >> $gui_in
echo "Silk Screen" >> $gui_in
echo "Solder Mask" >> $gui_in
echo "Solder Paste" >> $gui_in
echo "Rout " >> $gui_in
echo "Drawing" >> $gui_in
echo "END" >> $gui_in
#==========================================================
效果图片
3.5、FORM 控制语句
简介:
FORM是控制界面的一个语句, 作用是将FORM下面的语句放在同一栏上直到出现 “END FORM”,其语法格式为“FORM [radio] [button]” ,其中radio button是说我们可以用控制RADIO元素使下面的某些元素是否可以进行操作。
2.5.1连续输入两个 TEXT 代码(横着排列两个 TEXT)
#==========================================================
echo "FORM" >> $gui_in
echo "TEXT name1 5 FAMILLY NAME:" >> $gui_in
echo "TEXT name2 5 FIRST NAME:" >> $gui_in
echo "ENDFORM" >> $gui_in
#==========================================================
2.5.2 radio/ button field to another field
DEMO: (注释:当pcb_type= 1时 那么TEXT可以使用)
#==========================================================
echo "FORM pcb_type 1" >> $gui_in
echo "TEXT num_inners 2 NUMBER OF INNER LAYER:">>$gui_in
echo "ENDFORM" >> $gui_in
echo "RADIO pcb_type 'PCB Type:' H 1 990000" >> $gui_in
echo "Double sided" >> $gui_in
echo "Multi Layer" >> $gui_in
echo "END" >> $gui_in
#==========================================================
图示:
我的邮箱:[email protected]
这是我自学的成果。希望正在学习的朋友可以用的上。
注意:
有问题的,不要老是发邮件给我 回帖啊!!!!回邮件回的累死了!


