【SpringMVC整合MyBatis】商品查询工程框架配置
mybatis和spring进行整合,来编写一个商品查询的工程。
一.整合dao
1.sqlMapConfig.xml
mybatis自己的配置文件---sqlMapConfig.xml:
2.applicationContext-dao.xml
spring的配置文件
配置:
数据源
SqlSessionFactory
mapper扫描器
applicationContext-dao.xml内容:
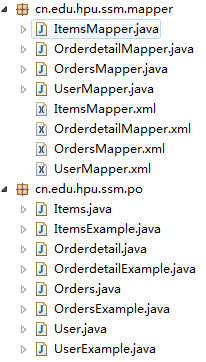
3.逆向工程生成po类及mapper(单表增删改查)
将生成的文件拷贝至工程中。
4.手动定义商品查询mapper
针对综合查询mapper,一般情况会有关联查询,建议自定义mapper
5.自定义mapper的映射配置文件ItemsMapperCustom.xml
sql语句:
SELECT * FROM items WHERE items.name LIKE '%洗衣机%'
ItemsMapperCustom.xml:
6.自定义mapper的映射接口文件ItemsMapperCustom.java
二.整合service
让spring管理service接口。
1.定义service接口
2.接口的实现ItemsServiceImpl:
3.在spring容器配置service(applicationContext-service.xml)
创建applicationContext-service.xml,文件中配置service。
4.事务控制(applicationContext-transaction.xml)
在applicationContext-transaction.xml中使用spring声明式事务控制方法。
5.整合springmvc
springmvc.xml
创建springmvc.xml文件,配置处理器映射器、适配器、视图解析器。
6.配置前端控制器
web.xml:
8.编写jsp如图-2.b.jsp的目录.png
9.加载spring容器
将mapper、service、controller加载到spring容器中。
在web.xml中,添加spring容器监听器,加载spring容器。
测试:
现将工程部署到tomcat中,启动tomcat,我们来测试
http://localhost:8080/springmvc_mybatis1507/queryItems.action
整个的整合和环境配置工作就到此结束了,接下来就是开发了。
一.整合dao
1.sqlMapConfig.xml
mybatis自己的配置文件---sqlMapConfig.xml:
<?xml version="1.0" encoding="UTF-8"?>
<!DOCTYPE configuration
PUBLIC "-//mybatis.org//DTD Config 3.0//EN"
"http://mybatis.org/dtd/mybatis-3-config.dtd">
<configuration>

    <!-- 全局setting配置,根据需要添加 -->

    <!-- 配置别名 -->
    <typeAliases>
    	<!-- 批量扫描别名 -->
    	<package name="cn.edu.hpu.ssm.po"/>
    </typeAliases>

    <!-- 配置mapper
    由于使用spring和mybatis的整合包进行mapper扫描,这里不需要配置了。
    但必须遵循:mapper.xml和mapper.java文件同名且在一个目录-->
    <!-- <mappers></mappers> -->

</configuration>
2.applicationContext-dao.xml
spring的配置文件
配置:
数据源
SqlSessionFactory
mapper扫描器
applicationContext-dao.xml内容:
<beans xmlns="http://www.springframework.org/schema/beans"
	xmlns:xsi="http://www.w3.org/2001/XMLSchema-instance" xmlns:mvc="http://www.springframework.org/schema/mvc"
	xmlns:context="http://www.springframework.org/schema/context"
	xmlns:aop="http://www.springframework.org/schema/aop" xmlns:tx="http://www.springframework.org/schema/tx"
	xsi:schemaLocation="http://www.springframework.org/schema/beans
		http://www.springframework.org/schema/beans/spring-beans-3.2.xsd
		http://www.springframework.org/schema/mvc
		http://www.springframework.org/schema/mvc/spring-mvc-3.2.xsd
		http://www.springframework.org/schema/context
		http://www.springframework.org/schema/context/spring-context-3.2.xsd
		http://www.springframework.org/schema/aop
		http://www.springframework.org/schema/aop/spring-aop-3.2.xsd
		http://www.springframework.org/schema/tx
		http://www.springframework.org/schema/tx/spring-tx-3.2.xsd ">


	<!-- 加载db.properties文件中的内容,db.properties文件中key命名要有一定的特殊规则 -->
	<context:property-placeholder location="classpath:db.properties" />
	<!-- 配置数据源 ,dbcp -->


	<!-- 数据源,使用dbcp -->
	<bean id="dataSource" class="org.apache.commons.dbcp.BasicDataSource"
		destroy-method="close">
		<property name="driverClassName" value="${jdbc.driver}" />
		<property name="url" value="${jdbc.url}" />
		<property name="username" value="${jdbc.username}" />
		<property name="password" value="${jdbc.password}" />
		<property name="maxActive" value="30" />
		<property name="maxIdle" value="5" />
	</bean>

	<!-- sqlSessionFactory -->
	<bean id="sqlSessionFactory" class="org.mybatis.spring.SqlSessionFactoryBean">
		<!-- 数据库连接池 -->
		<property name="dataSource" ref="dataSource" />
		<!-- 加载mybatis的全局配置文件 -->
		<property name="configLocation" value="classpath:mybatis/sqlMapConfig.xml" />
	</bean>

	<!-- mapper扫描器 -->
	<!-- mapper批量扫描,从mapper包中扫描出mapper接口,自动创建代理对象并且在spring容器中注入
	遵循规范:将mapper.java和mapper.xml映射文件名称保持一致,且在一个目录中.
	自动扫描出来的mapper的bean的id为mapper类名(首字母小写)-->
	<bean class="org.mybatis.spring.mapper.MapperScannerConfigurer">
		<!-- 扫描包路径,如果需要扫描多个包,中间使用半角逗号隔开 -->
		<property name="basePackage" value="cn.edu.hpu.ssm.mapper"></property>
		<property name="sqlSessionFactoryBeanName" value="sqlSessionFactory" />
	</bean>


</beans>
3.逆向工程生成po类及mapper(单表增删改查)
如图.逆向工程生成的文件
将生成的文件拷贝至工程中。
4.手动定义商品查询mapper
针对综合查询mapper,一般情况会有关联查询,建议自定义mapper
5.自定义mapper的映射配置文件ItemsMapperCustom.xml
sql语句:
SELECT * FROM items WHERE items.name LIKE '%洗衣机%'
ItemsMapperCustom.xml:
<?xml version="1.0" encoding="UTF-8" ?>
<!DOCTYPE mapper PUBLIC "-//mybatis.org//DTD Mapper 3.0//EN" "http://mybatis.org/dtd/mybatis-3-mapper.dtd" >
<mapper namespace="cn.edu.hpu.ssm.mapper.ItemsMapperCustom" >

  	<!-- 定义商品查询的sql片段,就是商品查询条件 -->
  	<sql id="query_items_where">
  	   <!-- 使用动态sql,通过if判断,满足条件进行sql拼接 -->
  	   <!-- 商品查询条件通过ItemsQueryVo包装对象中itemsCustom属性传递 -->
  	      <if test="itemsCustom!=null">
  	          <if test="itemsCustom.name!=null and itemsCustom.name!=''">
  	          		items.name LIKE '%${itemsCustom.name}%'
  	          </if>
  	      </if>

  	</sql>

  	<!-- 商品列表查询 -->
  	<!-- parameterType要传入包装对象,包装了查询条件 -->
  	<select id="findItemsList" parameterType="ItemsQueryVo"
  	resultType="cn.edu.hpu.ssm.po.ItemsCustom">
  		SELECT items.* FROM items
  		<where>
  		    <include refid="query_items_where"></include>
  		</where>
  	</select>

</mapper>
6.自定义mapper的映射接口文件ItemsMapperCustom.java
package cn.edu.hpu.ssm.mapper;

import java.util.List;

import cn.edu.hpu.ssm.po.ItemsCustom;
import cn.edu.hpu.ssm.po.ItemsQueryVo;

public interface ItemsMapperCustom {
    //商品查询列表
	public List<ItemsCustom> findItemsList(ItemsQueryVo itemsQueryVo)throws Exception;
}
二.整合service
让spring管理service接口。
1.定义service接口
package cn.edu.hpu.ssm.service.impl;

import java.util.List;

import cn.edu.hpu.ssm.po.ItemsCustom;
import cn.edu.hpu.ssm.po.ItemsQueryVo;

//商品管理service
public interface ItemsService {


	//商品查询列表
	public List<ItemsCustom> findItemsList(ItemsQueryVo itemsQueryVo)throws Exception;
}
2.接口的实现ItemsServiceImpl:
package cn.edu.hpu.ssm.service.impl;

import java.util.List;

import org.springframework.beans.factory.annotation.Autowired;

import cn.edu.hpu.ssm.mapper.ItemsMapperCustom;
import cn.edu.hpu.ssm.po.ItemsCustom;
import cn.edu.hpu.ssm.po.ItemsQueryVo;
import cn.edu.hpu.ssm.service.ItemsService;

//商品管理
public class ItemsServiceImpl implements ItemsService{


	@Autowired
	private ItemsMapperCustom itemsMapperCustom;

	@Override
	public List<ItemsCustom> findItemsList(ItemsQueryVo itemsQueryVo)
			throws Exception {
		//通过ItemsMapperCustom查询数据库
		return itemsMapperCustom.findItemsList(itemsQueryVo);
	}

}
3.在spring容器配置service(applicationContext-service.xml)
创建applicationContext-service.xml,文件中配置service。
<?xml version="1.0" encoding="UTF-8"?>
<beans xmlns="http://www.springframework.org/schema/beans"
	xmlns:xsi="http://www.w3.org/2001/XMLSchema-instance" xmlns:mvc="http://www.springframework.org/schema/mvc"
	xmlns:context="http://www.springframework.org/schema/context"
	xmlns:aop="http://www.springframework.org/schema/aop" xmlns:tx="http://www.springframework.org/schema/tx"
	xsi:schemaLocation="http://www.springframework.org/schema/beans
		http://www.springframework.org/schema/beans/spring-beans-3.2.xsd
		http://www.springframework.org/schema/mvc
		http://www.springframework.org/schema/mvc/spring-mvc-3.2.xsd
		http://www.springframework.org/schema/context
		http://www.springframework.org/schema/context/spring-context-3.2.xsd
		http://www.springframework.org/schema/aop
		http://www.springframework.org/schema/aop/spring-aop-3.2.xsd
		http://www.springframework.org/schema/tx
		http://www.springframework.org/schema/tx/spring-tx-3.2.xsd ">

	<!-- 商品管理的service -->
	<bean id="itemsService" class="cn.edu.hpu.ssm.service.impl.ItemsServiceImpl"></bean>


</beans>
4.事务控制(applicationContext-transaction.xml)
在applicationContext-transaction.xml中使用spring声明式事务控制方法。
<?xml version="1.0" encoding="UTF-8"?>
<beans xmlns="http://www.springframework.org/schema/beans"
	xmlns:xsi="http://www.w3.org/2001/XMLSchema-instance" xmlns:mvc="http://www.springframework.org/schema/mvc"
	xmlns:context="http://www.springframework.org/schema/context"
	xmlns:aop="http://www.springframework.org/schema/aop" xmlns:tx="http://www.springframework.org/schema/tx"
	xsi:schemaLocation="http://www.springframework.org/schema/beans
		http://www.springframework.org/schema/beans/spring-beans-3.2.xsd
		http://www.springframework.org/schema/mvc
		http://www.springframework.org/schema/mvc/spring-mvc-3.2.xsd
		http://www.springframework.org/schema/context
		http://www.springframework.org/schema/context/spring-context-3.2.xsd
		http://www.springframework.org/schema/aop
		http://www.springframework.org/schema/aop/spring-aop-3.2.xsd
		http://www.springframework.org/schema/tx
		http://www.springframework.org/schema/tx/spring-tx-3.2.xsd ">

	<!-- 事务管理器
	     对mybatis操作数据库事务控制,spring使用jdbc的事务控制类
	-->
	<bean id="transactionManager" class="org.springframework.jdbc.datasource.DataSourceTransactionManager">
		<!-- 数据源
		dataSource在applicationContext-dao.xml中配置了-->
		<property name="dataSource" ref="dataSource"></property>
	</bean>

	<!-- 通知 -->
	<tx:advice id="txAdvice" transaction-manager="transactionManager">
		<tx:attributes>
		   <!-- 传播行为 -->
		   <tx:method name="save*" propagation="REQUIRED"/>
		   <tx:method name="delete*" propagation="REQUIRED"/>
		   <tx:method name="insert*" propagation="REQUIRED"/>
		   <tx:method name="update*" propagation="REQUIRED"/>
		   <tx:method name="find*" propagation="SUPPORTS" read-only="true"/>
		   <tx:method name="get*" propagation="SUPPORTS" read-only="true"/>
		   <tx:method name="select*" propagation="SUPPORTS" read-only="true"/>
		</tx:attributes>
	</tx:advice>

	<!-- aop -->
	<aop:config>
		<aop:advisor advice-ref="txAdvice" pointcut="execution(* cn.edu.hpu.ssm.service.impl.*.*(..))"/>
	</aop:config>

</beans>
5.整合springmvc
springmvc.xml
创建springmvc.xml文件,配置处理器映射器、适配器、视图解析器。
<?xml version="1.0" encoding="UTF-8"?>
<beans xmlns="http://www.springframework.org/schema/beans"
	xmlns:xsi="http://www.w3.org/2001/XMLSchema-instance" xmlns:mvc="http://www.springframework.org/schema/mvc"
	xmlns:context="http://www.springframework.org/schema/context"
	xmlns:aop="http://www.springframework.org/schema/aop" xmlns:tx="http://www.springframework.org/schema/tx"
	xsi:schemaLocation="http://www.springframework.org/schema/beans
		http://www.springframework.org/schema/beans/spring-beans-3.2.xsd
		http://www.springframework.org/schema/mvc
		http://www.springframework.org/schema/mvc/spring-mvc-3.2.xsd
		http://www.springframework.org/schema/context
		http://www.springframework.org/schema/context/spring-context-3.2.xsd
		http://www.springframework.org/schema/aop
		http://www.springframework.org/schema/aop/spring-aop-3.2.xsd
		http://www.springframework.org/schema/tx
		http://www.springframework.org/schema/tx/spring-tx-3.2.xsd ">

	<!-- 可以扫描controller、service、...
	这里让扫描controller,指定controller的包-->
	<context:component-scan base-package="cn.edu.hpu.ssm.controller"></context:component-scan>

	<!-- 注解映射器 -->
	<!-- <bean class="org.springframework.web.servlet.mvc.method.annotation.RequestMappingHandlerMapping"/>	 -->
	<!-- 注解适配器 -->
	<!-- <bean class="org.springframework.web.servlet.mvc.method.annotation.RequestMappingHandlerAdapter"/>	 -->

	<!-- 使用mvc:annotation-driven代替上边注解映射器和注解适配器配置
	mvc:annotation-driven默认加载很多的参数绑定方法,
	比如json转换解析器就默认加载了,如果使用mvc:annotation-driven就不用配置上边的
    RequestMappingHandlerMapping和RequestMappingHandlerAdapter
	实际开发时使用mvc:annotation-driven-->
	<mvc:annotation-driven></mvc:annotation-driven>

	<!-- 视图解析器
	解析jsp解析,默认使用jstl标签,classpath下的得有jstl的包
	 -->
	<bean
		class="org.springframework.web.servlet.view.InternalResourceViewResolver">
		<property name="prefix" value="/WEB-INF/jsp/"></property>
	    <property name="suffix" value=".jsp"></property>
	</bean>
</beans>
6.配置前端控制器
web.xml:
<?xml version="1.0" encoding="UTF-8"?>
<web-app version="2.4"
	xmlns="http://java.sun.com/xml/ns/j2ee"
	xmlns:xsi="http://www.w3.org/2001/XMLSchema-instance"
	xsi:schemaLocation="http://java.sun.com/xml/ns/j2ee
	http://java.sun.com/xml/ns/j2ee/web-app_2_4.xsd">
	<!-- SpringMvc前端控制器 -->
	<servlet>
		<servlet-name>springmvc</servlet-name>
		<servlet-class>org.springframework.web.servlet.DispatcherServlet</servlet-class>
		<!-- contextConfigLocation配置springmvc加载的配置文件(配置处理器映射器,适配器等)
		如果不配置contextConfigLoaction,默认加载的是/WEB-INF/servlet名称-servlet.xml(springmvc-servlet.xml)
		-->
		<init-param>
			<param-name>contextConfigLocation</param-name>
			<param-value>classpath:spring/springmvc.xml</param-value>
		</init-param>
	</servlet>

	<servlet-mapping>
		<servlet-name>springmvc</servlet-name>
		<!-- 第一种:*.action。访问以.action结尾由DispatcherServlet进行解析;
		 第二种:/,所有访问的地址都由DispatcherServlet进行解析,对于静态文件的解析,
		 我们要配置不让DispatcherServlet进行解析。使用此种方法可以实现RESTful风格的url;
		 第三种:/*,这样配置不对,使用这种配置,最终要转发到一个jsp页面时,仍然会由
		 DispatcherServlet进行解析jsp地址,它不能根据jsp页面找到Handler,会报错-->
		<url-pattern>*.action</url-pattern>
	</servlet-mapping>

  <welcome-file-list>
    <welcome-file>index.jsp</welcome-file>
  </welcome-file-list>
</web-app>
7.编写Controller(就是Handler)
package cn.edu.hpu.ssm.controller;

import java.util.ArrayList;
import java.util.List;

import org.springframework.beans.factory.annotation.Autowired;
import org.springframework.web.bind.annotation.RequestMapping;
import org.springframework.web.servlet.ModelAndView;

import cn.edu.hpu.ssm.po.Items;
import cn.edu.hpu.ssm.po.ItemsCustom;
import cn.edu.hpu.ssm.service.ItemsService;

//商品的Controller
public class ItemsController {


	@Autowired
	private ItemsService itemsService;

	//商品查询列表
	//@RequestMapping实现 对queryItems方法和url进行映射,一个方法对应一个url
	//一般建议将url和方法写成一样
	@RequestMapping("/queryItems")
	public ModelAndView queryItems()throws Exception{

		//调用Service查找数据库,查询商品列表,这里使用静态数据模拟
		List<ItemsCustom> itemsList=itemsService.findItemsList(null);

		//返回ModelAndView
		ModelAndView modelAndView=new ModelAndView();
		//相当于request的setAttribut,在jsp页面中通过这个来取数据
		modelAndView.addObject("itemsList",itemsList);

		//指定视图
		//下边的路径,如果在视图解析器中配置jsp的路径前缀和后缀,修改为items/itemsList
		//modelAndView.setViewName("/WEB-INF/jsp/items/itemsList.jsp")
		//下边的路径配置就可以不在程序中指定jsp路径的前缀和后缀
		modelAndView.setViewName("items/itemsList");


		return modelAndView;
	}

}
8.编写jsp如图-2.b.jsp的目录.png
<%@ page language="java" contentType="text/html; charset=UTF-8"
    pageEncoding="UTF-8"%>
<%@ taglib uri="http://java.sun.com/jsp/jstl/core" prefix="c" %>
<%@ taglib uri="http://java.sun.com/jsp/jstl/fmt"  prefix="fmt"%>
<!DOCTYPE html PUBLIC "-//W3C//DTD HTML 4.01 Transitional//EN" "http://www.w3.org/TR/html4/loose.dtd">
<html>
<head>
<meta http-equiv="Content-Type" content="text/html; charset=UTF-8">
<title>查询商品列表</title>
</head>
<body>
<form action="${pageContext.request.contextPath }/items/queryItem.action" method="post">
查询条件:
<table width="100%" border=1>
<tr>
<td><input type="submit" value="查询"/></td>
</tr>
</table>
商品列表:
<table width="100%" border=1>
<tr>
	<td>商品名称</td>
	<td>商品价格</td>
	<td>生产日期</td>
	<td>商品描述</td>
	<td>操作</td>
</tr>
<c:forEach items="${itemsList }" var="item">
<tr>
	<td>${item.name }</td>
	<td>${item.price }</td>
	<td><fmt:formatDate value="${item.createtime}" pattern="yyyy-MM-dd HH:mm:ss"/></td>
	<td>${item.detail }</td>

	<td><a href="${pageContext.request.contextPath }/items/editItem.action?id=${item.id}">修改</a></td>


</tr>
</c:forEach>


</table>
</form>
</body>


</html>
9.加载spring容器
将mapper、service、controller加载到spring容器中。
图application配置文件
建议使用通配符加载上边的配置文件。在web.xml中,添加spring容器监听器,加载spring容器。
<!-- 加载spring容器 -->
	<context-param>
		<param-name>contextConfigLocation</param-name>
		<param-value>/WEB-INF/classes/spring/applicationContext-*.xml</param-value>
	</context-param>
	<listener>
		<listener-class>org.springframework.web.context.ContextLoaderListener</listener-class>
	</listener>
凡是符合/WEB-INF/classes/spring/applicationContext-*.xml规则的配置文件就自动加载了。
测试:
现将工程部署到tomcat中,启动tomcat,我们来测试
http://localhost:8080/springmvc_mybatis1507/queryItems.action
测试结果如图
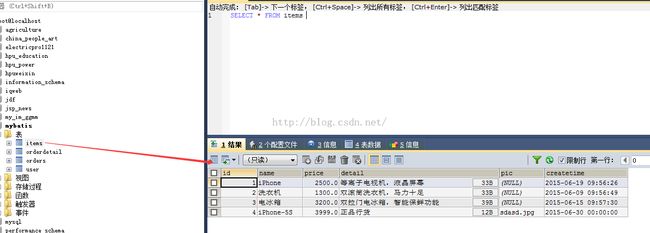
实际的数据库表中的情况如图数据库情况
说明测试成功!整个的整合和环境配置工作就到此结束了,接下来就是开发了。
在此基础上接下来的开发请看以后发布的总结文章。
转载请注明出处:http://blog.csdn.net/acmman/article/details/46997813


