Android官方教程翻译(4)——启动另一个Activity
Starting Another Activity
启动另一个Activity
PREVIOUSNEXT
THIS LESSON TEACHES YOU TO
这节课教你
1. Respond to the Send Button按钮响应
2. Build an Intent 创建一个意图Intent
3. Start the Second Activity 开启第二个activity
4. Create the Second Activity 创建第二个activity
5. Receive the Intent 接收Intent
6. Display the Message 显示消息
YOU SHOULD ALSO READ
· Installing the SDK
After completing the previous lesson, youhave an app that shows an activity (a single screen) with a text field and abutton. In this lesson, you’ll add some code to MainActivitythat starts a new activity when the user clicks the Sendbutton.
完成前面的课程后,你应该有一个包含文本域和一个按钮的应用。在这节课中,将添加一些代码来实现当用户点击按钮后启动新的activity。
Respond to the Send Button
按钮的响应
To respond to the button's on-click event, open theactivity_main.xml layout file and add the android:onClickattributeto the <Button> element:
为了响应按钮的点击事件,打开activity_main.xml布局文件给按钮添加android:onClick属性。
<Button
android:layout_width="wrap_content"
android:layout_height="wrap_content"
android:text="@string/button_send"
android:onClick="sendMessage"/>
The android:onClick attribute’s value, "sendMessage", is the name of a method in your activity that the systemcalls when the user clicks the button.
Anroid:onClick属性的值”sendMessage”就是对应anctivity中监听方法的名字。
Open the MainActivity class (located in the project's src/ directory) and add the corresponding method:
打开MainActivity类(在工程文件的src/目录下)添加响应方法。
/** Called when the user clicks theSend button */
public void sendMessage(View view){
// Do something in response to button
}
This requires that you import the View class:
这里要导入View类的jar包
import android.view.View;
Tip: In Eclipse, press Ctrl + Shift + O to import missing classes(Cmd + Shift + O on Mac).
提示:在Eclipse中按Ctrl+Shift+O可以自动导包
In order for the system to match this method to the methodname given to android:onClick,the signature must be exactly as shown. Specifically, the method must:
为了让该方法能匹配到android:onClick属性的值,这里必须具体说明该方法:
· Bepublic 公有的
· Havea void return value 空返回值
· Havea View as the only parameter (this will be the View that was clicked)
唯一一个View参数(View是被点击的视图对象)
Next, you’ll fill in this method to read the contents of thetext field and deliver that text to another activity.
下来,可以重写该方法去读文本域中输入的内容,并将该内容发送给另外一个activity。
Build an Intent
创建意图
An Intent is an object that provides runtime binding between separatecomponents (such as two activities). TheIntent represents an app’s "intent to do something." Youcan use intents for a wide variety of tasks, but most often they’re used tostart another activity.
Intent是一个绑定在两个组件(例如两个activity)之间的对象,这个Intent表示应用程序“有意向去做一些事”。你可以使用Intent来完成比较复杂的任务,但是更多的时候是用来启动另外一个activity。
Inside the sendMessage() method, create an Intent to start an activity called DisplayMessageActivity:
在sendMessage()方法中,创建一个Intent去启动一个叫DisplayMessageActivity的activity。
Intent intent = new Intent(this,DisplayMessageActivity.class);
The constructor used here takes two parameters:
该对象的构造函数接受两个参数。
· A Context as its first parameter (this is used because the Activity class is a subclass of Context)
上下文Context是第一个参数(使用该参数的是因为Activity继承自Context是的的textyageActivity内容,一些代码来实现启东新)
· The Class of the app component to which the system should deliver the Intent (in this case, the activity that should be started)
系统组件类应该发送这个Intent给另外一个activity(如本例中activity被启动)
Sending an intent to other apps
发送一个意图到其他应用
The intent created in this lesson is what's considered an explicit intent, because the Intent specifies the exact app component to which the intent shouldbe given. However, intents can also be implicit, in which case the Intent does not specify the desired component, but allows any appinstalled on the device to respond to the intent as long as it satisfies themeta-data specifications for the action that's specified in various Intentparameters. For more information, see the class about Interacting with Other Apps.
课程中创建的是一个显式的意图,因为已经明确了它将启动那个组件,然而Intent也有隐式的意图,这种意图没有明确指定要启动哪个组件,应用会根据Intent指定的规则去启动符合条件的组件,具体是哪个组件则不确定。有关更多的信息,请参看Interacting with Other Apps.
Note: The reference to DisplayMessageActivity will raise an error if you’re using an IDE such as Eclipsebecause the class doesn’t exist yet. Ignore the error for now; you’ll createthe class soon.
An intent not only allows you to start another activity, butit can carry a bundle of data to the activity as well. Inside thesendMessage() method, use findViewById() to get the EditTextelement and add its text value to the intent:
注意:如果你使用的是像Eclipse的集成环境,引用DisplayMessageActivity将产生一个错误。因为这个类没有被创建。先忽略这个错误,你马上将创建一个类。
Intent intent = new Intent(this,DisplayMessageActivity.class);
EditText editText = (EditText) findViewById(R.id.edit_message);
String message = editText.getText().toString();
intent.putExtra(EXTRA_MESSAGE, message);
Note: You now need import statements forandroid.content.Intent and android.widget.EditText. You'll define the EXTRA_MESSAGE constant in a moment.
注意:你现在需要导入android.content.Intent 和android.widget.EditText.两个包和定义EXTRA_MESSAGE常量。
An Intent can carry a collection of various data types as key-valuepairs called extras. The putExtra() method takes the key name in the first parameter and thevalue in the second parameter.
意图可以携带各种数据类型的键值对,putExtra()方法第一个参数是键,第二个参数是值。
In order for the next activity to query the extra data, youshould define the key for your intent's extra using a public constant. So addthe EXTRA_MESSAGE definition to the top of the MainActivity class:
为了让下面的activity去获取该数据,你应该定义一个常量并赋值。所以在MainActivity的上面去定义EXTRA_MESSAGE.
public class MainActivity extends Activity {
public finalstatic String EXTRA_MESSAGE= "com.example.myfirstapp.MESSAGE";
...
}
It's generally a good practice to define keys for intentextras using your app's package name as a prefix. This ensures they are unique,in case your app interacts with other apps.
用包名定义常量是一个好习惯,这样的常量是唯一的。
Start the Second Activity
开启第二个Activity
To start an activity, call startActivity() and pass it your Intent. The system receives this call and starts an instance of the Activity specified by the Intent.
开启activity的方法叫startActivity()要将Intent传递给新activity。系统接受到该响应并开启一个指定Intent的activity实例。
With this new code, the complete sendMessage() method that's invoked by the Send button now looks like this:
在新代码中,sendMessage()方法被第二个按钮调用,代码如下:
/** Called when the user clicks theSend button */
public void sendMessage(View view){
Intent intent = new Intent(this,DisplayMessageActivity.class);
EditText editText = (EditText) findViewById(R.id.edit_message);
String message = editText.getText().toString();
intent.putExtra(EXTRA_MESSAGE, message);
startActivity(intent);
}
Now you need to create the DisplayMessageActivity class in order for this to work.
现在来创建DisplayMessageActivity
Create the Second Activity
创建第二个Activity
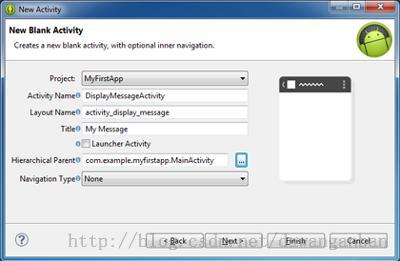
Figure 1. The new activity wizard in Eclipse.
To create a new activity using Eclipse:
1. Click New in the toolbar.
2. Inthe window that appears, open theAndroid folderand select AndroidActivity. Click Next.
3. Select BlankActivity and click Next.
4. Fillin the activity details:
o Project: MyFirstApp
o Activity Name: DisplayMessageActivity
o Layout Name: activity_display_message
o Title: My Message
o Hierarchial Parent: com.example.myfirstapp.MainActivity
o Navigation Type: None
Click Finish.
If you're using a different IDE or the command line tools,create a new file named DisplayMessageActivity.javain the project's src/ directory, next to the original MainActivity.java file.
//和创建第一个activity的方法一样
Open the DisplayMessageActivity.java file. If you used Eclipse to create this activity:
如果你使用Eclipse来创建这个activity,请打开DispalyMessageActivity.java
· Theclass already includes an implementation of the required onCreate() method.
该类已经包含了一个onCreate()的实现方法
· There'salso an implementation of the onCreateOptionsMenu() method, but you won't need it for this app so you can removeit.
还有一个onCreateOptionMenu()实现方法,这个方法不需要可以删掉。
· There'salso an implementation of onOptionsItemSelected() which handles the behavior for the action bar'sUp behavior. Keep this one the way it is.
还有一个onOptionsItemSelected()监听动作行为的方法,不要改动。
Because the ActionBar APIs are available only on HONEYCOMB (API level 11) and higher, you must add a condition aroundthe getActionBar() method to check the current platform version. Additionally,you must add the@SuppressLint("NewApi") tag to the onCreate() method to avoid lint errors.
因为ActionBar只在API11以后有,你必须添加一个getActionBar()方法去检测当前平台版本。另外,
你还应该给onCreate()方法添加@SuppressLint("NewApi") 标签来去掉提示。
Lint是一个静态检查器,它围绕Android项目的正确性、安全性、性能、可用性以及可访问性进行分析。它检查的对象包括XML资源、位图、ProGuard配置文件、源文件甚至编译后的字节码。
这一版本的Lint包含了API版本检查、性能检查以及其他诸多特性。其中还有一个重要的改动是Lint可以使用@SuppressLint标注忽略指定的警告。
这个是android带的lint工具提示的,lint官方的说法是Improving Your Code with lint,应该是帮助提升代码的,如果不想用的话,可以右键点工程,然后在android tools中,选择clear lint marker就没有这个错误了
The DisplayMessageActivity class should now look like this:
DisplayMessageActivity类如下:
public class DisplayMessageActivity extends Activity {
@SuppressLint("NewApi")
@Override
protected void onCreate(BundlesavedInstanceState){
super.onCreate(savedInstanceState);
setContentView(R.layout.activity_display_message);
// Make surewe're running on Honeycomb or higher to use ActionBar APIs
if (Build.VERSION.SDK_INT>= Build.VERSION_CODES.HONEYCOMB){
// Show theUp button in the action bar.
getActionBar().setDisplayHomeAsUpEnabled(true);
}
}
@Override
public booleanonOptionsItemSelected(MenuItem item){
switch (item.getItemId()){
case android.R.id.home:
NavUtils.navigateUpFromSameTask(this);
return true;
}
return super.onOptionsItemSelected(item);
}
}
If you used an IDE other than Eclipse, update your DisplayMessageActivity class with the above code.
如果你使用的是其他集成开发环境,更改代码如上。
All subclasses of Activity must implement the onCreate() method. The system calls this when creating a new instance ofthe activity. This method is where you must define the activity layout with the setContentView()method and is where you should perform initial setup for theactivity components.
所有的Activity子类都必须实现onCreate()方法。当创建新实例时系统会调用该方法。在该方法中你必须用setContentView()定义你要初始化显示的xml布局文件。
Note: If you are using an IDE other than Eclipse, your project doesnot contain the activity_display_messagelayout that's requested by setContentView(). That's OK because you will update this method later andwon't be using that layout.
注意:如果你使用的是其他的集成开发环境,你的工程中setContentView中定义的是activity_display_message布局文件,但你不想使用该布局文件,没关系,因为你即将更改该布局文件。
Add the title string
添加标题字符
If you used Eclipse, you can skip to the next section,because the template provides the title string for the new activity.
如果你使用Eclipse,你可以跳过。
If you're using an IDE other than Eclipse, add the newactivity's title to the strings.xml file:
<resources>
...
<string name="title_activity_display_message">My Message</string>
</resources>
Add it to the manifest
给mainfest文件添加配置
All activities must be declared in your manifest file, AndroidManifest.xml, using an <activity> element.
所有的activity都必须在mainfest文件中使用<activity>声明。
When you use the Eclipse tools to create the activity, itcreates a default entry. If you're using a different IDE, you need to add themanifest entry yourself. It should look like this:
用Eclipse创建activity时,默认创建。用其他开发环境,你需要去手动添加。如下:
<application ... >
...
<activity
android:name="com.example.myfirstapp.DisplayMessageActivity"
android:label="@string/title_activity_display_message"
android:parentActivityName="com.example.myfirstapp.MainActivity">
<meta-data
android:name="android.support.PARENT_ACTIVITY"
android:value="com.example.myfirstapp.MainActivity"/>
</activity>
</application>
The android:parentActivityName attribute declares the name of this activity's parentactivity within the app's logical hierarchy. The system uses this value toimplement default navigation behaviors, such as Up navigationonAndroid 4.1 (API level 16) and higher. You can provide the same navigationbehaviors for older versions of Android by using the Support Library and adding the <meta-data> element as shown here.
Android:parentActivityName属性声明了该activity的父类activity的路径,系统使用该配置寻找。
Note: Your Android SDK should already include the latest AndroidSupport Library. It's included with the ADT Bundle but if you're using adifferent IDE, you should have installed it during the Adding Platforms and Packages step. When using the templates in Eclipse, the SupportLibrary is automatically added to your app project (you can see the library'sJAR file listed under AndroidDependencies). If you're notusing Eclipse, you need to manually add the library to your project—follow theguide for setting up the Support Library then return here.
If you're developing with Eclipse, you can run the app now,but not much happens. Clicking the Send button starts the second activity butit uses a default "Hello world" layout provided by the template.You'll soon update the activity to instead display a custom text view, so ifyou're using a different IDE, don't worry that the app won't yet compile.
如果你使用的是Eclipse,你现在可以运行该应用了,但是没有什么特别的事发生,点击第二个按钮去启动activity,但是还是默认的“Helloword”.
Receive the Intent
Every Activity is invoked by an Intent, regardless of how the user navigated there. You can get the Intent that started your activity by calling getIntent() and retrieve the data contained within it.
每个Activity是被Intent调用的,无论用户如何跳转,你可以通过getIntent()得到Intnet实例并取出里面的数据。
In the DisplayMessageActivity class’s onCreate() method, get the intent and extract the message delivered byMainActivity:
在DisplayMessageActivity类的onCreate()方法中,可以获取MainActivity发送的消息和意图。
Intent intent = getIntent();
String message = intent.getStringExtra(MainActivity.EXTRA_MESSAGE);
Display the Message
显示消息
To show the message on the screen, create a TextView widget and set the text using setText(). Then add theTextView as the root view of the activity’s layout by passing it to setContentView().
为了在屏幕上显示消息,创建一个文本域部件并使用setText()设置文本,然后将该部件作为根视图给setContentView()方法。
The complete onCreate() method for DisplayMessageActivity now looks like this:
现在DisplayMessageActivity类的onCreate()方法如下:
@Override
public void onCreate(BundlesavedInstanceState){
super.onCreate(savedInstanceState);
// Get the message from the intent
Intent intent = getIntent();
String message = intent.getStringExtra(MainActivity.EXTRA_MESSAGE);
// Create the text view
TextView textView = new TextView(this);
textView.setTextSize(40);
textView.setText(message);
// Set the text view as the activitylayout
setContentView(textView);
}
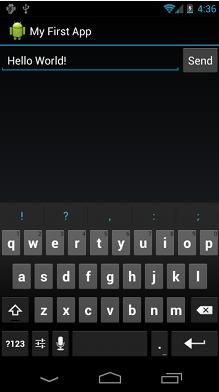
You can now run the app. When it opens, type a message in thetext field, click Send, and the message appears on the second activity.
你可以运行该例子,打开程序,输入一段文字,点击按钮,看到将该字符串发送到了第二个activity.
Figure 2. Both activities in the final app, running on Android 4.0.
That's it, you've built your first Android app!
这样,创建了你的第一个应用
To learn more about building Android apps, continue to followthe basic training classes. The next class isManaging the Activity Lifecycle.
更多学习,请看下一节。


