IOS5基础之九-----选取器之老虎机
首先看头文件和前面的基本相似。
#import <UIKit/UIKit.h>
@interface BIDCustomPickerViewController : UIViewController
<UIPickerViewDelegate,UIPickerViewDataSource>
@property (strong,nonatomic) IBOutlet UIPickerView *picker;
@property (strong,nonatomic) IBOutlet UILabel *winlabel;
@property (strong,nonatomic) NSArray *column1;
@property (strong,nonatomic) NSArray *column2;
@property (strong,nonatomic) NSArray *column3;
@property (strong,nonatomic) NSArray *column4;
@property (strong,nonatomic) NSArray *column5;
-(IBAction)spin;
@end
添加图像资源将打包好的图片文件夹拖入到文件中就OK。
接下来就是实现控制器了
- (void)viewDidLoad
{
[super viewDidLoad];
// Do any additional setup after loading the view from its nib.
//载入6个不同的图像
UIImage *seven=[UIImage imageNamed:@"seven.png"];
UIImage *bar=[UIImage imageNamed:@"bar.png"];
UIImage *crown=[UIImage imageNamed:@"crown.png"];
UIImage *cherry=[UIImage imageNamed:@"cherry.png"];
UIImage *lemon=[UIImage imageNamed:@"lemon.png"];
UIImage *apple=[UIImage imageNamed:@"apple.png"];
for(int i=1;i<=5;i++)
{
//每个选取器组件都创建5个图像
UIImageView *sevenView=[[UIImageView alloc] initWithImage:seven];
UIImageView *barView=[[UIImageView alloc] initWithImage:bar];
UIImageView *crownView=[[UIImageView alloc] initWithImage:crown];
UIImageView *cherryView=[[UIImageView alloc] initWithImage:cherry];
UIImageView *lemonView=[[UIImageView alloc] initWithImage:lemon];
UIImageView *appleView=[[UIImageView alloc] initWithImage:apple];
//将视图放到数组中。
NSArray *imageViewArray=[[NSArray alloc] initWithObjects:sevenView,barView,crownView,cherryView,lemonView,appleView, nil];
NSString *filedName=[[NSString alloc] initWithFormat:@"column%d",i];
//根据属性名称设置属性
[self setValue:imageViewArray forKey:filedName];
}
//随机数生成器
srandom(time(NULL));
}
- (void)viewDidUnload
{
[super viewDidUnload];
// Release any retained subviews of the main view.
// e.g. self.myOutlet = nil;
self.picker=nil;
self.winlabel=nil;
self.column1=nil;
self.column2=nil;
self.column3=nil;
self.column4=nil;
self.column5=nil;
}
-(IBAction)spin
{
BOOL win=NO;
int numInRow=1;
int lastVal=-1;
for(int i=0;i<5;i++)
{
//随即生成行选择
int newValue=random()%[self.column1 count];
if (newValue==lastVal) {
numInRow++;
}
else
numInRow=1;
lastVal=newValue;
//该组件制作更改动画,并告诉选取器重新载入该组件。
[picker selectRow:newValue inComponent:i animated:YES];
[picker reloadComponent:i];
if (numInRow==3) {
win=YES;
}
}
if (win) {
winlabel.text=@"Win";
}
else
winlabel.text=@"";
}
#pragma mark
#pragma mark Picker Data Source Methods
-(NSInteger)numberOfComponentsInPickerView:(UIPickerView *)pickerView
{
return 5;
}
-(NSInteger)pickerView:(UIPickerView *)pickerView numberOfRowsInComponent:(NSInteger)component
{
return [self.column1 count];
}
#pragma mark Picker Delegate Methods
-(NSString *)pickerView:(UIPickerView *)pickerView titleForRow:(NSInteger)row forComponent:(NSInteger)component
{
NSString *arrayName=[[NSString alloc] initWithFormat:@"column%d",component+1];
NSArray *array=[self valueForKey:arrayName];
return [array objectAtIndex:row];
}
这样基本的一个老虎机就完成了
我们继续完善添加声音和如何添加内部的一些框架(也就是类了,相当于dll之类的)
//显示按钮
-(void)showButton {
self.button.hidden = NO;
}
//当用户获胜时调用声音及显示文本框
-(void)playWinSound {
NSString *path = [[NSBundle mainBundle] pathForResource:@"win"
ofType:@"wav"];
SystemSoundID soundID;
AudioServicesCreateSystemSoundID(
(__bridge CFURLRef)[NSURL fileURLWithPath:path], &soundID);
AudioServicesPlaySystemSound (soundID);
winlabel.text = @"WIN!";
[self performSelector:@selector(showButton) withObject:nil
afterDelay:1.5];
}
修改后的操作方法- (IBAction)spin {
BOOL win = NO;
int numInRow = 1;
int lastVal = -1;
for (int i = 0; i < 5; i++) {
int newValue = random() % [self.column1 count];
if (newValue == lastVal)
numInRow++;
else
numInRow = 1;
lastVal = newValue;
[picker1 selectRow:newValue inComponent:i animated:YES];
[picker1 reloadComponent:i];
if (numInRow >= 3)
win = YES;
}
self.button.hidden = YES;//隐藏按钮
//用于播放已加载的声音
NSString *path = [[NSBundle mainBundle] pathForResource:@"crunch"
ofType:@"wav"];
SystemSoundID soundID;
AudioServicesCreateSystemSoundID(
(__bridge CFURLRef)[NSURL fileURLWithPath:path], &soundID);
AudioServicesPlaySystemSound (soundID);
if (win)
[self performSelector:@selector(playWinSound)
withObject:nil
afterDelay:.5];
else
[self performSelector:@selector(showButton)
withObject:nil
afterDelay:.5];
winlabel.text = @"";
}
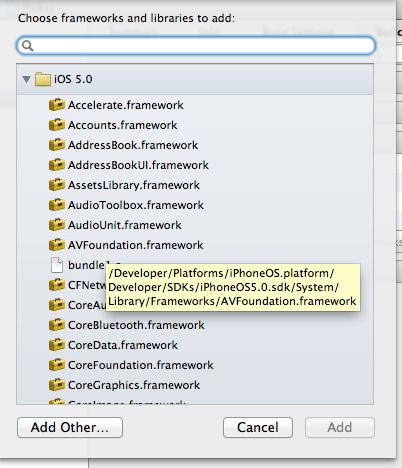
添加AudioToolBox.framework
首先点击图片左边上方的PIcker--找到dock中的TARGETS 的Picker --BuildPhases ---Link Binary With Libraries----点击+。
找到AudioToolBox.framework这样就把这个添加到Picker项目中,音乐也就会响起~~~~~~

