基于WiEngine游戏引擎--战斗场景之技能
转发,请保持地址:http://blog.csdn.net/stalendp/article/details/8606424
游戏战斗场景中的技能也是游戏的特色之一,这篇文章将记录使用WiEngine来设计游戏中的技能及其按钮特效。
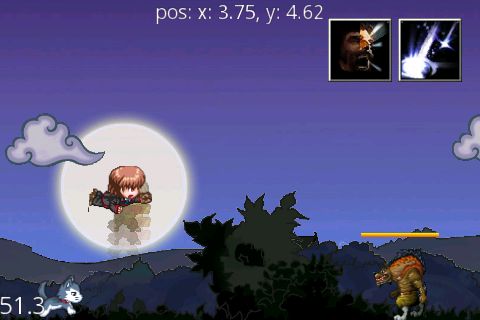
先看效果图吧:
点击技能的按钮,就会放出技能。技能有冷却事件,表现在按钮上(下图更清晰一些)。
这里的技能用到的是WiEngine粒子系统中的特效。我的理解,粒子系统是一个标准,只要给定相应的参数,就可以显示一些很炫的效果。我本来是想用ParticleDesigner来设计粒子效果的,不过试了一下,发现载入有些问题,所以改用WiEngine中内置的特效了。我这里使用的是官方例子的Meteor(位于Demo/ParticleDemon.h中;补充一下WiEngine的好处,引擎中例子特别详细,我这个demo中的大部分代码都是从例子中改过来的)。我对Meteor进行了一个改进,代码如下:
class ParticleMeteorSystem: public wyQuadParticleSystem {
public:
	ParticleMeteorSystem() :
			wyQuadParticleSystem(150) {
		// duration
		setDuration(PARTICLE_DURATION_INFINITY);

		// gravity
		setParticleGravity(DP(-133.33f), DP(0.33f));

		// angle
		setDirectionAngleVariance(90, 360);

		// speed of particles
		setSpeedVariance(DP(10), DP(3.33f));

		// life of particles
		setLifeVariance(2, 1);

		// size, in pixels
		setStartSizeVariance(DP(40.0f), DP(6.6f));

		// emits per second
		setEmissionRate(getMaxParticles() / getLife());

		// color of particles
		setStartColorVariance(0.2f, 0.4f, 0.7f, 1.0f, 0.0f, 0.0f, 0.2f, 0.1f);
		setEndColorVariance(0.0f, 0.0f, 0.0f, 1.0f, 0.0f, 0.0f, 0.0f, 0.0f);

		//set texture
		setTexture(wyTexture2D::makePNG(RES("R.drawable.fire")));

		// additive
		setBlendAdditive(true);
	}
};

class FightBullet: public wyLayer {
private:
	ParticleMeteorSystem* data;
public:
	FightBullet(float px, float py) {
		data = new ParticleMeteorSystem();
		data->autoRelease();
		addChildLocked(data);
		setScale(0.6f);
		setPosition(px, py);
	}

	virtual ~FightBullet() {
	}
};
这里对子弹射击,只是用于演示有些特效的,并没有处理碰撞监测相关的内容(会在接下来的介绍Box2d时讨论),这里使用动画来演示子弹飞行、击中物体,然后使其爆炸的特效。代码如下:
void Boy::shot() {
	wyCallFunc* sbegin = wyCallFunc::make(wyTargetSelector::make(this, SEL(Boy::shotBegin)));
	wyCallFunc* bulletfly = wyCallFunc::make(wyTargetSelector::make(this, SEL(Boy::letBulletFlying)));
	wySequence* s = wySequence::make(sbegin, bulletfly,  NULL);
	sprite->runAction(s);
}

void Boy::shotBegin() {
	LOGI("Shot begin");
	hitBullet = new FightBullet(sprite->getPositionX()-60, sprite->getPositionY()-50);
	addChildLocked(hitBullet);

	sprite->runAction(boyActions[Boy::BOY_HIT]); //让Hero进行攻击的动画
	playEffect(Boy::BOY_HIT); //播放攻击时的音效
}
void Boy::letBulletFlying() {
	LOGI("Shotting");

	wyActionCallback callback = { NULL, onMoveEnd, NULL };
	wyMoveBy* moveby = wyMoveBy::make(3, 235, 0);
	moveby->setCallback(&callback, this);
	hitBullet->runAction(moveby);  // 子弹飞行中
}
static void onMoveEnd(wyAction* action, void* data) { // 子弹飞行完,停止射击动画
	Boy* b = (Boy*)data;b->shotEnd();
}
void Boy::shotEnd() {
	LOGI("Shot end");
	changeAction(Boy::BOY_RUN); //子弹飞行完之后,让Hero进行奔跑动画
	removeChild(hitBullet, true);
	hitBullet->release();
	scene->enemyKilled(); // 表明击中物体,这里应当使用碰撞监测的。
}
接下来介绍技能按钮的实现。技能按钮有个冷却的时间(常识啊),在这里我将实现这个效果。相同的技能要准备两张图片,一张明亮一点的,表明技能可以使用,一张暗一点的,表示技能需要冷却。技能冷却时,吧暗一点的图片覆盖在亮一点的图片上, 播放一个动画时暗图片逐渐消失,就达到冷却效果了(效果在上面的第二张图片上很清晰。技能冷却的效果,对于玩过魔兽世界的同学来说,这是理所当然了)。
OK,附上代码:
class Button2: public wyNode {
public:
	MyScene* scene;
	wyButton* button;
	wySprite* enable;
	wyProgressTimer* disable;
	wyCallFunc* action;
	int type;

public:
	Button2(MyScene* scene, const char* ne, const char* ndis, int type) {
		this->scene = scene;
		this->type = type;

		wyZwoptexManager* zm = wyZwoptexManager::getInstance();

		// create sprites
		enable = zm->makeSprite(ne);
		disable = wyProgressTimer::make(zm->makeSprite(ndis));
		disable->setStyle(RADIAL_CCW); //设置进度条的改变方式
		disable->setScale(0.9f);

		// create atlas button
		button = new wyButton(enable, enable, enable, NULL, NULL,
				wyTargetSelector::make(this, SEL(Button2::onButtonClicked)));
		addChildLocked(button);
		disable->setPosition(button->getPositionX(), button->getPositionY());
		disable->setVisible(false);

		addChildLocked(disable);
	}

	virtual ~Button2() {
	}


	void onButtonClick() {
		switch(type) {
		case Boy::BOY_JUMP:
			scene->jump();
			break;
		case Boy::BOY_HIT:
			scene->shot();
			break;
		}
	}

	void onButtonClickedEnd() {
		disable->setVisible(false);
		button->setEnabled(true);
	}

	void onButtonClicked(wyTargetSelector* ts) {
		button->setEnabled(false);
		disable->setVisible(true);

		wyCallFunc* onaction = wyCallFunc::make(wyTargetSelector::make(this, SEL(Button2::onButtonClick)));
		wyCallFunc* setenable = wyCallFunc::make(wyTargetSelector::make(this, SEL(Button2::onButtonClickedEnd)));
		wySequence* s = wySequence::make(onaction, wyProgressTo::make(3, 100, 0), setenable,  NULL);
		disable->runAction(s);
	}
};

