在MFC中通过opencv显示摄像头视频或者文件视频
这里通过MFC显示摄像头视频,同样要用到CvvImage类,本人用的opencv2.3.1的版本,这里没有这个类,所以仍然需要手动加入这个类的头文件和代码文件。
关于CvvImage类的说明请看:
http://blog.csdn.net/weixingstudio/article/details/7357651
http://blog.csdn.net/weixingstudio/article/details/7357558
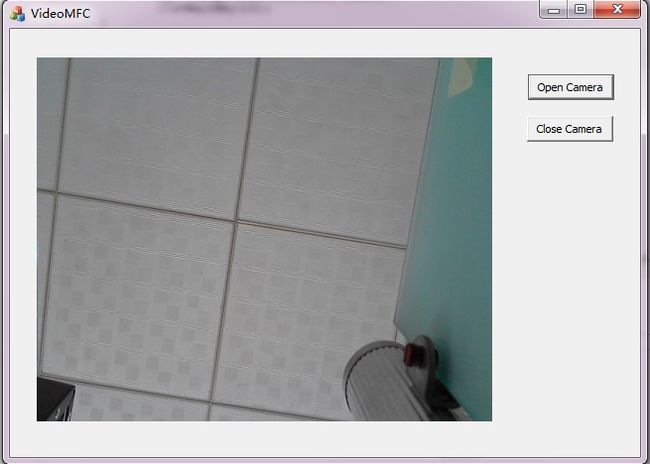
然后就是搭建工程了。这里就不多说界面的设计了。我这里的界面如图所示,有一个开始打开摄像头的按钮,一个关闭摄像头的按钮。有一个PictureBox的控件。
为了能够在PictureBox里面显示图片,我们需要定义一些变量来获取PictureBox的句柄。在主窗口的cpp文件中,添加如下的全局变量:
CvCapture* capture;
CRect rect;
CDC *pDC;
HDC hDC;
CWnd *pwnd;
这里特别注意,这些变量一定要是全局变量。再来看一下这些变量的添加位置:
#include "stdafx.h"
#include "VideoMFC.h"
#include "VideoMFCDlg.h"
#include "afxdialogex.h"

#ifdef _DEBUG
#define new DEBUG_NEW
#endif


CvCapture* capture;
CRect rect;
CDC *pDC;
HDC hDC;
CWnd *pwnd;

// CAboutDlg dialog used for App About

class CAboutDlg : public CDialogEx
{
public:
然后在窗口的初始化函数中进行句柄的初始化:
OnInitDialog()
这个函数,BOOL CVideoMFCDlg::OnInitDialog()
初始化代码:
// CVideoMFCDlg message handlers

BOOL CVideoMFCDlg::OnInitDialog()
{
	CDialogEx::OnInitDialog();

	// Add "About..." menu item to system menu.

	// IDM_ABOUTBOX must be in the system command range.
	ASSERT((IDM_ABOUTBOX & 0xFFF0) == IDM_ABOUTBOX);
	ASSERT(IDM_ABOUTBOX < 0xF000);

	CMenu* pSysMenu = GetSystemMenu(FALSE);
	if (pSysMenu != NULL)
	{
		BOOL bNameValid;
		CString strAboutMenu;
		bNameValid = strAboutMenu.LoadString(IDS_ABOUTBOX);
		ASSERT(bNameValid);
		if (!strAboutMenu.IsEmpty())
		{
			pSysMenu->AppendMenu(MF_SEPARATOR);
			pSysMenu->AppendMenu(MF_STRING, IDM_ABOUTBOX, strAboutMenu);
		}
	}


	// Set the icon for this dialog.  The framework does this automatically
	//  when the application's main window is not a dialog
	SetIcon(m_hIcon, TRUE);			// Set big icon
	SetIcon(m_hIcon, FALSE);		// Set small icon

	// TODO: Add extra initialization here
	pwnd = GetDlgItem(IDC_ShowImage);
	//pwnd->MoveWindow(35,30,352,288);
        pDC =pwnd->GetDC();
	//pDC =GetDC();
        hDC= pDC->GetSafeHdc();
	pwnd->GetClientRect(&rect);


	return TRUE;  // return TRUE  unless you set the focus to a control
}
这里的初始化代码只有Todo后面的是自己添加的,目的是获得图像控件的句柄,将来好在上面显示图像。这一步也可以放在具体的显示图像的时候在进行,但是就需要每显示一帧,都获得一次句柄。
在控制台程序中,我们可以很简单的通过for(;;)的空循环来不停的实现获取摄像头的每一帧,但是我发现这么做在MFC里面是不可行的。一个是因为MFC是用户界面程序,如果这么写的话,所有的界面都会卡住,而且这么写的话其他的功能按钮就失去作用了。
这里为了实现获取摄像头的每一帧,我们要通过设定一个时间事件,让每隔一定时间,比如20ms,就调用一个函数,通过这个时间调用来获取摄像头的帧。
这样,我们就可以实现在图像控件中显示视频,并且用户界面不会卡住了。
看一下打开摄像头按钮的代码:
void CVideoMFCDlg::OnBnClickedButton1()
{
	// TODO: Add your control notification handler code here
	//AfxMessageBox("OK");
	if(!capture)
	{
		capture = cvCaptureFromCAM(0);
		//AfxMessageBox("OK");
	}

	if (!capture)
	{
		AfxMessageBox("无法打开摄像头");
		return;
	}

	// 测试
	IplImage* m_Frame;
	m_Frame=cvQueryFrame(capture);
	CvvImage m_CvvImage;
	m_CvvImage.CopyOf(m_Frame,1);
	if (true)
	{
		m_CvvImage.DrawToHDC(hDC, &rect);
		//cvWaitKey(10);
	}

	// 设置计时器,每10ms触发一次事件
	SetTimer(1,10,NULL);
}
这里有一个SetTimer();函数,这个函数就是调用win32函数实现每隔指定的时间调用一次我们指定的事件。这个函数有两种用法,一种是指定一个回调函数,一个是通过MFC的ClassWizard指定的回调函数。
SetTimer()的具体用法请见:http://baike.baidu.com/view/998104.htm
这里我们使用了通过MFC的ClassWizard设定回调函数。
在VS中,用户界面设计右击打开Class Wizard, 切换到Message选项卡,然后找到WM_TIMER这个message, 双击右边的OnTimer句柄,然后进入回调函数的代码。
回调函数的代码如下:
void CVideoMFCDlg::OnTimer(UINT_PTR nIDEvent)
{
	// TODO: Add your message handler code here and/or call default
	/************************************************************************/
	/* 显示摄像头                                                           */
	/************************************************************************/
	IplImage* m_Frame;
	m_Frame=cvQueryFrame(capture);
	CvvImage m_CvvImage;
	m_CvvImage.CopyOf(m_Frame,1);
	if (true)
	{
		m_CvvImage.DrawToHDC(hDC, &rect);
		//cvWaitKey(10);
	}

	CDialogEx::OnTimer(nIDEvent);
}
关闭摄像头代码:
void CVideoMFCDlg::OnBnClickedButton2()
{
	// TODO: Add your control notification handler code here
	cvReleaseCapture(&capture);
	CDC MemDC;
	CBitmap m_Bitmap1;
	m_Bitmap1.LoadBitmap(IDB_BITMAP1);
	MemDC.CreateCompatibleDC(NULL);
	MemDC.SelectObject(&m_Bitmap1);
	pDC->StretchBlt(rect.left,rect.top,rect.Width(),rect.Height(),&MemDC,0,0,48,48,SRCCOPY);
}
系统运行截图:
如果需要保存摄像头视屏的操作,请看链接中的文章:http://blog.csdn.net/weixingstudio/article/details/7588505
整个工程的下载地址:http://download.csdn.net/detail/weixingstudio/4284066。在这个工程中保存视频的功能。

