网盘开发PHP(Online File Storage with PHP)
http://net.tutsplus.com/tutorials/php/online-file-storage-with-php/?search_index=2
Introduction
Have you ever wished that you had a place to upload files while on the road? What if you’re using a public terminal or someone else’s computer and cannot install any third party software for file transfer?
Wouldn’t it be neat to just open a page in a browser, and upload your file with the click of a button?
There’s plenty of file hosting sites already all around, but in this tutorial I will show you how to make your own. Here’s what we will be creating:

Step 1 – Basic HTML
Let’s get started. The first thing we need is an empty HTML document. I use XHTML 1.0 Transitional with ISO-8859-1 char set. If you prefer, and don’t have any need for special characters, you can replace this with UTF-8 char set.
- <!DOCTYPE html PUBLIC "-//W3C//DTD XHTML 1.0 Transitional//EN" "http://www.w3.org/TR/xhtml1/DTD/xhtml1-transitional.dtd">
- <html xmlns="http://www.w3.org/1999/xhtml">
- <head>
- <meta http-equiv="Content-Type" content="text/html; charset=ISO-8859-1" />
- <title>Online file storage</title>
- </head>
- <body>
- </body>
- </html>
Step 2 – Adding the File Upload Form
Ok, now that we have a basic HTML file, we have basically nothing :) So let’s add some content. I’ll wrap all the contents in a DIV element to help style the page with CSS. The Fieldset and Legend tags are perhaps somewhat rare, but they are the definite markup for organizing content into groups.
I’ve added a password field that we’ll be using to shoo away unwanted uploaders, as we don’t want strangers to fill up our file quota with random junk.
Note that in contrast to the standard everyday Form element, this one has the enctype set to multipart/form-data.
This is needed for POSTing files and must be here. I’ve set the action modifier to point to this very same file.
What that means is that once the form is submitted, the form data will be POSTed back to the same page.
The hidden MAX_FILE_SIZE field is for PHP and defines the maximum size (in bytes) that we can submit. This however won’t override the MAX_FILE_SIZE setting in the php.ini file, so that will always be the one that determines the max size.
- <div id="container">
- <h1>Online File Storage</h1>
- <fieldset>
- <legend>Add a new file to the storage</legend>
- <form method="post" action="index.php" enctype="multipart/form-data">
- <input type="hidden" name="MAX_FILE_SIZE" value="100000" />
- <p><label for="name">Select file</label><br />
- <input type="file" name="file" /></p>
- <p><label for="password">Password for upload</label><br />
- <input type="password" name="password" /></p>
- <p><input type="submit" name="submit" value="Start upload" /></p>
- </form>
- </fieldset>
- </div>
If we open the file in a browser, now we will have a boring and plain html form. It will submit content to itself but won’t know what to do with it.
We need a place to display the files that we’ve already uploaded; so add the following html inside the container div under the first fieldset.
- <fieldset>
- <legend>Previousely uploaded files</legend>
- <ul id="menu">
- <li><a href="">All files</a></li>
- <li><a href="">Documents</a></li>
- <li><a href="">Images</a></li>
- <li><a href="">Applications</a></li>
- </ul>
- <ul id="files">
- </ul>
- </fieldset>
Notice that the unordered list with the id “files” is empty. Don’t worry about that right now as we will fill that section with the files in the server.
Step 3 – Add CSS and JS
I used jQuery to create the ability to toggle the visibility of certain file types without having to refresh the page.
This is purely optional and removing the JS will speed up the loading of the page somewhat. So let’s add the following lines to the HEAD of the HTML file.
- <style type="text/css" media="all">
- @import url("style/style.css");
- </style>
- <script src="http://code.jquery.com/jquery-latest.js"></script>
I’m loading the jQuery from an external source at runtime. Again if you prefer, you can change this so that the file is loaded from a local source with this line.
- <script type="text/javascript" src="js/jquery-1.3.2.min.js"></script>
Loading the file directly from code.jquery.com ensures that we are using the latest version and saves our bandwidth on every page load, but if the code.jquery.com server would happen to be down or overcrowded, we might not get the file when we need it.
Create a new folder called style and create a new CSS file in it with the name style.css. This will be the file that tells the browser how we want the page to look. There’s quite a lot of CSS here, but it’s simple enough for anyone to follow.
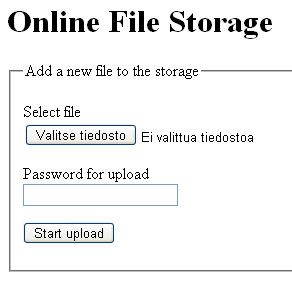
Now the page should look something like the following.
- @CHARSET "ISO-8859-1";
- body
- {
- background-color: #cddcec;
- font-family: "Arial";
- font-size: 11px;
- }
- div#container
- {
- width: 600px;
- margin: 0px auto;
- border: 1px solid #e6eef6;
- background-color: #ffffff;
- }
- div#container h1
- {
- background-color: #4b75b3;
- margin: 0px;
- padding: 8px;
- font-family: "Arial";
- font-weight: normal;
- border: 1px solid #3564a9;
- }
- div#container fieldset
- {
- margin: 20px;
- border: 1px solid #98b9d0;
- }
- ul#menu
- {
- list-style-type: none;
- margin: 4px;
- padding: 0px;
- }
- ul#menu li
- {
- float: left;
- margin: 4px;
- }
- ul#menu li.active
- {
- background-color: #98b9d0;
- border-left: 1px solid #3564a9;
- border-top: 1px solid #3564a9;
- border-bottom: 1px solid #e6eef6;
- border-right: 1px solid #e6eef6;
- }
- ul#menu li a
- {
- text-decoration: none;
- font-size: 10px;
- padding: 2px;
- color: #3564a9;
- }
- ul#files
- {
- list-style-type: none;
- margin: 40px 0px 0px 0px;
- padding: 0px;
- }
- ul#files li
- {
- background-color: #fff7c0;
- border-bottom: 1px solid #efefef;
- padding: 2px;
- margin-bottom: 1px;
- }
What we should now have is illustrated in the following image.
Step 4 – Handling File Input Submissions with PHP
Let’s start the PHP side of the tutorial by creating a Settings class. In this class we can save the upload password as well as the file path for the uploads folder.
We can then include the class into our page and use it’s values when needed.
You can write PHP files with pretty much the same tools you use to write HTML and CSS, just remember to save the file with the .php suffix.
- <?php
- /**
- * Class Settings holds the upload settings
- *
- */
- class Settings
- {
- static $password = "mypassword";
- static $uploadFolder = "uploads/";
- }
- ?>
Without going any deeper into Object Oriented Programming (OOP), what the code does is it creates a new class with the kind of values that can be accessed without instantiating the class.
We can now access it’s values simply by calling Settings::$password; and Settings::$uploadFolder; This is also the place where you can change the password whenever you please.
The <?php and ?> mark the beginning and the end of a PHP code segment. These segments can be written inside normal html pages and the server will interpret them when the page is requested.
Ok, now we get to business. In the html file we’ve been working with, let’s add the following into the very top of the file. Yes, before the <head> tag.
- <?php
- //Load the settings
- require_once("settings.php");
- $message = "";
First we tell the PHP interpreter to include our settings file. I’ve also set up a new variable $message. Later on I shall write process information into this variable and display it to the user.
- //Has the user uploaded something?
- if(isset($_FILES['file']))
- {
If the form has been submitted with a file, the $_FILE array should have a value with the key we used as the name of the file input field.
- $target_path = Settings::$uploadFolder;
- $target_path = $target_path . time() . '_' . basename( $_FILES['file']['name']);
Here we get the path to the upload folder we specified in the settings. On line 2, we add (concatenate) the name of the uploaded file into the target path.
Note also that I’ve added the current server timestamp into the beginning of the filename. There are two reasons for me doing this.
First it is used to store the date and second it will make sure that all files are of different names.
Should we be using a database behind this application, the time of adding would be there, and we could serialize the filenames and save the original name only in the database table,
but as there’s no database, we can just use this workaround.
- //Check the password to verify legal upload
- if($_POST['password'] != Settings::$password)
- {
- $message = "Invalid Password!";
- }
- else
- {
If the submission was made without giving any password or if the given password was something other than the one defined in the settings, we won’t handle the file and only return a message indicating a false password.
- //Try to move the uploaded file into the designated folder
- if(move_uploaded_file($_FILES['file']['tmp_name'], $target_path)) {
- $message = "The file ". basename( $_FILES['file']['name']).
- " has been uploaded";
- } else{
- $message = "There was an error uploading the file, please try again!";
- }
- }
- }
Ok, so the password was right, now what? Now we “save” the file. I say save in parenthesis since the file is actually already in the server; it’s just in the temporary folder.
So to make the file accessible and to make sure the server won’t delete it when the temp is cleared, we must move it to some safe location. I’ve used the move_uploaded_file function.
The function takes two arguments. First is the temporary name of the file assigned automatically by the server, and the other is the target path we assigned earlier.
The function returns a Boolean value indicating an successful operation. Again we set the message value to inform the user what happened.
- if(strlen($message) > 0)
- {
- $message = '<p class="error">' . $message . '</p>';
- }
And that’s how easy it is to upload files to server with PHP! Here I’ve just checked whether anything has been written into the message variable (length more that 0) and format it so we can style it with CSS.
Step 5 – List the Uploaded Files
- /** LIST UPLOADED FILES **/
- $uploaded_files = "";
- //Open directory for reading
- $dh = opendir(Settings::$uploadFolder);
The first thing to do is to create a folder handle. All it takes is one command. The variable uploaded_files is where we’ll be writing the folder filenames in HTML format.
- //LOOP through the files
- while (($file = readdir($dh)) !== false)
- {
Here we loop through the files in the folder. As long as we can read the next file in the folder into the file variable we do so and move on. Once we’ve gone through all the files, the function return false and ends the loop.
- if($file != '.' && $file != '..')
- {
The ‘.’ and ‘..’ are also returned by this function so we’ll have to make sure we don’t attempt to do anything with those.
- $filename = Settings::$uploadFolder . $file;
- $parts = explode("_", $file);
We add the name of the file into the path of the uploads folder and save it as filename variable. Then we explode the name of the file at the ‘_’ character.
This function returns an array of strings splitting the original string every time there’s a ‘_’.
Since there’s one of those characters, we’ll receive an array with the timestamp part as cell 1 and the original file name as cell 2.
- $size = formatBytes(filesize($filename));
- $added = date("m/d/Y", $parts[0]);
- $origName = $parts[1];
Now that we have the timestamp value as it’s own string, we can format it into a date and save the original filename as it’s own variable.
The filesize function provided by PHP returns the size of the file in bytes only, so we’ll format it into a more readable form with the formatBytes function, which is covered in a bit.
- $filetype = getFileType(substr($file, strlen($file) - 3));
- $uploaded_files .= "<li class=\"$filetype\"><a href=\"$filename\">$origName</a> $size - $added</li>\n";
When uploading a file into the server, PHP provides us with the file type information, but since we have no place to store that information, we’ll have to try to get the file type with a custom function.
I’m giving the three last chars of the file name as a parameter to the getFileType function (shown later on). I’m using the filetype variable to style the different files with CSS.
All that’s left now is to generate an HTML string and add it into the uploaded_files variable and close the folder handle.
- }
- }
- closedir($dh);
- if(strlen($uploaded_files) == 0)
- {
- $uploaded_files = "<li><em>No files found</em></li>";
- }
If no files were found, set the uploaded_files var to display a message.
We also have to show the uploaded_files string somewhere; so add this line inside the <ul> with the id ‘files’.
- <?php echo $uploaded_files; ?>
Step 6 – Auxiliary Function
The getFileType function tries to guess what type the file is by reading the last chars of it’s name. This won’t work with extensions like .jpeg and .tiff.
To make it more universal, we’d have to read a substring starting at the period and going to the end of the file name.
But then if the name is something like my.new.car.pic we’d get new.car.pic as the extensions.
So to make this really work we would have to find the last period in the name and take a substring from there on.
But for the scope of this tutorial this is close enough.
- function getFileType($extension)
- {
- $images = array('jpg', 'gif', 'png', 'bmp');
- $docs = array('txt', 'rtf', 'doc');
- $apps = array('zip', 'rar', 'exe');
- if(in_array($extension, $images)) return "Images";
- if(in_array($extension, $docs)) return "Documents";
- if(in_array($extension, $apps)) return "Applications";
- return "";
- }
This next function formats the bytes into a more readable format. Just basic math — nothing more. The function itself is from the PHP.net function comments.
- function formatBytes($bytes, $precision = 2) {
- $units = array('B', 'KB', 'MB', 'GB', 'TB');
- $bytes = max($bytes, 0);
- $pow = floor(($bytes ? log($bytes) : 0) / log(1024));
- $pow = min($pow, count($units) - 1);
- $bytes /= pow(1024, $pow);
- return round($bytes, $precision) . ' ' . $units[$pow];
- }
- ?>
And that’s it for the PHP part. Just some more JS and CSS and we’re all done.
Step 7 – A Touch of CSS for Increased Readability
What we have this far should look like:

But to make good use of the getFileType function and the class name it returns, I’ve added the next lines of CSS into the style.css file.
- ul#files li a
- {
- text-decoration: none;
- color: #3564a9;
- padding: 2px 25px;
- background-position: left;
- background-repeat: no-repeat;
- }
- ul#files li.Documents a
- {
- background-image: url('../images/text.jpg');
- }
- ul#files li.Images a
- {
- background-image: url('../images/picture.jpg');
- }
- ul#files li.Applications a
- {
- background-image: url('../images/zip.jpg');
- }
- p.error
- {
- background-color: #fff7c0;
- border-bottom: 1px solid #efefef;
- font-weight: bold;
- color: #ff0000;
- padding: 6px;
- }
I’m assigning an icon to each type of file. The icon’s I’ve used are from the magnificent collection found athttp://www.famfamfam.com.
Now what we should have is something like this.
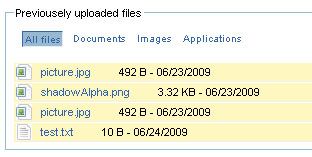
Ah, much better.
Step 8 – Toggle File Visibility with jQuery
For a finishing bit, let’s add some extra functionality with JavaScript. Create a new folder called “js” and in that folder make a new file, filestorage.js.
Then add the following line to end of the HTML page right before the </body> tag.
- <script src="js/filestorage.js" />
It’s considered a good practice to include these kind of js files at the very end of the page to allow the Document Object Model (DOM) to load first.
- function HideFiles(selector)
- {
- //show all files
- if(selector === "All files")
- {
- $("#files > li").show();
- return true;
- }
- else
- {
- //show only the selected filetype
- $("#files > li").hide();
- $("#files > li." + selector).show();
- return true;
- }
- }
The HideFiles function does two things. If the parameter selector is equal to ‘All files’, the function goes through all the <li> -items inside the files <ul> and makes them visible.
If, however, some other parameter was given, the function hides everything and then shows only the ones with the same class name as the parameter.
- function prepareMenu()
- {
- $("#menu li").click(
- function () {
- $("#menu li").each(
- function(){
- $(this).removeClass("active");
- }
- );
- $(this).addClass("active");
- HideFiles($(this).children().html());
- return false;
- });
- //Select the first as default
- $("#menu li:first").click();
- }
The prepareMenu function adds a function to the onClick event on the menu <li>s.
Upon a click, remove the class ‘active’ from all of them and then add it to the one that was clicked and call the HideFiles function with the text inside the element inside the clicked <li>.
Finally, we invoke the onClick event on the first menu element to make sure it’s selected as default when the page loads.
- $(document).ready(function()
- {
- prepareMenu();
- });
Don’t forget to call the prepareMenu function when the page is loaded. This can be done easily by calling it inside the document’s ready event as shown above.
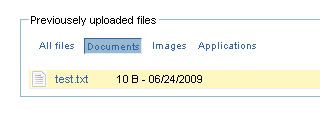
Now the menu “buttons” should be working and upon clicking them the list of files should change.
Step 9 – Congratulate Yourself for a Job Well Done!
That’s it! You should now have a working online file storage.
Just remember to create a “uploadFolder,” and change its CHMOD to allow for modification. Instructions for this can be found all around the web and directly from your hosting provider.
This has been a tutorial for the beginners. Hopefully it was in depth enough without being TOO explanatory.
Thank you for reading and please leave a comment if you have any questions.
