【Android基础】listview控件的使用(3)------Map与SimpleAdapter组成的多显示条目的Listview
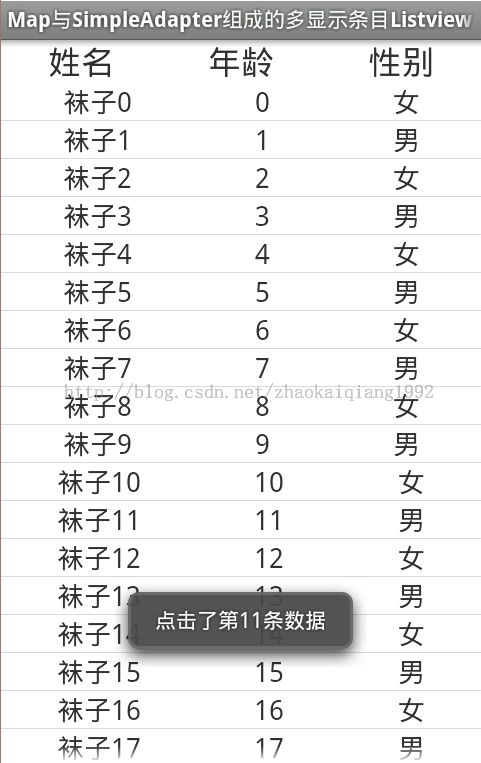
前面介绍的两种listview的使用都是最基础的,所以有很大的局限性,比如只能在一个item(即每一行的条目)中显示一个文本信息,这一篇我将介绍Map与SimpleAdapter组成的多显示条目的Listview的使用方法,这样就可以在每个item中显示多个文本的信息
先上效果图
由于需要自定义item的布局,所以这次有两个布局文件
主listview的布局文件
<LinearLayout xmlns:android="http://schemas.android.com/apk/res/android"
    xmlns:tools="http://schemas.android.com/tools"
    android:layout_width="match_parent"
    android:layout_height="match_parent"
    android:orientation="vertical" >

    <!-- LinearLayout中包裹的内容是为了给listview加一个表头的效果,看起来更加的清晰 -->

    <LinearLayout
        android:layout_width="match_parent"
        android:layout_height="wrap_content"
        android:orientation="horizontal" >

        <TextView
            android:layout_width="wrap_content"
            android:layout_height="wrap_content"
            android:layout_weight="1"
            android:gravity="center"
            android:text="姓名"
            android:textSize="22sp" />

        <TextView
            android:layout_width="wrap_content"
            android:layout_height="wrap_content"
            android:layout_weight="1"
            android:gravity="center"
            android:text="年龄"
            android:textSize="22sp" />

        <TextView
            android:layout_width="wrap_content"
            android:layout_height="wrap_content"
            android:layout_weight="1"
            android:gravity="center"
            android:text="性别"
            android:textSize="22sp" />
    </LinearLayout>

    <ListView
        android:id="@+id/listview3"
        android:layout_width="match_parent"
        android:layout_height="wrap_content" />

</LinearLayout>
自定义的每个item的布局文件
<?xml version="1.0" encoding="utf-8"?>
<LinearLayout xmlns:android="http://schemas.android.com/apk/res/android"
    android:layout_width="match_parent"
    android:layout_height="match_parent"
    android:orientation="horizontal" >

    <TextView
        android:id="@+id/name"
        android:layout_width="wrap_content"
        android:layout_height="wrap_content"
        android:layout_weight="1"
        android:gravity="center"
        android:textSize="18sp" />

    <TextView
        android:id="@+id/age"
        android:layout_width="wrap_content"
        android:layout_height="wrap_content"
        android:layout_weight="1"
        android:gravity="center"
        android:textSize="18sp" />

    <TextView
        android:id="@+id/sex"
        android:layout_width="wrap_content"
        android:layout_height="wrap_content"
        android:layout_weight="1"
        android:gravity="center"
        android:textSize="18sp" />

</LinearLayout>
在activity中的代码实现
package com.example.listviewdemo;

import java.util.ArrayList;
import java.util.HashMap;
import java.util.List;
import java.util.Map;

import android.app.Activity;
import android.os.Bundle;
import android.view.View;
import android.widget.AdapterView;
import android.widget.AdapterView.OnItemClickListener;
import android.widget.ListView;
import android.widget.SimpleAdapter;
import android.widget.Toast;

//Activity实现OnItemClickListener接口,这样就不用另外定义一个类实现了
public class ThreeActivity extends Activity implements OnItemClickListener {

	private ListView listview;

	@Override
	protected void onCreate(Bundle savedInstanceState) {
		super.onCreate(savedInstanceState);
		setContentView(R.layout.activity_three);
		listview = (ListView) findViewById(R.id.listview3);
		// 获取数据
		List<Map<String, String>> data = getSource();
		// 这里使用了系统自带的SimpleAdapter,这是一个简单的适配器,适配器的主要作用就是将资源文件(布局以及显示的文本信息)与listview控件进行绑定
		// SimpleAdapter(上下文对象, 填充的数据,自定义的item的布局文件,
		// map对象中的键的数组,item的布局文件中控件id数组)
		// 注意:【map对象中的键的数组】中的元素将与【item的布局文件中控件id数组】的元素一一对应
		SimpleAdapter adapter = new SimpleAdapter(ThreeActivity.this, data,
				R.layout.item_three, new String[] { "name", "age", "sex" },
				new int[] { R.id.name, R.id.age, R.id.sex });
		// 设置适配器
		listview.setAdapter(adapter);
		// 绑定item的点击事件
		listview.setOnItemClickListener(this);
	}

	@Override
	public void onItemClick(AdapterView<?> arg0, View arg1, int position,
			long arg3) {
		Toast.makeText(this, "点击了第" + position + "条数据", 0).show();
	}

	/**
	 * 该方法是为了获取模拟的数据
	 *
	 * @return 填充好数据的List对象
	 */
	public static List<Map<String, String>> getSource() {
		List<Map<String, String>> list = new ArrayList<Map<String, String>>();
		Map<String, String> map = null;

		for (int i = 0; i < 20; i++) {
			map = new HashMap<String, String>();
			map.put("name", "袜子" + i);
			map.put("age", i + "");
			map.put("sex", i % 2 == 0 ? "女" : "男");
			list.add(map);
		}
		return list;
	}

}
文中注释比较详细,如还有疑问,请留言
