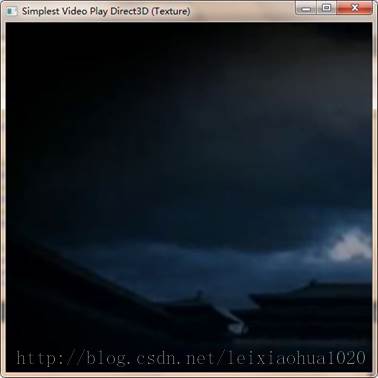
最简单的视音频播放示例4:Direct3D播放RGB(通过Texture)
=====================================================
最简单的视音频播放示例系列文章列表:
最简单的视音频播放示例1:总述
最简单的视音频播放示例2:GDI播放YUV, RGB
最简单的视音频播放示例3:Direct3D播放YUV,RGB(通过Surface)
最简单的视音频播放示例4:Direct3D播放RGB(通过Texture)
最简单的视音频播放示例5:OpenGL播放RGB/YUV
最简单的视音频播放示例6:OpenGL播放YUV420P(通过Texture,使用Shader)
最简单的视音频播放示例7:SDL2播放RGB/YUV
最简单的视音频播放示例8:DirectSound播放PCM
最简单的视音频播放示例9:SDL2播放PCM
=====================================================
本文接着上一篇文章继续记录Direct3D(简称D3D)播放视频的技术。上一篇文章中已经记录了使用Direct3D中的Surface渲染视频的技术。本文记录一种稍微复杂但是更加灵活的渲染视频的方式:使用Direct3D中的Texture(纹理)渲染视频。
纹理有关的基础知识
在记录使用Direct3D的Texture渲染视频的技术之前,首先记录一下有关纹理的基础知识。我自己归纳总结了以下几点知识。
1. 渲染(Render),纹理(Texture)
刚开始学习Direct3D显示视频技术的人一定会有一个疑问:“像GDI那样直接指定一下像素数据,然后画在窗口上不就行了?为什么又是渲染又是纹理,搞得这么复杂?”。确实,相比于GDI,Direct3D的入门的代码要复杂很多。其实Ditect3D中的很多概念并不是出自于视频领域,而是出自于3D制作。下面简单记录一下Direct3D这些概念的意义。
纹理(Texture)纹理实际上就是一张图片。个人感觉这个词的英文Texture其实也可以翻译成“材质”(“纹理”总给人一种有很多花纹的感觉 =_=)。在3D制作过程中,如果单靠计算机绘制生成3D模型,往往达不到很真实的效果。如果可以把一张2D图片“贴”到3D模型的表面上,则不但节约了计算机绘图的计算量,而且也能达到更真实的效果。纹理就是这张“贴图”。例如,下面这张图就是把一张“木箱表面”的纹理贴在了一个正六面体的六个面上,从而达到了一个“木箱”的效果(还挺像CS里面的木箱的)。
渲染(Render)渲染就是从模型生成图像的过程,通常是3D制作的最后一步。例如上图的那个木箱,在经过纹理贴图之后,形成了一个“木箱”模型。但是只有把它作为2D图像输出到屏幕上之后,它才能被我们的看见。这个输出的过程就是渲染。我们也可以调整这个“木箱模型”的参数,达到不同的渲染结果。比如说改变观察角度等等。
2. 纹理坐标
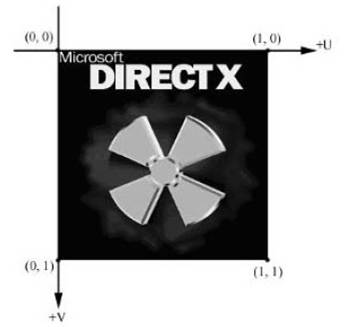
Direct3D使用一个纹理坐标系统,它是由用水平方向的u轴和竖直方向v轴构成。注意v轴是向下的(OpenGL的v轴是向上的)。需要注意的是,纹理坐标的取值范围是0-1,而不是像普通坐标那样以像素为单位。它代表了一种图像映射的关系。例如纹理坐标是(0.5,0.0),就是把2D纹理横向二分之一处的点映射到随后定义的物体顶点上去。纹理坐标和图像的大小是没有关系的。下图显示了一大一小两张图片中纹理坐标(0,0.5)的位置。可以看出都位于它们宽度中间的位置。
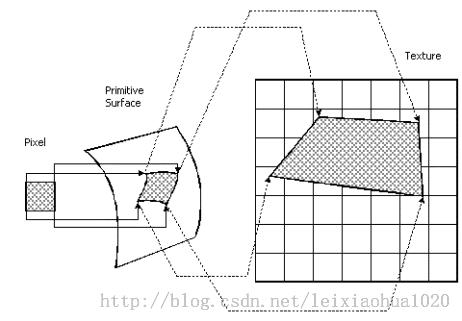
下面有关纹理坐标再多说两句。举个例子,纹理图像分辨率为640x480。我们如果选定(0, 0), (0, 1), (1, 0), (1, 1)四个纹理坐标的点对纹理图像映射的话,就是映射的整个纹理图片。如果我们选择(0, 0), (0, 1), (0.5, 0), (0.5, 1) 四个纹理坐标的点对纹理图像映射的话,就是映射左半边的纹理图片(相当于右半边图片不要了),相当于取了一张320x480的图片。但是有一点需要注意,映射的纹理图片不一定是“矩形”的。实际上可以指定任意形状的纹理坐标进行映射。下面这张图就是映射了一个梯形的纹理到目标物体表面。这也是纹理(Texture)比上一篇文章中记录的表面(Surface)更加灵活的地方。
当然,使用Direct3D播放视频的时候,还是映射整个纹理画面的,不然视频就没法看了。下面那本文记录的程序做几个示例。
输入像素数据的分辨率是320x180。把它作为纹理的时候,它的纹理坐标如下图所示。
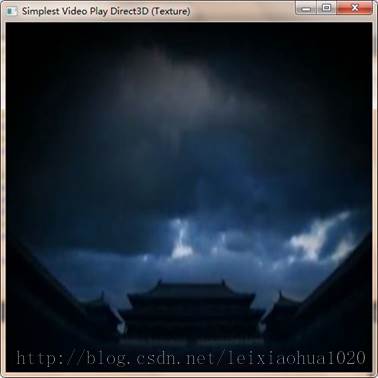
我们可以映射整张纹理到目标物体表面。把纹理坐标(0,0),(0,1)(1,0),(1,1)映射到坐标(0,0), (0,180), (320,0), (320,180)后的结果如下图所示。
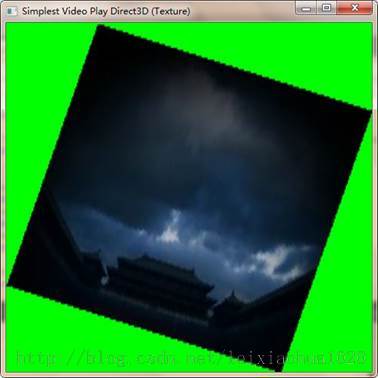
可以试着修改一下目标物体表面的坐标。把纹理坐标(0,0),(0,1)(1,0),(1,1)映射到坐标(80,0), (0,135), (320,45), (240,180)后的结果如下图所示。相当于把纹理“旋转”了一下。
也可以试着修改一下纹理的坐标。把纹理坐标(0,0),(0,1)(0.5,0),(0.5,1)映射到坐标(0,0), (0,180), (320,0), (320,180)后的结果如下图所示。由图可见,“故宫”只有左半边了。
此外纹理映射还有其他更多的功能,使用起来非常灵活,就不一一记录了。
3. 灵活顶点格式(Flexible Vertex Format,FVF)
上文记录了纹理到目标物体表面坐标的映射,但究竟是什么变量建立起了这二者之间的联系呢?就是灵活顶点格式。灵活顶点格式(Flexible Vertex Format,FVF)在Direct3D中用来描述一个顶点。灵活顶点格式可以让我们随心所欲地自定义其中所包含的顶点属性信息。例如,指定顶点的三维坐标、颜色、顶点法线和纹理坐标等等。比如我们可以定义一个只包含顶点三维坐标和颜色的结构体:
struct CUSTOMVERTEX
{
  float x, y, z;             //顶点的三维坐标值,x,y,z
   DWORD color;               //顶点的颜色值
};
也可以定义一个复杂一点,包含很多属性的顶点:
struct NormalTexVertex
{
  float x, y, z; // 顶点坐标
  float nx, ny, nz; // 法线向量
  float u, v; // 纹理坐标
};
但单单定义出结构体, Direct3D是不能理解我们在干嘛的,这时候,我们需要一个宏来传达我们定义的顶点有哪些属性。
比如刚刚我定义的CUSTOMVERTEX结构体就可以通过以下方式来描述:
#define D3DFVF_CUSTOMVERTEX (D3DFVF_XYZRHW|D3DFVF_DIFFUSE)
需要注意的是:上述的定义是有顺序的。Direct3D支持下述定义。
序号 |
标示 |
含义 |
1 |
D3DFVF_XYZ |
包含未经过坐标变换的顶点坐标值,不可以和D3DFVF_XYZRHW一起使用 |
2 |
D3DFVF_XYZRHW |
包含经过坐标变换的顶点坐标值,不可以和D3DFVF_XYZ以及D3DFVF_NORMAL一起使用 |
3 |
D3DFVF_XYZB1~5 |
标示顶点混合的权重值 |
4 |
D3DFVF_NORMAL |
包含法线向量的数值 |
5 |
D3DFVF_DIFFUSE |
包含漫反射的颜色值 |
6 |
D3DFVF_SPECULAR |
包含镜面反射的数值 |
7 |
D3DFVF_TEX1~8 |
表示包含1~8个纹理坐标信息,是几重纹理后缀就用几,最多8层纹理 |
下面给出一个使用Direct3D播放视频的时候的自定义顶点类型的代码。
typedef struct
{
	FLOAT       x,y,z;
	FLOAT       rhw;
	D3DCOLOR    diffuse;
	FLOAT       tu, tv;
} CUSTOMVERTEX;
#define D3DFVF_CUSTOMVERTEX (D3DFVF_XYZRHW|D3DFVF_DIFFUSE|D3DFVF_TEX1)
从上述代码中可以看出,其中包含了一个顶点在目标物体表面的坐标(x, y),以及它的纹理坐标(tu, tv)。修改上述两个坐标的值,就可以实现各种各样的映射了。
PS:z坐标在这里用不到。
4. 纹理(Texture)和表面(Surface)的区别与联系
Surfaces是一个存储2D图像的内存。Textures是一张贴图。Texture的图像数据存储于它的Surface中。一个Texture可以包含多个Surface。
D3D视频显示的流程
下文将会结合代码记录Direct3D中与视频显示相关的功能。
函数分析有关DirectX的安装可以参考前文,不再记录。在这里只记录一下使用Direct3D的Texture渲染视频的步骤:
1. 创建一个窗口(不属于D3D的API)
2. 初始化
1) 创建一个Device3. 循环显示画面
2) 设置一些参数(非必须)
3) 基于Device创建一个 Texture
4) 基于Device创建一个 VertexBuffer
5) 填充VertexBuffer
1) 清理下面结合Direct3D的Texture播放RGB的示例代码,详细分析一下上文的流程。注意有一部分代码和上一篇文章中介绍的Direct3D的Surface播放视频的代码是一样的,这里再重复一下。
2) 一帧视频数据拷贝至 Texture
3) 开始一个Scene
4) Device需要启用的 Texture
5) Device绑定 VertexBuffer
6) 渲染
7) 显示
1. 创建一个窗口(不属于D3D的API)
建立一个Win32的窗口程序,就可以用于Direct3D的显示。程序的入口函数是WinMain(),调用CreateWindow()即可创建一个窗口。2. 初始化
1) 创建一个Device这一步完成的时候,可以得到一个IDirect3DDevice9接口的指针。创建一个Device又可以分成以下几个详细的步骤:
(a) 通过 Direct3DCreate9()创建一个IDirect3D9接口。
获取IDirect3D9接口的关键实现代码只有一行:IDirect3D9 *m_pDirect3D9 = Direct3DCreate9( D3D_SDK_VERSION );
IDirect3D9接口是一个代表我们显示3D图形的物理设备的C++对象。它可以用于获得物理设备的信息和创建一个IDirect3DDevice9接口。例如,可以通过它的GetAdapterDisplayMode()函数获取当前主显卡输出的分辨率,刷新频率等参数,实现代码如下。
D3DDISPLAYMODE d3dDisplayMode;
lRet = m_pDirect3D9->GetAdapterDisplayMode( D3DADAPTER_DEFAULT, &d3dDisplayMode );
由代码可以看出,获取的信息存储在D3DDISPLAYMODE结构体中。D3DDISPLAYMODE结构体中包含了主显卡的分辨率等信息:
/* Display Modes */
typedef struct _D3DDISPLAYMODE
{
    UINT            Width;
    UINT            Height;
    UINT            RefreshRate;
    D3DFORMAT       Format;
} D3DDISPLAYMODE;
也可以用它的GetDeviceCaps()函数搞清楚主显卡是否支持硬件顶点处理,实现的代码如下。
	D3DCAPS9 d3dcaps;
	lRet=m_pDirect3D9->GetDeviceCaps(D3DADAPTER_DEFAULT,D3DDEVTYPE_HAL,&d3dcaps);
	int hal_vp = 0;
	if( d3dcaps.DevCaps & D3DDEVCAPS_HWTRANSFORMANDLIGHT ){
		// yes, save in ‘vp’ the fact that hardware vertex
		// processing is supported.
		hal_vp = D3DCREATE_HARDWARE_VERTEXPROCESSING;
	}
由代码可以看出,获取的设备信息存储在D3DCAPS9结构体中。D3DCAPS9定义比较长包含了各种各样的信息,不再列出来。从该结构体的DevCaps字段可以判断得出该设备是否支持硬件顶点处理。
(b) 设置D3DPRESENT_PARAMETERS结构体,为创建Device做准备。
接下来填充一个D3DPRESENT_PARAMETERS结构的实例。这个结构用于设定我们将要创建的IDirect3DDevice9对象的一些特性,它的定义如下。
typedef struct _D3DPRESENT_PARAMETERS_
{
    UINT                BackBufferWidth;
    UINT                BackBufferHeight;
    D3DFORMAT           BackBufferFormat;
    UINT                BackBufferCount;


    D3DMULTISAMPLE_TYPE MultiSampleType;
    DWORD               MultiSampleQuality;


    D3DSWAPEFFECT       SwapEffect;
    HWND                hDeviceWindow;
    BOOL                Windowed;
    BOOL                EnableAutoDepthStencil;
    D3DFORMAT           AutoDepthStencilFormat;
    DWORD               Flags;


    /* FullScreen_RefreshRateInHz must be zero for Windowed mode */
    UINT                FullScreen_RefreshRateInHz;
    UINT                PresentationInterval;
} D3DPRESENT_PARAMETERS;
D3DPRESENT_PARAMETERS这个结构体比较重要。详细列一下它每个参数的含义:
BackBufferWidth:后备缓冲表面的宽度(以像素为单位)
BackBufferHeight:后备缓冲表面的高度(以像素为单位)
BackBufferFormat:后备缓冲表面的像素格式(如:32位像素格式为D3DFMT:A8R8G8B8)
BackBufferCount:后备缓冲表面的数量,通常设为“1”,即只有一个后备表面
MultiSampleType:全屏抗锯齿的类型,显示视频没用到,不详细分析。
MultiSampleQuality:全屏抗锯齿的质量等级,显示视频没用到,不详细分析。
SwapEffect:指定表面在交换链中是如何被交换的。支持以下取值:
*D3DSWAPEFFECT_DISCARD:后备缓冲区的东西被复制到屏幕上后,后备缓冲区的东西就没有什么用了,可以丢弃了。
*D3DSWAPEFFECT_FLIP: 后备缓冲拷贝到前台缓冲,保持后备缓冲内容不变。当后备缓冲大于1个时使用。
*D3DSWAPEFFECT_COPY: 同上。当后备缓冲等于1个时使用。
一般使用D3DSWAPEFFECT_DISCARD。
hDeviceWindow:与设备相关的窗口句柄,你想在哪个窗口绘制就写那个窗口的句柄
Windowed:BOOL型,设为true则为窗口模式,false则为全屏模式
EnableAutoDepthStencil:设为true,D3D将自动创建深度/模版缓冲。
AutoDepthStencilFormat:深度/模版缓冲的格式
Flags:一些附加特性
FullScreen_RefreshRateInHz:刷新率,设定D3DPRESENT_RATE_DEFAULT使用默认刷新率
PresentationInterval:设置刷新的间隔,可以用以下方式:
*D3DPRENSENT_INTERVAL_DEFAULT,则说明在显示一个渲染画面的时候必要等候显示器刷新完一次屏幕。例如显示器刷新率设为80Hz的话,则一秒最多可以显示80个渲染画面。
*D3DPRENSENT_INTERVAL_IMMEDIATE:表示可以以实时的方式来显示渲染画面。
下面列出使用Direct3D播放视频的时候的一个典型的设置。可以看出有一些参数都是设置的False:
	//D3DPRESENT_PARAMETERS Describes the presentation parameters.
	D3DPRESENT_PARAMETERS d3dpp;
	ZeroMemory( &d3dpp, sizeof(d3dpp) );
	d3dpp.BackBufferWidth = lWidth;
	d3dpp.BackBufferHeight = lHeight;
	d3dpp.BackBufferFormat = D3DFMT_X8R8G8B8;
	d3dpp.BackBufferCount        = 1;
	d3dpp.MultiSampleType   = D3DMULTISAMPLE_NONE;
	d3dpp.SwapEffect  = D3DSWAPEFFECT_COPY;
	d3dpp.hDeviceWindow  = hwnd;
	d3dpp.Windowed   = TRUE;
	d3dpp.EnableAutoDepthStencil = FALSE;
	d3dpp.Flags = D3DPRESENTFLAG_VIDEO;
	d3dpp.PresentationInterval   = D3DPRESENT_INTERVAL_DEFAULT;
(c) 通过IDirect3D9的CreateDevice ()创建一个Device。
最后就可以调用IDirect3D9的CreateDevice()方法创建Device了。
CreateDevice()的函数原型如下:HRESULT CreateDevice( UINT Adapter, D3DDEVTYPE DeviceType, HWND hFocusWindow, DWORD BehaviorFlags, D3DPRESENT_PARAMETERS *pPresentationParameters, IDirect3DDevice9** ppReturnedDeviceInterface );
其中每个参数的含义如下所列:
Adapter:指定对象要表示的物理显示设备。D3DADAPTER_DEFAULT始终是主要的显示器适配器。
DeviceType:设备类型,包括D3DDEVTYPE_HAL(Hardware Accelerator,硬件加速)、D3DDEVTYPE_SW(SoftWare,软件)。
hFocusWindow:同我们在前面d3dpp.hDeviceWindow的相同
BehaviorFlags:设定为D3DCREATE_SOFTWARE_VERTEXPROCESSING(软件顶点处理)或者D3DCREATE_HARDWARE_VERTEXPROCESSING(硬件顶点处理),使用前应该用D3DCAPS9来检测用户计算机是否支持硬件顶点处理功能。
pPresentationParameters:指定一个已经初始化好的D3DPRESENT_PARAMETERS实例
ppReturnedDeviceInterface:返回创建的Device
下面列出使用Direct3D播放视频的时候的一个典型的代码。
IDirect3DDevice9 *m_pDirect3DDevice;
D3DPRESENT_PARAMETERS d3dpp;
…
m_pDirect3D9->CreateDevice( D3DADAPTER_DEFAULT, D3DDEVTYPE_HAL, NULL,
D3DCREATE_SOFTWARE_VERTEXPROCESSING|D3DCREATE_MULTITHREADED, &d3dpp, &m_pDirect3DDevice );
2) 设置一些参数(非必须)
这一步不是必需的。创建完成IDirect3DDevice9之后,就可以针对该Device设置一些参数了。IDirect3DDevice9提供了一系列设置参数的API,在这里无法一一列举,仅列出几个在视频播放过程中设置参数需要用到的API:SetSamplerState(),SetRenderState(),SetTextureStageState()。
Direct3D函数命名
在记录着几个函数的作用之前,先说一下IDirect3D中函数的命名特点:所有接口中的函数名称都重新定义了一遍。原来形如XXXX->YYYY(….)的函数,名称改为了IDirect3DXXXX_YYYY(XXXX,…)。即原本接口的指针移动到了函数内部成为了第一个参数,同时函数名称前面加上了“IDirect3DXXXX_”。这样描述说不清楚,举个具体的例子吧。比如说调用IDirect3DDevice9中的SetSamplerState可以采用如下方法:IDirect3DDevice9 * m_pDirect3DDevice; … m_pDirect3DDevice->SetSamplerState(0, D3DSAMP_MINFILTER, D3DTEXF_LINEAR); IDirect3DDevice9_SetSamplerState(m_pDirect3DDevice, 0, D3DSAMP_MINFILTER, D3DTEXF_LINEAR);
实际上也可以使用如下方法:
IDirect3DDevice9 * m_pDirect3DDevice;
…
IDirect3DDevice9_SetSamplerState (m_pDirect3DDevice, 0, D3DSAMP_MINFILTER, D3DTEXF_LINEAR);
IDirect3DDevice9_SetSamplerState(m_pDirect3DDevice, 0, D3DSAMP_MINFILTER, D3DTEXF_LINEAR);
设置参数
设置参数这里用到了3个API:SetSamplerState(),SetRenderState(),SetTextureStageState()。其中SetSamplerState()可以设置枚举类型D3DSAMPLERSTATETYPE的属性的值。SetRenderState()可以设置枚举类型D3DRENDERSTATETYPE的属性的值。SetTextureStageState()可以设置枚举类型D3DTEXTURESTAGESTATETYPE的属性的值。以上3个枚举类型中的数据太多,无法一一列举。在这里直接列出Direct3D播放视频的时候的设置代码:
	//SetSamplerState()
	// Texture coordinates outside the range [0.0, 1.0] are set
	// to the texture color at 0.0 or 1.0, respectively.
	IDirect3DDevice9_SetSamplerState(m_pDirect3DDevice, 0, D3DSAMP_ADDRESSU, D3DTADDRESS_CLAMP);
	IDirect3DDevice9_SetSamplerState(m_pDirect3DDevice, 0, D3DSAMP_ADDRESSV, D3DTADDRESS_CLAMP);
	// Set linear filtering quality
	IDirect3DDevice9_SetSamplerState(m_pDirect3DDevice, 0, D3DSAMP_MINFILTER, D3DTEXF_LINEAR);
	IDirect3DDevice9_SetSamplerState(m_pDirect3DDevice, 0, D3DSAMP_MAGFILTER, D3DTEXF_LINEAR);
	//SetRenderState()
	//set maximum ambient light
	IDirect3DDevice9_SetRenderState(m_pDirect3DDevice, D3DRS_AMBIENT, D3DCOLOR_XRGB(255,255,0));
	// Turn off culling
	IDirect3DDevice9_SetRenderState(m_pDirect3DDevice, D3DRS_CULLMODE, D3DCULL_NONE);
	// Turn off the zbuffer
	IDirect3DDevice9_SetRenderState(m_pDirect3DDevice, D3DRS_ZENABLE, D3DZB_FALSE);
	// Turn off lights
	IDirect3DDevice9_SetRenderState(m_pDirect3DDevice, D3DRS_LIGHTING, FALSE);
	// Enable dithering
	IDirect3DDevice9_SetRenderState(m_pDirect3DDevice, D3DRS_DITHERENABLE, TRUE);
	// disable stencil
	IDirect3DDevice9_SetRenderState(m_pDirect3DDevice, D3DRS_STENCILENABLE, FALSE);
	// manage blending
	IDirect3DDevice9_SetRenderState(m_pDirect3DDevice, D3DRS_ALPHABLENDENABLE, TRUE);
	IDirect3DDevice9_SetRenderState(m_pDirect3DDevice, D3DRS_SRCBLEND,D3DBLEND_SRCALPHA);
	IDirect3DDevice9_SetRenderState(m_pDirect3DDevice, D3DRS_DESTBLEND,D3DBLEND_INVSRCALPHA);
	IDirect3DDevice9_SetRenderState(m_pDirect3DDevice, D3DRS_ALPHATESTENABLE,TRUE);
	IDirect3DDevice9_SetRenderState(m_pDirect3DDevice, D3DRS_ALPHAREF, 0x10);
	IDirect3DDevice9_SetRenderState(m_pDirect3DDevice, D3DRS_ALPHAFUNC,D3DCMP_GREATER);
	// Set texture states
	IDirect3DDevice9_SetTextureStageState(m_pDirect3DDevice, 0, D3DTSS_COLOROP,D3DTOP_MODULATE);
	IDirect3DDevice9_SetTextureStageState(m_pDirect3DDevice, 0, D3DTSS_COLORARG1,D3DTA_TEXTURE);
	IDirect3DDevice9_SetTextureStageState(m_pDirect3DDevice, 0, D3DTSS_COLORARG2,D3DTA_DIFFUSE);
	// turn off alpha operation
	IDirect3DDevice9_SetTextureStageState(m_pDirect3DDevice, 0, D3DTSS_ALPHAOP, D3DTOP_DISABLE);
这些代码设定的属性值确实太多,我自己也没能一一研究。这些属性不设置的话也可以显示,可能会影响到显示的效果,在这里不再详细叙述。
3) 基于Device创建一个Texture
通过IDirect3DDevice9接口的CreateTexture()方法可以创建一个Texture。CreateTexture()的函数原型如下所示:
HRESULT CreateTexture(
  UINT Width,
  UINT Height,
  UINT Levels,
  DWORD Usage,
  D3DFORMAT Format,
  D3DPOOL Pool,
  IDirect3DTexture9 **ppTexture,
  HANDLE *pSharedHandle
);
其中每个参数的含义如下所列:
Width:宽。
Height:高。
Levels:设为1。
Usage:可以设定一些选项。例如D3DUSAGE_SOFTWAREPROCESSING表示使用软件来进行顶点运算,不指定这个值的话,就取的是默认方式:硬件顶点运算。
Format:
Pool:D3DPOOL定义了资源对应的内存类型,例如如下几种类型。
D3D3POOL_DEFAULT:默认值,表示存在于显卡的显存中。ppTexture:得到的Texture。
D3D3POOL_MANAGED:由Direct3D自由调度内存的位置(显存或者缓存中)。
D3DPOOL_SYSTEMMEM: 表示位于内存中。
pSharedHandle:可以设为NULL。
下面给出一个使用Direct3D播放视频的时候CreateTexture()的典型代码。
IDirect3DDevice9 * m_pDirect3DDevice;
IDirect3DTexture9 *m_pDirect3DTexture;
…
m_pDirect3DDevice->CreateTexture(lWidth, lHeight, 1, D3DUSAGE_SOFTWAREPROCESSING,
		D3DFMT_X8R8G8B8,
		D3DPOOL_MANAGED,
		&m_pDirect3DTexture, NULL );
4) 基于Device创建一个VertexBuffer
通过IDirect3DDevice9接口的CreateVertexBuffer()方法即可创建一个VertexBuffer。CreateVertexBuffer ()的函数原型如下所示:
HRESULT IDirect3DDevice9::CreateVertexBuffer(
UINT Length,
DWORD Usage,
DWORD FVF,
D3DPOOL Pool,
IDirectVertexBuffer9** ppVertexBuffer,
HANDLE pHandle
);
其中每个参数的含义如下所列:
Length:指定顶点缓冲区的大小,以字节为单位
Usage:指定顶点缓冲区属性(上文已经说过)。它可以设为0或几种值的组合,例如D3DUSAGE_SOFTWAREPROCESSING表示使用软件进行顶点计算,否则使用硬件进行顶点计算
FVF:表示顶点的灵活顶点格式,可以设置D3DFVF_DIFFUSE,D3DFVF_XYZRHW等值。注意其中有些值不能同时使用。
Pool:D3DPOOL定义了资源对应的内存类型,例如如下几种类型(上文已经说过)。
D3D3POOL_DEFAULT: 默认值,表示顶点缓存存在于显卡的显存中。ppVertexBuffer:是一个指向创建的顶点缓冲区地址的指针,用于返回顶点缓冲区的地址
D3D3POOL_MANAGED:由Direct3D自由调度顶点缓冲区内存的位置(显存或者缓存中)。
D3DPOOL_SYSTEMMEM: 表示顶点缓存位于内存中。
pSharedHandle:是一个保留参数,可设置为NULL
下面给出一个使用Direct3D播放视频的时候CreateVertexBuffer ()的典型代码。
IDirect3DDevice9 * m_pDirect3DDevice;
IDirect3DVertexBuffer9 *m_pDirect3DVertexBuffer;
typedef struct
{
	FLOAT       x,y,z;
	FLOAT       rhw;
	D3DCOLOR    diffuse;
	FLOAT       tu, tv;
} CUSTOMVERTEX;
#define D3DFVF_CUSTOMVERTEX (D3DFVF_XYZRHW|D3DFVF_DIFFUSE|D3DFVF_TEX1)
…
m_pDirect3DDevice->CreateVertexBuffer( 4 * sizeof(CUSTOMVERTEX),
		0, D3DFVF_CUSTOMVERTEX, D3DPOOL_DEFAULT, &m_pDirect3DVertexBuffer, NULL );
上述代码中用到了一个名为CUSTOMVERTEX自定义的灵活顶点格式(Flexible Vertex Format简称FVF)。前文已经介绍,这里不再重复。
5) 填充VertexBuffer
通过IDirect3DVertexBuffer9接口的Lock()函数可以锁定VertexBuffer并且填充其中的数据。数据填充完毕后,可以调用IDirect3DVertexBuffer9d的Unlock()方法解锁。
其中每个参数的含义如下所列:
OffsetToLock: 指定加锁内存起始地址。
SizeToLock:指定加锁内存大小。
ppbData: 用于返回内存指针地址。
Flags: 表示顶点缓冲区的加锁属性。
下面给出一个使用Direct3D播放视频的时候IDirect3DVertexBuffer9的Lock ()的典型代码。其中的CUSTOMVERTEX是自定义的灵活顶点格式。
//Flexible Vertex Format, FVF
typedef struct{
	FLOAT       x,y,z;      // vertex untransformed position
	FLOAT       rhw;        // eye distance
	D3DCOLOR    diffuse;    // diffuse color
	FLOAT       tu, tv;     // texture relative coordinates
} CUSTOMVERTEX;
IDirect3DVertexBuffer9 *m_pDirect3DVertexBuffer;
…
CUSTOMVERTEX *pVertex;
	lRet = m_pDirect3DVertexBuffer->Lock( 0, 4 * sizeof(CUSTOMVERTEX), (void**)&pVertex, 0 );
加锁之后,直接通过赋值的方法设定自定义的定点数组就可以了,例如上文中的pVertex中的数据的设置如下所示。其中lWidth和lHeight分别代表了视频显示窗口的宽和高。
	pVertex[0].x       = 0.0f;       // left
	pVertex[0].y       = 0.0f;       // top
	pVertex[0].z       = 0.0f;
	pVertex[0].diffuse = D3DCOLOR_ARGB(255, 255, 255, 255);
	pVertex[0].rhw     = 1.0f;
	pVertex[0].tu      = 0.0f;
	pVertex[0].tv      = 0.0f;


	pVertex[1].x       = lWidth;    // right
	pVertex[1].y       = 0.0f;       // top
	pVertex[1].z       = 0.0f;
	pVertex[1].diffuse = D3DCOLOR_ARGB(255, 255, 255, 255);
	pVertex[1].rhw     = 1.0f;
	pVertex[1].tu      = 1.0f;
	pVertex[1].tv      = 0.0f;


	pVertex[2].x       = lWidth;    // right
	pVertex[2].y       = lHeight;   // bottom
	pVertex[2].z       = 0.0f;
	pVertex[2].diffuse = D3DCOLOR_ARGB(255, 255, 255, 255);
	pVertex[2].rhw     = 1.0f;
	pVertex[2].tu      = 1.0f;
	pVertex[2].tv      = 1.0f;


	pVertex[3].x       = 0.0f;       // left
	pVertex[3].y       = lHeight;   // bottom
	pVertex[3].z       = 0.0f;
	pVertex[3].diffuse = D3DCOLOR_ARGB(255, 255, 255, 255);
	pVertex[3].rhw     = 1.0f;
	pVertex[3].tu      = 0.0f;
	pVertex[3].tv      = 1.0f;
从代码中可以看出,x、y分别指定了映射后的坐标。z在这里没有用到。Diffuse在这里设定的是白色。tu、tv分别指定了纹理坐标。
数据设定完后,调用Unlock()即可。
m_pDirect3DVertexBuffer->Unlock();
填充VertexBuffer完成之后,初始化工作就完成了。
3. 循环显示画面
循环显示画面就是一帧一帧的读取YUV/RGB数据,然后显示在屏幕上的过程,下面详述一下步骤。
1) 清理
在显示之前,通过IDirect3DDevice9接口的Clear()函数可以清理Surface。个人感觉在播放视频的时候用不用这个函数都可以。因为视频本身就是全屏显示的。显示下一帧的时候自然会覆盖前一帧的所有内容。Clear()函数的原型如下所示:
HRESULT Clear(
 DWORD Count,
 const D3DRECT *pRects,
 DWORD Flags,
 D3DCOLOR Color,
 float Z,
 DWORD Stencil
);
其中每个参数的含义如下所列:
Count:说明你要清空的矩形数目。如果要清空的是整个客户区窗口,则设为0。
pRects:这是一个D3DRECT结构体的一个数组,如果count中设为5,则这个数组中就得有5个元素。
Flags:一些标记组合。只有三种标记:D3DCLEAR_STENCIL , D3DCLEAR_TARGET , D3DCLEAR_ZBUFFER。
Color:清除目标区域所使用的颜色。
float:设置Z缓冲的Z初始值。Z缓冲还没研究过,不再记录。
Stencil:这个在播放视频的时候也没有用到,不再记录。
下面给出一个使用Direct3D播放视频的时候IDirect3DDevice9的Clear()的典型代码。
IDirect3DDevice9 *m_pDirect3DDevice;
m_pDirect3DDevice->Clear(0, NULL, D3DCLEAR_TARGET, D3DCOLOR_XRGB(0, 0, 255), 1.0f, 0);
上述代码运行完后,屏幕会变成蓝色(R,G,B取值为0,0,255)。
2) 一帧视频数据拷贝至Texture
操作Texture的像素数据,需要使用IDirect3DTexture9的LockRect()和UnlockRect()方法。使用LockRect()锁定纹理上的一块矩形区域,该矩形区域被映射成像素数组。利用函数返回的D3DLOCKED_RECT结构体,可以对数组中的像素进行直接存取。LockRect()函数原型如下。
HRESULT LockRect(
  UINT Level,
  D3DLOCKED_RECT *pLockedRect,
  const RECT *pRect,
  DWORD Flags
);
每个参数的意义如下:
Level: 指定了锁定的纹理是哪一层。
pLockedRect: 返回的一个D3DLOCKED_RECT结构体用于描述被锁定的区域。
pRect: 使用一个 RECT结构体指定需要锁定的区域。如果为NULL的话就是整个区域。
Flags: 暂时还没有细研究。
其中D3DLOCKED_RECT结构体定义如下所示。
typedef struct _D3DLOCKED_RECT
{
    INT                 Pitch;
    void*               pBits;
} D3DLOCKED_RECT;
两个参数的意义如下:
Pitch:Texture中一行像素的数据量(Bytes)。注意,这个值和设备有关,一般为4的整数倍,可能会大于一行像素的数据量。大于的那部分是无效的数据。
pBits:指向被锁定的数据。
结构如下图所示。
使用LockRect()函数之后,就可以对其返回的D3DLOCKED_RECT中的数据进行操作了。例如memcpy()等。操作完成后,调用UnlockRect()方法。下面给出一个使用Direct3D播放视频的时候IDirect3DTexture9的数据拷贝的典型代码。
IDirect3DTexture9 *m_pDirect3DTexture;
...
D3DLOCKED_RECT d3d_rect;


// Copy pixel data to texture
	m_pDirect3DTexture->LockRect( 0, &d3d_rect, 0, 0 );
	byte *pSrc = buffer;
	byte *pDest = (byte *)d3d_rect.pBits;
	int stride = d3d_rect.Pitch;


	int pixel_w_size=pixel_w*bpp/8;
	for(unsigned long i=0; i< pixel_h; i++){
		memcpy( pDest, pSrc, pixel_w_size );
		pDest += stride;
		pSrc += pixel_w_size;
	}


	m_pDirect3DTexture->UnlockRect( 0 );
从代码中可以看出,是一行一行的拷贝像素数据的。
3) 开始一个Scene
使用IDirect3DDevice9接口的BeginScene()开始一个Scene。Direct3D中规定所有绘制方法都必须在BeginScene()和EndScene()之间完成。这个函数没有参数。
4) Device设置需要启用的Texture
使用IDirect3DDevice9接口的SetTexture ()设置我们当前需要启用的纹理。SetTexture()函数的原型如下。
HRESULT SetTexture( DWORD Sampler,IDirect3DBaseTexture9 *pTexture );其中每个参数的含义如下所列: Sampler:指定了应用的纹理是哪一层。Direct3D中最多可以设置8层纹理,所以这个参数取值就在0~7之间了。
pTexture:表示我们将要启用的纹理的IDirect3DBaseTexture9接口对象。
下面给出一个使用Direct3D播放视频的时候IDirect3DDevice9的SetTexture ()的典型代码。
IDirect3DDevice9 *m_pDirect3DDevice;
IDirect3DTexture9 *m_pDirect3DTexture;
…
m_pDirect3DDevice->SetTexture( 0, m_pDirect3DTexture );
5) Device绑定VertexBuffer
使用IDirect3DDevice9接口的SetStreamSource()绑定VertexBuffer。SetStreamSource()方法把一个顶点缓存绑定到一个设备数据流,这样就在顶点数据和一个顶点数据流端口之间建立了联系。
而后使用SetFVF()设置顶点格式。即告知系统如何解读VertexBuffer中的数据。SetStreamSource()函数的原型如下。
HRESULT SetStreamSource(
  UINT StreamNumber,
  IDirect3DVertexBuffer9 *pStreamData,
  UINT OffsetInBytes,
  UINT Stride
);
几个参数的定义如下:
StreamNumber:指定数据流。
pStreamData:指向IDirect3DVertexBuffer9的指针,用于绑定数据流。
OffsetInBytes:还没有研究该字段。
Stride:单位Vertex数据的大小。
下面给出一个使用Direct3D播放视频的时候IDirect3DDevice9的SetStreamSource()和SetFVF()的典型代码。
IDirect3DDevice9 *m_pDirect3DDevice;
//Flexible Vertex Format, FVF
typedef struct
{
	FLOAT       x,y,z;      // vertex untransformed position
	FLOAT       rhw;        // eye distance
	D3DCOLOR    diffuse;    // diffuse color
	FLOAT       tu, tv;     // texture relative coordinates
} CUSTOMVERTEX;
// Custom flexible vertex format (FVF), which describes custom vertex structure
#define D3DFVF_CUSTOMVERTEX (D3DFVF_XYZRHW|D3DFVF_DIFFUSE|D3DFVF_TEX1)
//...
m_pDirect3DDevice->SetStreamSource( 0, m_pDirect3DVertexBuffer,0, sizeof(CUSTOMVERTEX) );
m_pDirect3DDevice->SetFVF( D3DFVF_CUSTOMVERTEX );
6) 渲染
使用IDirect3DDevice9接口的DrawPrimitive()进行渲染。渲染完成后,就可以使用EndScene()结束这个Scene了。DrawPrimitive()函数原型如下。
HRESULT DrawPrimitive(
  D3DPRIMITIVETYPE PrimitiveType,
  UINT StartVertex,
  UINT PrimitiveCount
);
几个参数的意义如下:
PrimitiveType:一个标记,它通知 Direct3D 以哪种方式渲染物件。
StartVertex:第一个顶点的索引。
PrimitiveCount:通知绘制的物件的数目。
PrimitiveType有下面选项(注:这个地方不太好理解,直接使用D3DPT_TRIANGLEFAN也可以)
D3DPT_POINTLIST对应的代码如下所示
点列表:将一连串的顶点作为像素进行绘制
D3DPT_LINELIST
线列表:彼此孤立(彼此没有发生连接)的一些直线
D3DPT_LINESTRIP
线带:一连串连接的直线。每条直线都是从前一个顶点到当前顶点绘制而成,很像连接点
D3DPT_TRIANGLELIST
三角形列表:这个设置比较简单,索引区每隔三个一个三角形。
D3DPT_TRIANGLESTRIP
三角形带:索引区中每三个一个三角形,前一个三角形的后两个顶点和后一个三角形的前两个顶点重合。即绘制的第一个三边形使用3个顶点,后面绘制的每一个三角形只使用一个额外的顶点。
D3DPT_TRIANGLEFAN
三角扇形:索引区中第一个点为公共顶点,后面依次展开,每两个点和公共定点组成三角形。
下图显示了几种不同的渲染物件的方式。图中分别按顺序1,3,5,7,9…渲染这些点。
//从第0个点开始用D3DPT_POINTLIST模式渲染6个点
m_pDirect3DDevice->DrawPrimitive(D3DPT_POINTLIST,0,6);
//从第0个点开始用D3DPT_LINELIST 模式渲染3条线
m_pDirect3DDevice->DrawPrimitive(D3DPT_LINELIST,0,3);
//从第0个点开始用D3DPT_TRIANGLESTRIP 模式渲染4个三角形
m_pDirect3DDevice->DrawPrimitive(D3DPT_TRIANGLESTRIP,0,4);
//从第0个点开始用D3DPT_TRIANGLEFAN模式渲染3个三角形
m_pDirect3DDevice->DrawPrimitive(D3DPT_TRIANGLEFAN,0,3);
//从第0个点开始用D3DPT_LINESTRIP 模式渲染5条线
m_pDirect3DDevice->DrawPrimitive(D3DPT_LINELIST,0,5);
//从第0个点开始用D3DPT_TRIANGLELIST 模式渲染2个三角形
m_pDirect3DDevice->DrawPrimitive(D3DPT_TRIANGLELIST,0,2);
下面给出一个使用Direct3D播放视频的时候IDirect3DDevice9的DrawPrimitive ()的典型代码。
IDirect3DDevice9 *m_pDirect3DDevice;
…
m_pDirect3DDevice->DrawPrimitive( D3DPT_TRIANGLEFAN, 0, 2 );
7) 显示
使用IDirect3DDevice9接口的Present ()显示结果。Present ()的原型如下。
HRESULT Present(
   const RECT *pSourceRect,
   const RECT *pDestRect,
   HWND hDestWindowOverride,
   const RGNDATA *pDirtyRegion
  );
几个参数的意义如下:
pSourceRect:你想要显示的后备缓冲区的一个矩形区域。设为NULL则表示要把整个后备缓冲区的内容都显示。
pDestRect:表示一个显示区域。设为NULL表示整个客户显示区。
hDestWindowOverride:你可以通过它来把显示的内容显示到不同的窗口去。设为NULL则表示显示到主窗口。
pDirtyRegion:高级使用。一般设为NULL
下面给出一个使用Direct3D播放视频的时候IDirect3DDevice9的Present ()的典型代码。可见直接全部设置为NULL就可以了。
IDirect3DDevice9 *m_pDirect3DDevice;
…
m_pDirect3DDevice->Present( NULL, NULL, NULL, NULL );
播放视频流程总结
文章至此,使用Direct3D显示YUV/RGB的全部流程就记录完毕了。最后贴一张图总结上述流程。
数据结构总结
在Direct3D播放YUV/RGB的流程中,用到了许多的数据结构,现在理一下它们之间的关系,如下图所示。
接口如下所列
IDirect3D9
IDirect3DDevice9IDirect3DTexture9
IDirect3DVertexBuffer9
结构体如下所列
D3DCAPS9
D3DDISPLAYMODED3DPRESENT_PARAMETERS
D3DLOCKED_RECT
CUSTOMVERTEX
代码
完成的代码其实长度并不长,如下所示。/** * 最简单的Direct3D播放视频的例子(Direct3D播放RGB)[Texture] * Simplest Video Play Direct3D (Direct3D play RGB)[Texture] * * 雷霄骅 Lei Xiaohua * [email protected] * 中国传媒大学/数字电视技术 * Communication University of China / Digital TV Technology * http://blog.csdn.net/leixiaohua1020 * * 本程序使用Direct3D播放RGB/YUV视频像素数据。使用D3D中的Texture渲染数据。 * 相对于使用Surface渲染视频数据来说,使用Texture渲染视频数据功能更加灵活, * 但是学习起来也会相对复杂一些。 * * 函数调用步骤如下: * * [初始化] * Direct3DCreate9():获得IDirect3D9 * IDirect3D9->CreateDevice():通过IDirect3D9创建Device(设备) * IDirect3DDevice9->CreateTexture():通过Device创建一个Texture(纹理)。 * IDirect3DDevice9->CreateVertexBuffer():通过Device创建一个VertexBuffer(顶点缓存)。 * IDirect3DVertexBuffer9->Lock():锁定顶点缓存。 * memcpy():填充顶点缓存。 * IDirect3DVertexBuffer9->Unlock():解锁顶点缓存。 * * [循环渲染数据] * IDirect3DTexture9->LockRect():锁定纹理。 * memcpy():填充纹理数据 * IDirect3DTexture9->UnLockRect():解锁纹理。 * IDirect3DDevice9->BeginScene():开始绘制。 * IDirect3DDevice9->SetTexture():设置当前要渲染的纹理。 * IDirect3DDevice9->SetStreamSource():绑定VertexBuffer。 * IDirect3DDevice9->SetFVF():设置Vertex格式。 * IDirect3DDevice9->DrawPrimitive():渲染。 * IDirect3DDevice9->EndScene():结束绘制。 * IDirect3DDevice9->Present():显示出来。 * * This software plays RGB/YUV raw video data using Direct3D. * It uses Texture in D3D to render the pixel data. * Compared to another method (use Surface), it's more flexible * but a little difficult. * * The process is shown as follows: * * [Init] * Direct3DCreate9():Get IDirect3D9. * IDirect3D9->CreateDevice():Create a Device. * IDirect3DDevice9->CreateTexture():Create a Texture. * IDirect3DDevice9->CreateVertexBuffer():Create a VertexBuffer. * IDirect3DVertexBuffer9->Lock():Lock VertexBuffer. * memcpy():Fill VertexBuffer. * IDirect3DVertexBuffer9->Unlock():UnLock VertexBuffer. * * [Loop to Render data] * IDirect3DTexture9->LockRect():Lock Texture. * memcpy():Fill pixel data... * IDirect3DTexture9->UnLockRect():UnLock Texture. * IDirect3DDevice9->BeginScene():Begin to draw. * IDirect3DDevice9->SetTexture():Set current Texture. * IDirect3DDevice9->SetStreamSource():Bind VertexBuffer. * IDirect3DDevice9->SetFVF():Set Vertex Format. * IDirect3DDevice9->DrawPrimitive():Render. * IDirect3DDevice9->EndScene():End drawing. * IDirect3DDevice9->Present():Show on the screen. */ #include <stdio.h> #include <tchar.h> #include <d3d9.h> //Flexible Vertex Format, FVF typedef struct { FLOAT x,y,z; FLOAT rhw; D3DCOLOR diffuse; FLOAT tu, tv; } CUSTOMVERTEX; CRITICAL_SECTION m_critial; HWND m_hVideoWnd; // 视频窗口 IDirect3D9 *m_pDirect3D9= NULL; IDirect3DDevice9 *m_pDirect3DDevice= NULL; IDirect3DTexture9 *m_pDirect3DTexture= NULL; IDirect3DVertexBuffer9 *m_pDirect3DVertexBuffer= NULL; // Custom flexible vertex format (FVF), which describes custom vertex structure #define D3DFVF_CUSTOMVERTEX (D3DFVF_XYZRHW|D3DFVF_DIFFUSE|D3DFVF_TEX1) //Select one of the Texture mode (Set '1'): #define TEXTURE_DEFAULT 0 //Rotate the texture #define TEXTURE_ROTATE 1 //Show half of the Texture #define TEXTURE_HALF 0 //Width, Height const int screen_w=500,screen_h=500; const int pixel_w=320,pixel_h=180; FILE *fp=NULL; //Bit per Pixel const int bpp=32; unsigned char buffer[pixel_w*pixel_h*bpp/8]; void Cleanup() { EnterCriticalSection(&m_critial); if(m_pDirect3DVertexBuffer) m_pDirect3DVertexBuffer->Release(); if(m_pDirect3DTexture) m_pDirect3DTexture->Release(); if(m_pDirect3DDevice) m_pDirect3DDevice->Release(); if(m_pDirect3D9) m_pDirect3D9->Release(); LeaveCriticalSection(&m_critial); } int InitD3D( HWND hwnd, unsigned long lWidth, unsigned long lHeight ) { HRESULT lRet; InitializeCriticalSection(&m_critial); Cleanup(); EnterCriticalSection(&m_critial); // Create IDirect3D m_pDirect3D9 = Direct3DCreate9( D3D_SDK_VERSION ); if ( m_pDirect3D9 == NULL ){ LeaveCriticalSection(&m_critial); return -1; } if ( lWidth == 0 || lHeight == 0 ){ RECT rt; GetClientRect( hwnd, &rt ); lWidth = rt.right-rt.left; lHeight = rt.bottom-rt.top; } /* //Get Some Info //Retrieves device-specific information about a device. D3DCAPS9 d3dcaps; lRet=m_pDirect3D9->GetDeviceCaps(D3DADAPTER_DEFAULT,D3DDEVTYPE_HAL,&d3dcaps); int hal_vp = 0; if( d3dcaps.DevCaps & D3DDEVCAPS_HWTRANSFORMANDLIGHT ){ //save in hal_vp the fact that hardware vertex processing is supported. hal_vp = D3DCREATE_HARDWARE_VERTEXPROCESSING; } // get D3DDISPLAYMODE D3DDISPLAYMODE d3dDisplayMode; lRet = m_pDirect3D9->GetAdapterDisplayMode( D3DADAPTER_DEFAULT, &d3dDisplayMode ); if ( FAILED(lRet) ){ LeaveCriticalSection(&m_critial); return -1; } */ //D3DPRESENT_PARAMETERS Describes the presentation parameters. D3DPRESENT_PARAMETERS d3dpp; ZeroMemory( &d3dpp, sizeof(d3dpp) ); d3dpp.BackBufferWidth = lWidth; d3dpp.BackBufferHeight = lHeight; d3dpp.BackBufferFormat = D3DFMT_UNKNOWN; //d3dpp.BackBufferFormat = D3DFMT_X8R8G8B8; d3dpp.BackBufferCount = 1; d3dpp.MultiSampleType = D3DMULTISAMPLE_NONE; d3dpp.SwapEffect = D3DSWAPEFFECT_COPY; d3dpp.hDeviceWindow = hwnd; d3dpp.Windowed = TRUE; d3dpp.EnableAutoDepthStencil = FALSE; d3dpp.Flags = D3DPRESENTFLAG_VIDEO; d3dpp.PresentationInterval = D3DPRESENT_INTERVAL_DEFAULT; m_hVideoWnd = hwnd; //Creates a device to represent the display adapter. //Adapter: Ordinal number that denotes the display adapter. D3DADAPTER_DEFAULT is always the primary display //D3DDEVTYPE: D3DDEVTYPE_HAL((Hardware Accelerator), or D3DDEVTYPE_SW(SoftWare) //BehaviorFlags:D3DCREATE_SOFTWARE_VERTEXPROCESSING, or D3DCREATE_HARDWARE_VERTEXPROCESSING lRet = m_pDirect3D9->CreateDevice( D3DADAPTER_DEFAULT, D3DDEVTYPE_HAL, NULL, D3DCREATE_SOFTWARE_VERTEXPROCESSING|D3DCREATE_MULTITHREADED, &d3dpp, &m_pDirect3DDevice ); /* //Set some property //SetSamplerState() // Texture coordinates outside the range [0.0, 1.0] are set // to the texture color at 0.0 or 1.0, respectively. IDirect3DDevice9_SetSamplerState(m_pDirect3DDevice, 0, D3DSAMP_ADDRESSU, D3DTADDRESS_CLAMP); IDirect3DDevice9_SetSamplerState(m_pDirect3DDevice, 0, D3DSAMP_ADDRESSV, D3DTADDRESS_CLAMP); // Set linear filtering quality IDirect3DDevice9_SetSamplerState(m_pDirect3DDevice, 0, D3DSAMP_MINFILTER, D3DTEXF_LINEAR); IDirect3DDevice9_SetSamplerState(m_pDirect3DDevice, 0, D3DSAMP_MAGFILTER, D3DTEXF_LINEAR); //SetRenderState() //set maximum ambient light IDirect3DDevice9_SetRenderState(m_pDirect3DDevice, D3DRS_AMBIENT, D3DCOLOR_XRGB(255,255,0)); // Turn off culling IDirect3DDevice9_SetRenderState(m_pDirect3DDevice, D3DRS_CULLMODE, D3DCULL_NONE); // Turn off the zbuffer IDirect3DDevice9_SetRenderState(m_pDirect3DDevice, D3DRS_ZENABLE, D3DZB_FALSE); // Turn off lights IDirect3DDevice9_SetRenderState(m_pDirect3DDevice, D3DRS_LIGHTING, FALSE); // Enable dithering IDirect3DDevice9_SetRenderState(m_pDirect3DDevice, D3DRS_DITHERENABLE, TRUE); // disable stencil IDirect3DDevice9_SetRenderState(m_pDirect3DDevice, D3DRS_STENCILENABLE, FALSE); // manage blending IDirect3DDevice9_SetRenderState(m_pDirect3DDevice, D3DRS_ALPHABLENDENABLE, TRUE); IDirect3DDevice9_SetRenderState(m_pDirect3DDevice, D3DRS_SRCBLEND,D3DBLEND_SRCALPHA); IDirect3DDevice9_SetRenderState(m_pDirect3DDevice, D3DRS_DESTBLEND,D3DBLEND_INVSRCALPHA); IDirect3DDevice9_SetRenderState(m_pDirect3DDevice, D3DRS_ALPHATESTENABLE,TRUE); IDirect3DDevice9_SetRenderState(m_pDirect3DDevice, D3DRS_ALPHAREF, 0x10); IDirect3DDevice9_SetRenderState(m_pDirect3DDevice, D3DRS_ALPHAFUNC,D3DCMP_GREATER); // Set texture states IDirect3DDevice9_SetTextureStageState(m_pDirect3DDevice, 0, D3DTSS_COLOROP,D3DTOP_MODULATE); IDirect3DDevice9_SetTextureStageState(m_pDirect3DDevice, 0, D3DTSS_COLORARG1,D3DTA_TEXTURE); IDirect3DDevice9_SetTextureStageState(m_pDirect3DDevice, 0, D3DTSS_COLORARG2,D3DTA_DIFFUSE); // turn off alpha operation IDirect3DDevice9_SetTextureStageState(m_pDirect3DDevice, 0, D3DTSS_ALPHAOP, D3DTOP_DISABLE); */ //Creates a texture resource. //Usage: //D3DUSAGE_SOFTWAREPROCESSING: If this flag is used, vertex processing is done in software. // If this flag is not used, vertex processing is done in hardware. //D3DPool: //D3D3POOL_DEFAULT: Resources are placed in the hardware memory (Such as video memory) //D3D3POOL_MANAGED: Resources are placed automatically to device-accessible memory as needed. //D3DPOOL_SYSTEMMEM: Resources are placed in system memory. lRet = m_pDirect3DDevice->CreateTexture(lWidth, lHeight, 1, D3DUSAGE_SOFTWAREPROCESSING, D3DFMT_X8R8G8B8, D3DPOOL_MANAGED, &m_pDirect3DTexture, NULL ); if ( FAILED(lRet) ){ LeaveCriticalSection(&m_critial); return -1; } // Create Vertex Buffer lRet = m_pDirect3DDevice->CreateVertexBuffer( 4 * sizeof(CUSTOMVERTEX), 0, D3DFVF_CUSTOMVERTEX, D3DPOOL_DEFAULT, &m_pDirect3DVertexBuffer, NULL ); if ( FAILED(lRet) ){ LeaveCriticalSection(&m_critial); return -1; } #if TEXTURE_HALF CUSTOMVERTEX vertices[] ={ {0.0f, 0.0f, 0.0f, 1.0f,D3DCOLOR_ARGB(255, 255, 255, 255),0.0f,0.0f}, {lWidth, 0.0f, 0.0f, 1.0f,D3DCOLOR_ARGB(255, 255, 255, 255),0.5f,0.0f}, {lWidth, lHeight, 0.0f, 1.0f,D3DCOLOR_ARGB(255, 255, 255, 255),0.5f,1.0f}, {0.0f, lHeight, 0.0f, 1.0f,D3DCOLOR_ARGB(255, 255, 255, 255),0.0f,1.0f} }; #elif TEXTURE_ROTATE //Rotate Texture? CUSTOMVERTEX vertices[] ={ {lWidth/4, 0.0f, 0.0f, 1.0f,D3DCOLOR_ARGB(255, 255, 255, 255),0.0f,0.0f}, {lWidth, lHeight/4, 0.0f, 1.0f,D3DCOLOR_ARGB(255, 255, 255, 255),1.0f,0.0f}, {lWidth*3/4, lHeight, 0.0f, 1.0f,D3DCOLOR_ARGB(255, 255, 255, 255),1.0f,1.0f}, {0.0f, lHeight*3/4,0.0f, 1.0f,D3DCOLOR_ARGB(255, 255, 255, 255),0.0f,1.0f} }; #else CUSTOMVERTEX vertices[] ={ {0.0f, 0.0f, 0.0f, 1.0f,D3DCOLOR_ARGB(255, 255, 255, 255),0.0f,0.0f}, {lWidth, 0.0f, 0.0f, 1.0f,D3DCOLOR_ARGB(255, 255, 255, 255),1.0f,0.0f}, {lWidth, lHeight, 0.0f, 1.0f,D3DCOLOR_ARGB(255, 255, 255, 255),1.0f,1.0f}, {0.0f, lHeight, 0.0f, 1.0f,D3DCOLOR_ARGB(255, 255, 255, 255),0.0f,1.0f} }; #endif // Fill Vertex Buffer CUSTOMVERTEX *pVertex; lRet = m_pDirect3DVertexBuffer->Lock( 0, 4 * sizeof(CUSTOMVERTEX), (void**)&pVertex, 0 ); if ( FAILED(lRet) ){ LeaveCriticalSection(&m_critial); return -1; } memcpy(pVertex, vertices, sizeof(vertices)); m_pDirect3DVertexBuffer->Unlock(); LeaveCriticalSection(&m_critial); return 0; } bool Render() { LRESULT lRet; //Read Data //RGB if (fread(buffer, 1, pixel_w*pixel_h*bpp/8, fp) != pixel_w*pixel_h*bpp/8){ // Loop fseek(fp, 0, SEEK_SET); fread(buffer, 1, pixel_w*pixel_h*bpp/8, fp); } if(buffer == NULL || m_pDirect3DDevice == NULL) return false; //Clears one or more surfaces lRet = m_pDirect3DDevice->Clear(0, NULL, D3DCLEAR_TARGET, D3DCOLOR_XRGB(0, 255, 0), 1.0f, 0); D3DLOCKED_RECT d3d_rect; //Locks a rectangle on a texture resource. //And then we can manipulate pixel data in it. lRet = m_pDirect3DTexture->LockRect( 0, &d3d_rect, 0, 0 ); if ( FAILED(lRet) ){ return false; } // Copy pixel data to texture byte *pSrc = buffer; byte *pDest = (byte *)d3d_rect.pBits; int stride = d3d_rect.Pitch; int pixel_w_size=pixel_w*bpp/8; for(unsigned long i=0; i< pixel_h; i++){ memcpy( pDest, pSrc, pixel_w_size ); pDest += stride; pSrc += pixel_w_size; } m_pDirect3DTexture->UnlockRect( 0 ); //Begin the scene if ( FAILED(m_pDirect3DDevice->BeginScene()) ){ return false; } lRet = m_pDirect3DDevice->SetTexture( 0, m_pDirect3DTexture ); //Binds a vertex buffer to a device data stream. m_pDirect3DDevice->SetStreamSource( 0, m_pDirect3DVertexBuffer, 0, sizeof(CUSTOMVERTEX) ); //Sets the current vertex stream declaration. lRet = m_pDirect3DDevice->SetFVF( D3DFVF_CUSTOMVERTEX ); //Renders a sequence of nonindexed, geometric primitives of the //specified type from the current set of data input streams. m_pDirect3DDevice->DrawPrimitive( D3DPT_TRIANGLEFAN, 0, 2 ); m_pDirect3DDevice->EndScene(); //Presents the contents of the next buffer in the sequence of back //buffers owned by the device. m_pDirect3DDevice->Present( NULL, NULL, NULL, NULL ); return true; } LRESULT WINAPI MyWndProc(HWND hwnd, UINT msg, WPARAM wparma, LPARAM lparam) { switch(msg){ case WM_DESTROY: Cleanup(); PostQuitMessage(0); return 0; } return DefWindowProc(hwnd, msg, wparma, lparam); } int WINAPI WinMain( __in HINSTANCE hInstance, __in_opt HINSTANCE hPrevInstance, __in LPSTR lpCmdLine, __in int nShowCmd ) { WNDCLASSEX wc; ZeroMemory(&wc, sizeof(wc)); wc.cbSize = sizeof(wc); wc.hbrBackground = (HBRUSH)(COLOR_WINDOW + 1); wc.lpfnWndProc = (WNDPROC)MyWndProc; wc.lpszClassName = L"D3D"; wc.style = CS_HREDRAW | CS_VREDRAW; RegisterClassEx(&wc); HWND hwnd = NULL; hwnd = CreateWindow(L"D3D", L"Simplest Video Play Direct3D (Texture)", WS_OVERLAPPEDWINDOW, 100, 100, screen_w, screen_h, NULL, NULL, hInstance, NULL); if (hwnd==NULL){ return -1; } if(InitD3D( hwnd, pixel_w, pixel_h)==E_FAIL){ return -1; } ShowWindow(hwnd, nShowCmd); UpdateWindow(hwnd); fp=fopen("../test_bgra_320x180.rgb","rb+"); if(fp==NULL){ printf("Cannot open this file.\n"); return -1; } MSG msg; ZeroMemory(&msg, sizeof(msg)); while (msg.message != WM_QUIT){ //PeekMessage, not GetMessage if (PeekMessage(&msg, NULL, 0, 0, PM_REMOVE)){ TranslateMessage(&msg); DispatchMessage(&msg); } else{ Sleep(40); Render(); } } UnregisterClass(L"D3D", hInstance); return 0; }
代码说明
1. 目前支持读取bgra格式的像素数据。
2. 窗口的宽高为screen_w,screen_h。像素数据的宽高为pixel_w,pixel_h。它们的定义如下。
//Width, Height
const int screen_w=500,screen_h=500;
const int pixel_w=320,pixel_h=180;
3. 其他要点
本程序使用的是Win32的API创建的窗口。但注意这个并不是MFC应用程序的窗口。MFC代码量太大,并不适宜用来做教程。因此使用Win32的API创建窗口。程序的入口函数是WinMain(),其中调用了CreateWindow()创建了显示视频的窗口。此外,程序中的消息循环使用的是PeekMessage()而不是GetMessage()。GetMessage()获取消息后,将消息从系统中移除,当系统无消息时,会等待下一条消息,是阻塞函数。而函数PeekMesssge()是以查看的方式从系统中获取消息,可以不将消息从系统中移除(相当于“偷看”消息),是非阻塞函数;当系统无消息时,返回FALSE,继续执行后续代码。使用PeekMessage()的好处是可以保证每隔40ms可以显示下一帧画面。
4. 通过代码前面的宏,可以选择几种不同的纹理映射方式
//Select one of the Texture mode (Set '1'):
#define TEXTURE_DEFAULT 1
//Rotate the texture
#define TEXTURE_ROTATE  0
//Show half of the Texture
#define TEXTURE_HALF    0
第一种是正常的映射方式,第二种是“旋转”的方式,第三种是只映射一半的方式。
5. 代码中还有很多注释的部分都是可用的代码,可以取消注释看看效果。
运行结果
下面展示一下三种纹理映射方式的结果:
(1) 正常(2) “旋转”
(3) 一半纹理
下载
代码位于“Simplest Media Play”中
SourceForge项目地址: https://sourceforge.net/projects/simplestmediaplay/
CSDN下载地址: http://download.csdn.net/detail/leixiaohua1020/8054395
注:
该项目会不定时的更新并修复一些小问题,最新的版本请参考该系列文章的总述页面:
《最简单的视音频播放示例1:总述》
通过本工程的代码初学者可以快速学习使用这几个API播放视频和音频的技术。
一共包括了如下几个子工程:
simplest_audio_play_directsound: 使用DirectSound播放PCM音频采样数据。
simplest_audio_play_sdl2: 使用SDL2播放PCM音频采样数据。
simplest_video_play_direct3d: 使用Direct3D的Surface播放RGB/YUV视频像素数据。
simplest_video_play_direct3d_texture:使用Direct3D的Texture播放RGB视频像素数据。
simplest_video_play_gdi: 使用GDI播放RGB/YUV视频像素数据。
simplest_video_play_opengl: 使用OpenGL播放RGB/YUV视频像素数据。
simplest_video_play_opengl_texture: 使用OpenGL的Texture播放YUV视频像素数据。
simplest_video_play_sdl2: 使用SDL2播放RGB/YUV视频像素数据。


