Spring Security身份认证之HelloSpringSecurity
<project xmlns="http://maven.apache.org/POM/4.0.0" xmlns:xsi="http://www.w3.org/2001/XMLSchema-instance"
  xsi:schemaLocation="http://maven.apache.org/POM/4.0.0 http://maven.apache.org/maven-v4_0_0.xsd">
  <modelVersion>4.0.0</modelVersion>
  <groupId>com.favccxx.favsecurity</groupId>
  <artifactId>HelloSpringSecurity</artifactId>
  <packaging>war</packaging>
  <version>0.0.1-SNAPSHOT</version>
  <name>HelloSpringSecurity Maven Webapp</name>
  <url>http://maven.apache.org</url>

    <properties>
          <spring.version>3.2.8.RELEASE</spring.version>
  </properties>

  <dependencies>
    <dependency>
      <groupId>junit</groupId>
      <artifactId>junit</artifactId>
      <version>3.8.1</version>
      <scope>test</scope>
    </dependency>


    <dependency>
        <groupId>org.springframework</groupId>
        <artifactId>spring-core</artifactId>
        <version>${spring.version}</version>
    </dependency>
    <dependency>
        <groupId>org.springframework</groupId>
        <artifactId>spring-webmvc</artifactId>
        <version>${spring.version}</version>
    </dependency>
    <dependency>
        <groupId>org.springframework</groupId>
        <artifactId>spring-beans</artifactId>
        <version>${spring.version}</version>
    </dependency>
    <dependency>
        <groupId>org.springframework</groupId>
        <artifactId>spring-context</artifactId>
        <version>${spring.version}</version>
    </dependency>
    <dependency>
        <groupId>org.springframework</groupId>
        <artifactId>spring-aop</artifactId>
        <version>${spring.version}</version>
    </dependency>
    <dependency>
        <groupId>org.springframework</groupId>
        <artifactId>spring-tx</artifactId>
        <version>${spring.version}</version>
    </dependency>
<!--    <dependency> -->
<!--        <groupId>org.springframework</groupId> -->
<!--        <artifactId>spring-test</artifactId> -->
<!--        <version>${spring.version}</version> -->
<!--    </dependency> -->
    <dependency>
        <groupId>org.freemarker</groupId>
        <artifactId>freemarker</artifactId>
        <version>2.3.20</version>
    </dependency>
    <dependency>
        <groupId>org.springframework</groupId>
        <artifactId>spring-orm</artifactId>
        <version>${spring.version}</version>
    </dependency>


     <dependency>
        <groupId>org.springframework.security</groupId>
        <artifactId>spring-security-web</artifactId>
        <version>3.2.5.RELEASE</version>
      </dependency>
      <dependency>
        <groupId>org.springframework.security</groupId>
        <artifactId>spring-security-config</artifactId>
        <version>3.2.5.RELEASE</version>
      </dependency>

      <dependency>
           <groupId>jstl</groupId>
           <artifactId>jstl</artifactId>
           <version>1.2</version>
       </dependency>
  </dependencies>
  <build>
    <finalName>HelloSpringSecurity</finalName>
  </build>
</project>
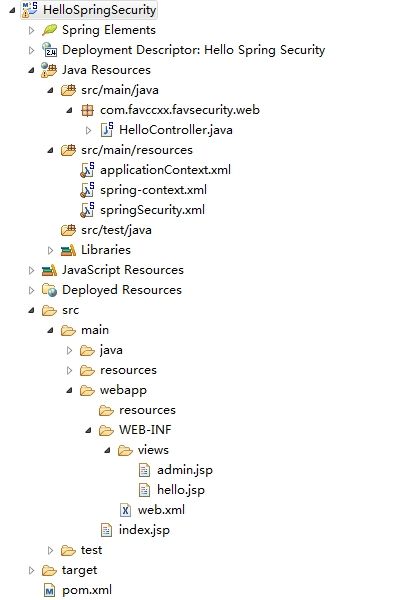
3. 配置web.xml,在容器启动时加载Spring MVC的配置文件与Spring Security的配置文件。
<?xml version="1.0" encoding="UTF-8"?>
<web-app id="helloSpringSecurity" version="2.4" xmlns="http://java.sun.com/xml/ns/j2ee"
    xmlns:xsi="http://www.w3.org/2001/XMLSchema-instance"
    xsi:schemaLocation="http://java.sun.com/xml/ns/j2ee http://java.sun.com/xml/ns/j2ee/web-app_2_4.xsd">
    <display-name>Hello Spring Security</display-name>

    <context-param>
        <param-name>contextConfigLocation</param-name>
        <param-value>
            classpath:springSecurity.xml
        </param-value>
    </context-param>

    <listener>
         <listener-class>org.springframework.web.context.ContextLoaderListener</listener-class>
     </listener>

     <filter>
        <filter-name>springSecurityFilterChain</filter-name>
        <filter-class>org.springframework.web.filter.DelegatingFilterProxy</filter-class>
    </filter>
    <filter-mapping>
        <filter-name>springSecurityFilterChain</filter-name>
        <url-pattern>/*</url-pattern>
    </filter-mapping>

     <servlet>
        <servlet-name>springMVC</servlet-name>
        <servlet-class>org.springframework.web.servlet.DispatcherServlet</servlet-class>
         <init-param>
             <param-name>contextConfigLocation</param-name>
             <param-value>classpath:spring-context.xml</param-value>
        </init-param>
        <load-on-startup>1</load-on-startup>
    </servlet>
    <servlet-mapping>
        <servlet-name>springMVC</servlet-name>
        <url-pattern>/</url-pattern>
    </servlet-mapping>

</web-app>
4. SpringSecurity.xml配置文件如下
<?xml version="1.0" encoding="UTF-8"?>
<beans xmlns="http://www.springframework.org/schema/beans"
    xmlns:xsi="http://www.w3.org/2001/XMLSchema-instance"
    xmlns:security="http://www.springframework.org/schema/security"
    xsi:schemaLocation="http://www.springframework.org/schema/beans http://www.springframework.org/schema/beans/spring-beans-3.2.xsd
        http://www.springframework.org/schema/security http://www.springframework.org/schema/security/spring-security-3.2.xsd">

    <security:http auto-config="true">
        <security:intercept-url pattern="/admin" access="ROLE_ADMIN"/>
        <security:intercept-url pattern="/confidential" access="ROLE_SUPERADMIN"/>
    </security:http>


    <security:authentication-manager>
        <security:authentication-provider>
            <security:user-service>
                <security:user name="favccxx" password="favccxx" authorities="ROLE_USER,ROLE_ADMIN"/>
                <security:user name="super" password="super" authorities="ROLE_SUPERADMIN"/>
            </security:user-service>
        </security:authentication-provider>
    </security:authentication-manager>

</beans>
5. spring-context.xml配置文件如下
<?xml version="1.0" encoding="UTF-8"?>
<beans xmlns="http://www.springframework.org/schema/beans"
    xmlns:xsi="http://www.w3.org/2001/XMLSchema-instance"
    xmlns:context="http://www.springframework.org/schema/context"
    xmlns:mvc="http://www.springframework.org/schema/mvc"
    xsi:schemaLocation="http://www.springframework.org/schema/beans http://www.springframework.org/schema/beans/spring-beans.xsd
        http://www.springframework.org/schema/context http://www.springframework.org/schema/context/spring-context-3.2.xsd
        http://www.springframework.org/schema/mvc http://www.springframework.org/schema/mvc/spring-mvc-3.2.xsd">

    <mvc:annotation-driven></mvc:annotation-driven>

    <context:component-scan base-package="com.favccxx.favsecurity.web"></context:component-scan>

    <bean id="viewResolver"
        class="org.springframework.web.servlet.view.UrlBasedViewResolver">
        <property name="viewClass"
            value="org.springframework.web.servlet.view.JstlView" />
        <property name="prefix" value="/WEB-INF/views" />
        <property name="suffix" value=".jsp" />
    </bean>

</beans>
6. 新建HelloSpringSecurityController.java文件,代码如下:
package com.favccxx.favsecurity.web;

import org.springframework.stereotype.Controller;
import org.springframework.web.bind.annotation.RequestMapping;
import org.springframework.web.bind.annotation.RequestMethod;
import org.springframework.web.servlet.ModelAndView;

@Controller
public class HelloSpringSecurityController {

    @RequestMapping("/hello")
    public ModelAndView hello(){
        ModelAndView mav = new ModelAndView();
        mav.addObject("title", "Welcome - Spring Security Hello World");
        mav.addObject("message", "This is welcome page!");
        mav.setViewName("/hello");
        return mav;
    }

    @RequestMapping(value = { "/", "/welcome" }, method = RequestMethod.GET)
     public ModelAndView welcome() {
        ModelAndView mav = new ModelAndView();
        mav.addObject("title", "Welcome - Spring Security Hello World");
        mav.addObject("message", "This is welcome page!");
        mav.setViewName("/hello");
        return mav;
     }

     @RequestMapping(value = "/admin", method = RequestMethod.GET)
          public ModelAndView admin() {

              ModelAndView mav = new ModelAndView();
              mav.addObject("title", "Admin - Spring Security Hello World");
              mav.addObject("message", "This is protected page!");
              mav.setViewName("/admin");
             return mav;

        }

     }

}
7. 在/WEB-INF/views文件夹下分别创建admin.jsp和hello.jsp
<%@ page language="java" contentType="text/html; charset=UTF-8"
    pageEncoding="UTF-8"%>
<%@taglib prefix="c" uri="http://java.sun.com/jsp/jstl/core"%>
<!DOCTYPE html>
<html>
<head>
<meta http-equiv="Content-Type" content="text/html; charset=UTF-8">
<title>${title}</title>
</head>
<body>
    <h1>Title : ${title}</h1>
    <h1>Message : ${message}</h1>
    <c:if test="${pageContext.request.userPrincipal.name != null}">
        <h2>
             Welcome : ${pageContext.request.userPrincipal.name} | <a href="<c:url value="/j_spring_security_logout" />"> Logout</a>
        </h2>
    </c:if>
</body>
</html>
<%@ page language="java" contentType="text/html; charset=UTF-8"
    pageEncoding="UTF-8"%>
<!DOCTYPE html PUBLIC "-//W3C//DTD HTML 4.01 Transitional//EN" "http://www.w3.org/TR/html4/loose.dtd">
<html>
<head>
<meta http-equiv="Content-Type" content="text/html; charset=UTF-8">
<title>${title}</title>
</head>
<body>
    <h1>Title:${title}</h1>
    <h1>Message:${message}</h1>
</body>
</html>


