动画特效十三:自定义过度动画之基本使用
好久没有进行动画系列了,今天我们继续;这次讲解的内容是过度动画;先看看最终动画效果。
需求分析:
1. UI下方有一排内容,用来显示缩略图,可以横向滚动;
2. 选中某一项后,会弹出具体的内容。
操作细节:
1. 动画在缩略图的情形下,只有图片没有文本描述信息。
2. 动画在执行过程中,图片的圆角也会伴随着动画的变化而变化。
实现思路:
1. 点击每个缩略图的时候,创建一个相同的View(带有文本描述信息),动画执行开始时,隐藏掉被点击的缩略图,然后动画执行创建的View;执行的是缩放动画,并且在动画执行的时候,注意圆角的处理。当点击具体内容的View的时候,缩小自定义的View,并且在动画执行完毕的时候,移除掉这个自定义的View,并且显示刚才被点击的缩略图。
2. 使用UIViewControllerAnimatedTransitioning动画,注意,此时不是通过自定义View的形式来实现的了。而是带缩略图的界面是一个控制器,弹出后的详情界面是另一个控制器。而我们只需要通过过度动画来完成两个界面之间的切换。我选择这个实现方式,主要是讲解过度动画的实现原理。
代码实现:
一. 构建基本UI界面,主界面是一个ViewController,下面是一个UIScrollView,用来存放缩略图(也可以直接使用UICollectionView)。界面如下:
二. 详情页(HerbDetailsViewController)界面如下:
三. 主界面实现基本代码:
- (void)viewDidLoad {
    [super viewDidLoad];
    [self setupList];
}

- (void)setupList {
    for (NSInteger i = 0; i < self.mockupData.count; i++) {
        Herb *herb = self.mockupData[i];
        UIImageView *imageView = [[UIImageView alloc] init];
        imageView.image = [UIImage imageNamed:herb.image];
        imageView.tag = i + kBaseTag;
        imageView.contentMode = UIViewContentModeScaleAspectFill;
        imageView.userInteractionEnabled = YES;
        imageView.layer.cornerRadius = 20.0;
        imageView.layer.masksToBounds = YES;

        UITapGestureRecognizer *tap = [[UITapGestureRecognizer alloc] initWithTarget:self action:@selector(clickImage:)];
        [imageView addGestureRecognizer:tap];

        [self.scrollView addSubview:imageView];
        [self positionListItems];
    }
}

- (void)positionListItems {
    CGFloat itemHeight = self.scrollView.frame.size.height * 1.33;
    CGFloat ratio = [UIScreen mainScreen].bounds.size.height / [UIScreen mainScreen].bounds.size.width;
    CGFloat itemWidth = itemHeight / ratio;

    CGFloat padding = 10.0;
    for (NSInteger i = 0; i < self.mockupData.count; i++) {
        UIImageView *imageView = (UIImageView *)[self.scrollView viewWithTag:i + kBaseTag];
        imageView.frame = CGRectMake(padding + (itemWidth + padding) * i, 0, itemWidth, itemHeight);
    }

    self.scrollView.contentSize = CGSizeMake(padding + (itemWidth + padding) * self.mockupData.count, 0);
}

- (void)clickImage:(UITapGestureRecognizer *)tap {
    self.selectedImageView = (UIImageView *)tap.view;

    NSInteger index = tap.view.tag - kBaseTag;
    Herb *herb = self.mockupData[index];
    HerbDetailsViewController *herbVC = [[HerbDetailsViewController alloc] init];
    herbVC.herb = herb;
    [self presentViewController:herbVC animated:YES completion:nil];
}
其中的mockupData是一个数组,存放的是Herb模型数据集合。而Herb模型的结构如下,其实就是主要获取name和image信息,用来展示:
@interface Herb : NSObject
@property (nonatomic, copy) NSString *name;
@property (nonatomic, copy) NSString *image;
@property (nonatomic, copy) NSString *license;
@property (nonatomic, copy) NSString *credit;
@property (nonatomic, copy) NSString *descriptions;
- (instancetype)initHerbWithName:(NSString *)name image:(NSString *)image license:(NSString *)license credit:(NSString *)credit descriptions:(NSString *)descriptions;
@end
注意clickImage方法执行的tap手势操作,这里是用presentViewController 的形式弹出HerbDetailsViewController的。此刻运行代码,效果如下:
现在的效果就是系统默认的模态对话框的展现形式。但这并不是我们想要的效果,所以我们可以自定义过度动画。让ViewController 遵守UIViewControllerTransitioningDelegate协议,然后在clickImage方法中,添加如下代码:
herbVC.transitioningDelegate = self;然后实现两个自定义模态动画效果的代理方法:
- (id <UIViewControllerAnimatedTransitioning>)animationControllerForPresentedController:(UIViewController *)presented presentingController:(UIViewController *)presenting sourceController:(UIViewController *)source;

- (id <UIViewControllerAnimatedTransitioning>)animationControllerForDismissedController:(UIViewController *)dismissed;
这两个方法对应的分别是弹出模态层和退出模态层。注意这两个方法返回的均是
UIViewControllerAnimatedTransitioning,所以我们可以自定义遵守这个协议的类,来完成自定的动画效果来取代系统默认的这种动画执行效果。
四. 自定义PopAnimator类
PopAnimator类只是一个普通的继承自NSObject的类,并且它遵守UIViewControllerAnimatedTransitioning协议。并且动画都有自己的执行时间,所以PopAnimator类大致定义如下:
#import <Foundation/Foundation.h>
#import <UIKit/UIKit.h>

@interface PopAnimator : NSObject<UIViewControllerAnimatedTransitioning>
@property (nonatomic, assign) CGFloat duration;
@end
而UIViewControllerAnimatedTransitioning协议中有两个方法:
- (NSTimeInterval)transitionDuration:(id <UIViewControllerContextTransitioning>)transitionContext;
- (void)animateTransition:(id <UIViewControllerContextTransitioning>)transitionContext;
1. 第一个方法就是动画执行所需要的时间。
2. 第二个方法就是处理自定动画效果的地方。
五. 简单Demo演示
为了说明自定义过度动画的执行流程,我们先实现两个控制器之间的淡入淡出效果。
1. 在ViewController中实例化一个PopAnimator(懒加载),用来执行自定义的动画。
- (PopAnimator *)animator {
    if (!_animator) {
        _animator = [[PopAnimator alloc] init];
    }
    return _animator;
}
2. ViewController实现UIViewControllerTransitioningDelegate的两个方法,假设动画时间为1秒,并且返回的UIViewControllerAnimatedTransitioning对象均为 PopAnimator。
- (nullable id <UIViewControllerAnimatedTransitioning>)animationControllerForPresentedController:(UIViewController *)presented presentingController:(UIViewController *)presenting sourceController:(UIViewController *)source {
    self.animator.duration = 1;
    return self.animator;
}

- (nullable id <UIViewControllerAnimatedTransitioning>)animationControllerForDismissedController:(UIViewController *)dismissed {
    return self.animator;
}
3. PopAnimator中实现UIViewControllerAnimatedTransitioning中的方法,完成淡入淡出动画效果:
- (NSTimeInterval)transitionDuration:(nullable id <UIViewControllerContextTransitioning>)transitionContext {
    return self.duration;
}

- (void)animateTransition:(id <UIViewControllerContextTransitioning>)transitionContext {
    UIView *containerView = [transitionContext containerView];
    UIView *toView = [transitionContext viewForKey:UITransitionContextToViewKey];
    [containerView addSubview:toView];

    toView.alpha = 0.0;
    [UIView animateWithDuration:self.duration animations:^{
        toView.alpha = 1.0;
    } completion:^(BOOL finished) {
        [transitionContext completeTransition:YES];
    }];
}
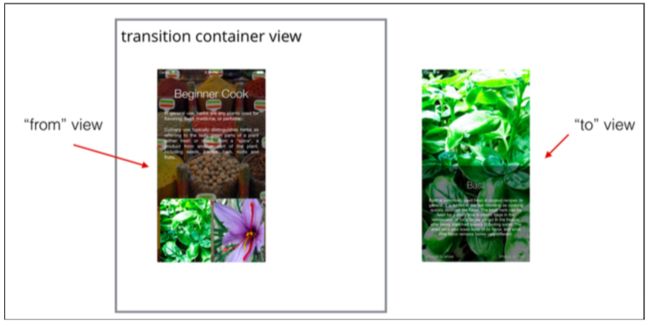
transitionContext就是过度动画执行的上下文,所有的动画变换操作都是在这个上下文中完成的,通过这个上下文我们可以获取很多的信息。
1. containerView就是动画执行的容器。
2. UITransitionContextToViewKey就是获取将要呈现的View,同理UITransitionContextFromViewKey就是获取目前正在界面上面呈现的View。
初始状态的时候,View的结构图如下:
即fromView是在container view中的,animateTransition方法执行后,toView立刻被加入到container view上面了,然后执行淡入淡出动画,注意:在过度动画中,当动画执行完毕后,fromView会被自动从container view中移除。所以动画执行完毕后,View的结构图如下:
当你下次点击详情页面,执行动画时,此时,需要注意的是,fromView永远是在container view中的那一个!!!所以此时的fromView应该是详情页,而toView是主页。这样就可以完成动画的无限切换效果了。
效果图如下:
六、具体实现:
在明白了上面的实现思路之后,我们用自定义过度动画来完成本节开头中的动画效果。
主要代码清单:
1. PopAnimator.h:
@interface PopAnimator : NSObject<UIViewControllerAnimatedTransitioning>
@property (nonatomic, assign) CGFloat duration;
// 是弹出详情控制器还是,还是返回显示主控制器
@property (nonatomic, assign, getter=isPresenting) BOOL presenting;
// 弹出缩略图的其实frame大小
@property (nonatomic, assign) CGRect originFrame;
// dismiss 控制器之后,应该显示scroll view上面的item项
@property (nonatomic, copy) void (^didFinishDismiss)();
@end
2. PopAnimator.m:
@implementation PopAnimator

- (NSTimeInterval)transitionDuration:(nullable id <UIViewControllerContextTransitioning>)transitionContext {
    return self.duration;
}

- (void)animateTransition:(id <UIViewControllerContextTransitioning>)transitionContext {
    UIView *containerView = [transitionContext containerView];
    UIView *toView = [transitionContext viewForKey:UITransitionContextToViewKey];

    UIView *herbView = self.isPresenting ? toView : [transitionContext viewForKey:UITransitionContextFromViewKey];
    CGRect initFrame = self.isPresenting ? self.originFrame : herbView.frame;
    CGRect finalFrame = self.isPresenting ? herbView.frame : self.originFrame;

    CGFloat scaleX = self.isPresenting ? initFrame.size.width / finalFrame.size.width : finalFrame.size.width / initFrame.size.width;
    CGFloat scaleY = self.isPresenting ? initFrame.size.height / finalFrame.size.height : finalFrame.size.height / initFrame.size.height;

    CGAffineTransform scaleTransform = CGAffineTransformMakeScale(scaleX, scaleY);
    if (self.isPresenting) {
        herbView.transform = scaleTransform;
        herbView.center = CGPointMake(CGRectGetMidX(initFrame), CGRectGetMidY(initFrame));
        herbView.clipsToBounds = YES;
    }

    // 控制HerbDetailsViewController上面的Container View的显示与隐藏
    UIViewController *fromVC = [transitionContext viewControllerForKey:UITransitionContextFromViewControllerKey];
    UIViewController *toVC = [transitionContext viewControllerForKey:UITransitionContextToViewControllerKey];
    HerbDetailsViewController *herbVC = self.isPresenting ? (HerbDetailsViewController *)toVC : (HerbDetailsViewController *)fromVC;


    // alpha:0, 是透明的
    herbVC.herbContainerView.alpha = self.isPresenting ? 0.0 : 1.0;

    NSLog(@"Container subviews' count:%lu",(unsigned long)containerView.subviews.count);
    [containerView addSubview:toView];
    [containerView bringSubviewToFront:herbView];
    NSLog(@"Container subviews' count:%lu",(unsigned long)containerView.subviews.count);

    [UIView animateWithDuration:self.duration delay:0.0 usingSpringWithDamping:0.4 initialSpringVelocity:0.0 options:UIViewAnimationOptionCurveEaseIn animations:^{
        herbView.transform = self.isPresenting ? CGAffineTransformIdentity : scaleTransform;
        herbView.center = CGPointMake(CGRectGetMidX(finalFrame), CGRectGetMidY(finalFrame));
        herbVC.herbContainerView.alpha = self.isPresenting ? 1.0 : 0.0;
    } completion:^(BOOL finished) {
        [transitionContext completeTransition:YES];
        NSLog(@"Container subviews' count:%lu",(unsigned long)containerView.subviews.count);
        if (_didFinishDismiss) {
            _didFinishDismiss();
        }
    }];

    // 动画过程中保持圆角效果
    CABasicAnimation *basicAnimation = [CABasicAnimation animation];
    basicAnimation.keyPath = @"cornerRadius";
    basicAnimation.duration = self.duration;
    basicAnimation.fromValue = self.isPresenting ? @(20 / scaleX) : @0;
    basicAnimation.toValue = self.isPresenting ? @0 : @(20 / scaleX);
    [herbView.layer addAnimation:basicAnimation forKey:nil];

}
@end
3. ViewController 中创建PopAnimator对象
- (PopAnimator *)animator {
    if (!_animator) {
        _animator = [[PopAnimator alloc] init];
        __weak typeof(self) wSelf = self;
        _animator.didFinishDismiss = ^{
            wSelf.selectedImageView.hidden = NO;
        };
    }
    return _animator;
}
4. ViewController 实现的UIViewControllerTransitioningDelegate的协议的方法
- (nullable id <UIViewControllerAnimatedTransitioning>)animationControllerForPresentedController:(UIViewController *)presented presentingController:(UIViewController *)presenting sourceController:(UIViewController *)source {
    self.animator.duration = 1;
    // convertRect 将selectedImageView所在的坐标转换到self.view上面的坐标。
    self.animator.originFrame = [self.selectedImageView.superview convertRect:self.selectedImageView.frame toView:nil];
    self.animator.presenting = YES;
    self.selectedImageView.hidden = YES;
    return self.animator;
}

- (nullable id <UIViewControllerAnimatedTransitioning>)animationControllerForDismissedController:(UIViewController *)dismissed {
    self.animator.presenting = NO;
    self.selectedImageView.hidden = YES;
    return self.animator;
}
至此,动画效果大致完成了,但是屏幕旋转之后会出现图片错位的问题,所以我们应该再处理屏幕旋转事件,代码如下:
- (void)viewWillTransitionToSize:(CGSize)size withTransitionCoordinator:(id<UIViewControllerTransitionCoordinator>)coordinator {
    [super viewWillTransitionToSize:size withTransitionCoordinator:coordinator];

    [coordinator animateAlongsideTransition:nil completion:^(id<UIViewControllerTransitionCoordinatorContext> context) {
        // 屏幕旋转的时候,改变背景图片的透明度
        self.coverView.alpha = size.width > size.height ? 0.55 : 0.25;
        [self positionListItems];
    }];
}


