OpenCV Viz 3D虚拟空间模块
在OpenCV2.4.9发布release版本时添加了3D模块,实现起来非常简洁漂亮,三维虚拟空间模块是集成自三维计算机图形学、图像处理和可视化的VTK得到的,OpenCV3.0的OpenCV tutorial中例程效果如下:
首次配置Viz运行得到的效果:

源代码如下:
#include <opencv2/viz/vizcore.hpp>
#include <iostream>

using namespace cv;
using namespace std;

/**
* @function main
*/
int main()
{
    /// Create a window
    viz::Viz3d myWindow("Viz Demo");

    /// Start event loop
    myWindow.spin();

    /// Event loop is over when pressed q, Q, e, E
    cout << "First event loop is over" << endl;

    /// Access window via its name
    viz::Viz3d sameWindow = viz::getWindowByName("Viz Demo");

    /// Start event loop
    sameWindow.spin();

    /// Event loop is over when pressed q, Q, e, E
    cout << "Second event loop is over" << endl;

    /// Event loop is over when pressed q, Q, e, E
    /// Start event loop once for 1 millisecond
    sameWindow.spinOnce(1, true);
    while(!sameWindow.wasStopped())
    {
        /// Interact with window

        /// Event loop for 1 millisecond
        sameWindow.spinOnce(1, true);
    }

    /// Once more event loop is stopped
    cout << "Last event loop is over" << endl;
    return 0;
}
Windows 7下并非第一幅图像一般一片黑。其他类似例程如下:

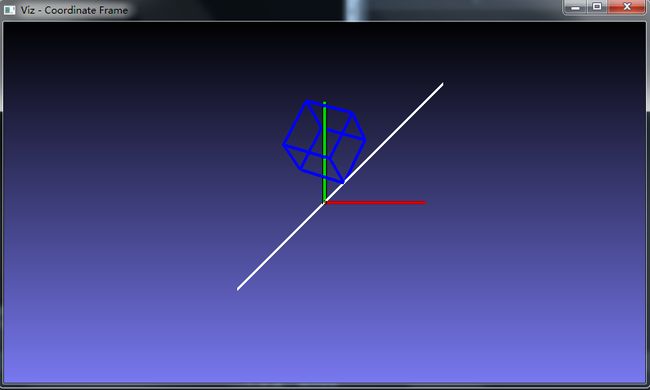
源代码如下:
#include <opencv2/viz.hpp>
#include <opencv2/calib3d.hpp>
#include <iostream>
using namespace cv;
using namespace std;

int main()
{
	/// Create a window
	viz::Viz3d myWindow("Coordinate Frame");
	/// Add coordinate axes
	myWindow.showWidget("Coordinate Widget", viz::WCoordinateSystem());
	/// Add line to represent (1,1,1) axis
	viz::WLine axis(Point3f(-1.0f, -1.0f, -1.0f), Point3f(1.0f, 1.0f, 1.0f));
	axis.setRenderingProperty(viz::LINE_WIDTH, 4.0);
	myWindow.showWidget("Line Widget", axis);
	/// Construct a cube widget
	viz::WCube cube_widget(Point3f(0.5, 0.5, 0.0), Point3f(0.0, 0.0, -0.5), true, viz::Color::blue());
	cube_widget.setRenderingProperty(viz::LINE_WIDTH, 4.0);
	/// Display widget (update if already displayed)
	myWindow.showWidget("Cube Widget", cube_widget);
	/// Rodrigues vector
	Mat rot_vec = Mat::zeros(1, 3, CV_32F);
	float translation_phase = 0.0, translation = 0.0;
	while (!myWindow.wasStopped())
	{
		//* Rotation using rodrigues
		/// Rotate around (1,1,1)
		rot_vec.at<float>(0, 0) += CV_PI * 0.01f;
		rot_vec.at<float>(0, 1) += CV_PI * 0.01f;
		rot_vec.at<float>(0, 2) += CV_PI * 0.01f;
		/// Shift on (1,1,1)
		translation_phase += CV_PI * 0.01f;
		translation = sin(translation_phase);
		Mat rot_mat;
		Rodrigues(rot_vec, rot_mat);
		/// Construct pose
		Affine3f pose(rot_mat, Vec3f(translation, translation, translation));
		myWindow.setWidgetPose("Cube Widget", pose);
		myWindow.spinOnce(1, true);
	}
	return 0;
}
You need to build VTK 6.1 (download) using CMake 2.8.x with shared libs turned off. VTK needs to be build as static library so it can be used to link to opencv with the VIZ module.
Build opencv with the viz module turned on using the src and build folders for vtk.