Extjs学习(2):数据打包
1. 概述
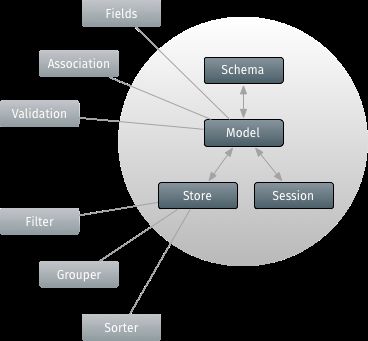
主要运用的包含3个类:Ext.data.Model,Store,Ext.data.proxy.Proxy
2. Model:一组字段和相关的业务逻辑
1)概述
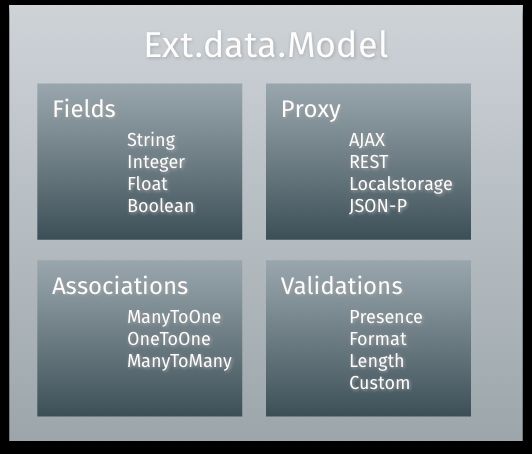
Ext.data.Model,代表应用实体(如电子商务应用包含Users, Products 和 Orders),即定义一组字段和相关的业务逻辑。
Model重要组成部分:
2)创建一个Model
此Model包含两个选项:fields和schema,
Ext.define('MyApp.model.Base', {
    extend: 'Ext.data.Model',

    fields: [{
        name: 'id',
        type: 'int'
    }],

    schema: {
        namespace: 'MyApp.model',  // generate auto entityName

        proxy: {     // Ext.util.ObjectTemplate
            type: 'ajax',
            url: '{entityName}.json',
            reader: {
                type: 'json',
                rootProperty: '{entityName:lowercase}'
            }
        }
    }
});
说明:
①代理:Proxies
介于Models和Stores之间,用于处理加载或保存Model数据,有两种类型:Client 和Server
Client Proxy:包含Memory 和Local Storage
Server Proxy:处理数据的封送,与远程服务器链接,包含AJAX, JSONP 和 REST.
②Schema:彼此间有关联的实体的集合
User.json
{
  "success": "true",
  "user": [
    {
      "id": 1,
      "name": "Philip J. Fry"
    },
    {
      "id": 2,
      "name": "Hubert Farnsworth"
    },
    {
      "id": 3,
      "name": "Turanga Leela"
    },
    {
      "id": 4,
      "name": "Amy Wong"
    }
  ]
}
3. Stores:一个集合的记录(模型派生类的实例)
var store = new Ext.data.Store ({
    model: 'MyApp.model.User'
});

store.load({
    callback:function(){
        var first_name = this.first().get('name');
       console.log(first_name);
    }
});
1)内联数据:Stores也可以在网上加载数据。在内部,存储将每一个我们所传递的对象转换成合适的模型类型的数据
new Ext.data.Store({
    model: 'MyApp.model.User',
    data: [{
        id: 1,
        name: "Philip J. Fry"
    },{
        id: 2,
        name: "Hubert Farnsworth"
    },{
        id: 3,
        name: "Turanga Leela"
    },{
        id: 4,
        name: "Amy Wong"
    }]
});
2)排序和分组
new Ext.data.Store({
    model: 'MyApp.model.User',

    sorters: ['name','id'],
    filters: {
        property: 'name',
        value   : 'Philip J. Fry'
    }
});
4. Associations:Models可以通过他连接在一起
大部分应用依赖与多个Models,这些Models几乎相关联,如‘博客应用’需要Models:User和Post,一个user可以
有多个Posts,但一个Post只能有一个User去创建,即‘多对一’关系:
Ext.define('MyApp.model.User', {
    extend: 'MyApp.model.Base',

    fields: [{
        name: 'name',
        type: 'string'
    }]
});

Ext.define('MyApp.model.Post', {
    extend: 'MyApp.model.Base',

    fields: [{
        name: 'userId',
        reference: 'User', // the entityName for MyApp.model.User
        type: 'int'
    }, {
        name: 'title',
        type: 'string'
    }]
});
如果你想得到一个User的所有Posts,可以:
// Loads User with ID 1 and related posts and comments
// using User's Proxy
MyApp.model.User.load(1, {
    callback: function(user) {
        console.log('User: ' + user.get('name'));

        //Each User model has many Posts, which added the user.posts() function that we used
        //Calling user.posts() returns a Store configured with the Post model
        user.posts(function(posts){
            posts.each(function(post) {
                console.log('Post: ' + post.get('title'));
            });
        });
    }
});
关联(Associations)不仅对加载数据有用,也可以用于创建新的数据记录
user.posts().add({
    userId: 1,
    title: 'Post 10'
});

user.posts().sync();        //saves the new Post via its proxy
//The “inverse” of the association also generates new methods on the Post model:
MyApp.model.Post.load(1, {
    callback: function(post) {

        //getUser()是异步的,需要一个回调函数来获得用户实例
        post.getUser(function(user) {
            console.log('Got user from post: ' + user.get('name'));
        });
    }
});

MyApp.model.Post.load(2, {
    callback: function(post) {
        post.setUser(100);              //setUser()简单地更新userId(或叫“外键”)并保存Post Model
    }
});
加载嵌套数据:当关联定义之后可以执行,如下面的服务器响应内容
//we can return all of the data in a single server response
{
    "success": true,
    "user": [{
        "id": 1,
        "name": "Philip J. Fry",
        "posts": [{
            "title": "Post 1"
        },{
            "title": "Post 2"
        },{
            "title": "Post 3"
        }]
    }]
}
5. 验证:Validations
1)在User model 里面添加验证
Ext.define('MyApp.model.User', {
    extend: 'Ext.data.Model',
    fields: ...,

    validators: {
        name: [
            'presence',
            { type: 'length', min: 7 },
            { type: 'exclusion', list: ['Bender'] }
        ]
    }
});
5中验证:Presence,Length,Format,Inclusion,Exclusion
// now lets try to create a new user with as many validation测试上面
// errors as we can
var newUser = new MyApp.model.User({
    id: 10,                            //出现错误:Length must be greater than 7
    name: 'Bender'
});

// run some validation on the new user we just created
console.log('Is User valid?', newUser.isValid());

//returns 'false' as there were validation errors

var errors = newUser.getValidation(),
    error  = errors.get('name');

console.log("Error is: " + error);
//newUser.isValid() 此时将返回true
newUser.set('name', 'Bender Bending Rodriguez');
errors = newUser.getValidation();

