3.Android Studio 之命令行开发安卓
-----------android培训、java培训、java学习型技术博客、期待与您交流!------------
目录:
Android Studio 之命令行开发安卓
一、命令行获取所有可用的安卓系统镜像信息
二、命令行创建创建安卓项目
三、命令行编译安卓程序
3.1 使用aapt.exe工具生成R.java文件
3.2 使用aidl.exe将framework.aidl文件生成framework.java文件
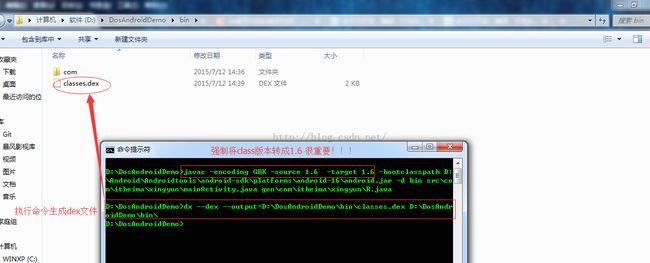
3.3 用javac命令工具将.java源文件编译为.class文件
3.4 命令行dx.bat脚本生成classes.dex文件
3.5 aapt.exe生成资源包文件
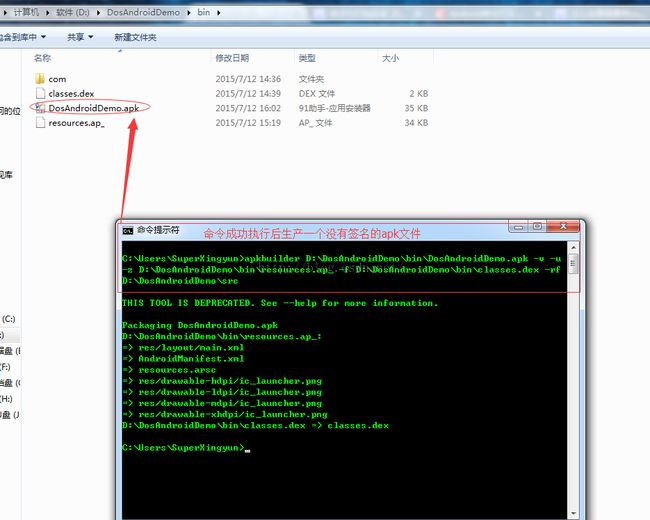
3.6 apkbuilder工具生成未签名的APK文件
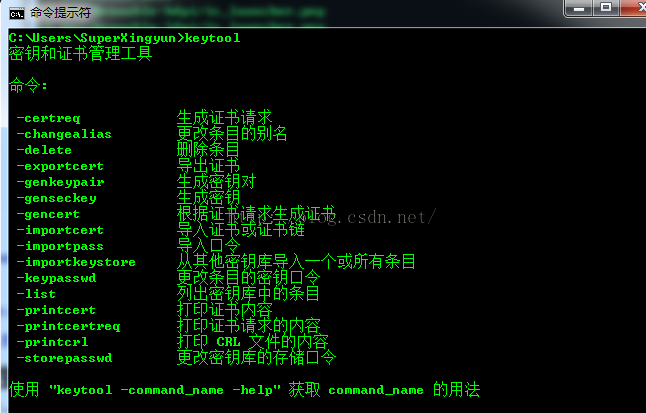
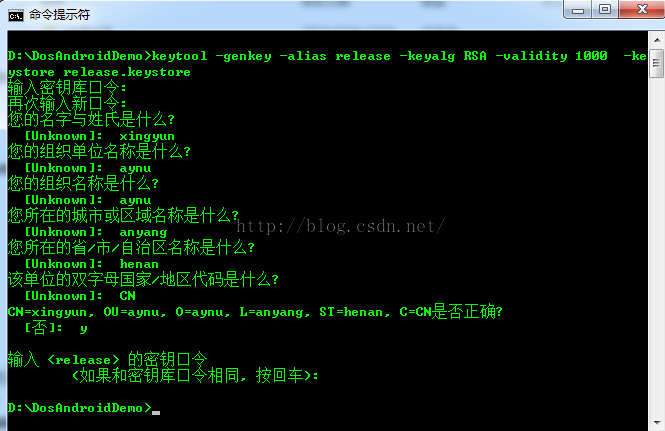
3.7 keytool工具生成证书文件
3.8 通过jarsigner命令签名
四、命令行创建模拟器
如果没有使用Android Studio开发Android项目,我们可以在命令行使用SDK提供的tools来创建一个Android项目。
注意:需已下载好SDK并设置好环境变量。
关于SDK环境变量配置方法见:http://pan.baidu.com/s/1i3B0z8x 密码:85w0
Android Studio 之命令行开发安卓
一、命令行获取所有可用的安卓系统镜像信息
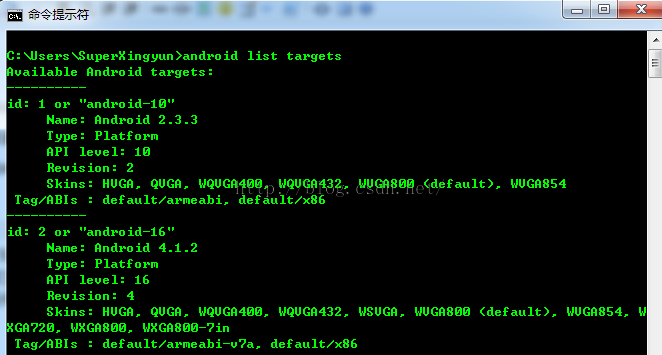
1. 打开cmd命令行,输入命令:
android list targets
完整内容如下:
C:\Users\SuperXingyun>android list targets
Available Android targets:
----------
id: 1 or "android-10"
     Name: Android 2.3.3
     Type: Platform
     API level: 10
     Revision: 2
     Skins: HVGA, QVGA, WQVGA400, WQVGA432, WVGA800 (default), WVGA854
 Tag/ABIs : default/armeabi, default/x86
----------
id: 2 or "android-16"
     Name: Android 4.1.2
     Type: Platform
     API level: 16
     Revision: 4
     Skins: HVGA, QVGA, WQVGA400, WQVGA432, WSVGA, WVGA800 (default), WVGA854, W
XGA720, WXGA800, WXGA800-7in
 Tag/ABIs : default/armeabi-v7a, default/x86
----------
id: 3 or "android-19"
     Name: Android 4.4.2
     Type: Platform
     API level: 19
     Revision: 3
     Skins: HVGA, QVGA, WQVGA400, WQVGA432, WSVGA, WVGA800 (default), WVGA854, W
XGA720, WXGA800, WXGA800-7in, AndroidWearRound, AndroidWearSquare
 Tag/ABIs : android-wear/armeabi-v7a, default/armeabi-v7a, default/x86
----------
id: 4 or "Google Inc.:Google APIs:10"
     Name: Google APIs
     Type: Add-On
     Vendor: Google Inc.
     Revision: 2
     Description: Android + Google APIs
     Based on Android 2.3.3 (API level 10)
     Libraries:
      * com.android.future.usb.accessory (usb.jar)
          API for USB Accessories
      * com.google.android.maps (maps.jar)
          API for Google Maps
     Skins: QVGA, WVGA854, WVGA800 (default), WQVGA400, WQVGA432, HVGA
 Tag/ABIs : default/armeabi
----------
id: 5 or "Google Inc.:Google APIs:16"
     Name: Google APIs
     Type: Add-On
     Vendor: Google Inc.
     Revision: 3
     Description: Android + Google APIs
     Based on Android 4.1.2 (API level 16)
     Libraries:
      * com.android.future.usb.accessory (usb.jar)
          API for USB Accessories
      * com.google.android.media.effects (effects.jar)
          Collection of video effects
      * com.google.android.maps (maps.jar)
          API for Google Maps
     Skins: QVGA, WXGA720, WSVGA, WXGA800, WVGA800 (default), WVGA854, WQVGA400,
 WXGA800-7in, HVGA, WQVGA432
 Tag/ABIs : default/armeabi-v7a
----------
id: 6 or "Google Inc.:Glass Development Kit Preview:19"
     Name: Glass Development Kit Preview
     Type: Add-On
     Vendor: Google Inc.
     Revision: 8
     Description: Preview of the Glass Development Kit
     Based on Android 4.4.2 (API level 19)
     Libraries:
      * com.google.android.glass (gdk.jar)
          APIs for Glass Development Kit Preview
     Skins: WVGA800 (default), WXGA800, WXGA800-7in, WQVGA432, WVGA854, WQVGA400
, QVGA, WSVGA, WXGA720, AndroidWearRound, AndroidWearSquare, HVGA
 Tag/ABIs : no ABIs.
----------
id: 7 or "Google Inc.:Google APIs:19"
     Name: Google APIs
     Type: Add-On
     Vendor: Google Inc.
     Revision: 6
     Description: Android + Google APIs
     Based on Android 4.4.2 (API level 19)
     Libraries:
      * com.android.future.usb.accessory (usb.jar)
          API for USB Accessories
      * com.google.android.media.effects (effects.jar)
          Collection of video effects
      * com.google.android.maps (maps.jar)
          API for Google Maps
     Skins: WVGA800 (default), WXGA800, WXGA800-7in, WQVGA432, WVGA854, WQVGA400
, QVGA, WSVGA, WXGA720, AndroidWearRound, AndroidWearSquare, HVGA
 Tag/ABIs : default/armeabi-v7a
----------
id: 8 or "Google Inc.:Google APIs (x86 System Image):19"
     Name: Google APIs (x86 System Image)
     Type: Add-On
     Vendor: Google Inc.
     Revision: 6
     Description: Android x86 + Google APIs
     Based on Android 4.4.2 (API level 19)
     Libraries:
      * com.android.future.usb.accessory (usb.jar)
          API for USB Accessories
      * com.google.android.media.effects (effects.jar)
          Collection of video effects
      * com.google.android.maps (maps.jar)
          API for Google Maps
     Skins: WVGA800 (default), WXGA800, WXGA800-7in, WQVGA432, WVGA854, WQVGA400
, QVGA, WSVGA, WXGA720, AndroidWearRound, AndroidWearSquare, HVGA
 Tag/ABIs : default/x86

C:\Users\SuperXingyun>
现在我们已经获取到了目前安装的SDK的全部详细信息。
二、命令行创建安卓项目
我们先查看下命令行创建安卓项目的规则
打开命令行,输入命令:
android -h create project

我们先分析下这些命令是什么意思
Usage(用法):
android [global options] create project [action options]
现在我们分析下,先看前半部分,确定开头一定是android,然后后面紧跟Global options参数。
    Global(全局) options(选项):

  -s --silent     : Silent mode, shows errors only. /* 注释:安静模式,只显示错误信息。*/
  -v --verbose    : Verbose mode, shows errors, warnings and all messages. /* 注释:创建时显示所有信息,清晰的缓存库清单。 */
     --clear-cache: Clear the SDK Manager repository manifest cache.
  -h --help       : Help on a specific command.<span style="color:#009900;">/* 显示android.bat 帮助信息 */
我们现在分析下后半部分【action options】
 Action "create project": Creates a new Android project./* 创建一个安卓工程 */

 Options:
  -n --name          : Project name.<span style="color:#009900;">/* 安卓工程名称 */
  -a --activity      : Name of the default Activity that is created.[required] /* 必选项,创建时默认的activity */

  -k --package       : Android package name for the application. [required] /* 包名 应用程序区分的包名 */
  -v --gradle-version: Gradle Android plugin version.<span style="color:#009900;">/* gradle 编译器的版本  */
  -t --target        : Target ID of the new project. [required] <span style="color:#009900;">/* 必选项 工程的目标版本号 ID */
  -g --gradle        : Use gradle template./* 使用模板 */
  -p --path          : The new project's directory. [required] /* 必选项,工程存放位置 */
好了,现在明白后,我们开始构造命令吧!
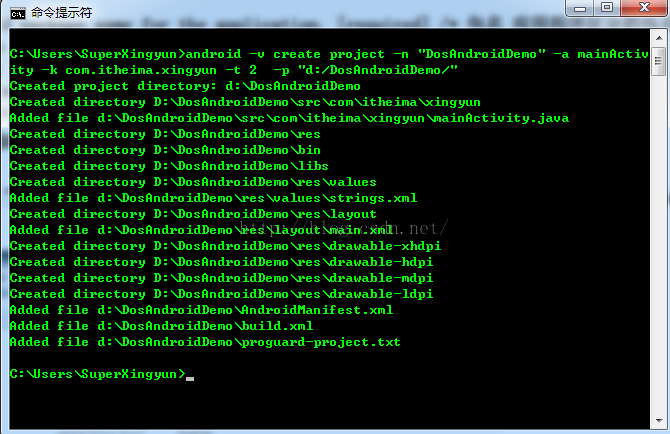
android -v create project -n "DosAndroidDemo" -a mainActivity -k com.itheima.xingyun -t 2 -p "d:/DosAndroidDemo/"
三、命令行编译安卓程序
3.1 使用aapt.exe工具生成R.java文件
编译R.java类需要用到AndroidSDK提供的aapt工具,aapt有很多参数。
注意:aapt.exe 位于D:\Android\Androidtools\android-sdk\build-tools\20.0.0\aapt.exe ,需要将其添加到环境变量里。
D:\DosAndroidDemo>aapt
Android Asset Packaging Tool

Usage:
 aapt l[ist] [-v] [-a] file.{zip,jar,apk}
   List contents of Zip-compatible archive.

 aapt d[ump] [--values] WHAT file.{apk} [asset [asset ...]]
   strings          Print the contents of the resource table string pool in the
APK.
   badging          Print the label and icon for the app declared in APK.
   permissions      Print the permissions from the APK.
   resources        Print the resource table from the APK.
   configurations   Print the configurations in the APK.
   xmltree          Print the compiled xmls in the given assets.
   xmlstrings       Print the strings of the given compiled xml assets.

 aapt p[ackage] [-d][-f][-m][-u][-v][-x][-z][-M AndroidManifest.xml] \
        [-0 extension [-0 extension ...]] [-g tolerance] [-j jarfile] \
        [--debug-mode] [--min-sdk-version VAL] [--target-sdk-version VAL] \
        [--app-version VAL] [--app-version-name TEXT] [--custom-package VAL] \
        [--rename-manifest-package PACKAGE] \
        [--rename-instrumentation-target-package PACKAGE] \
        [--utf16] [--auto-add-overlay] \
        [--max-res-version VAL] \
        [-I base-package [-I base-package ...]] \
        [-A asset-source-dir]  [-G class-list-file] [-P public-definitions-file]
 \
        [-S resource-sources [-S resource-sources ...]] \
        [-F apk-file] [-J R-file-dir] \
        [--product product1,product2,...] \
        [-c CONFIGS] [--preferred-configurations CONFIGS] \
        [raw-files-dir [raw-files-dir] ...] \
        [--output-text-symbols DIR]

   Package the android resources.  It will read assets and resources that are
   supplied with the -M -A -S or raw-files-dir arguments.  The -J -P -F and -R
   options control which files are output.

 aapt r[emove] [-v] file.{zip,jar,apk} file1 [file2 ...]
   Delete specified files from Zip-compatible archive.

 aapt a[dd] [-v] file.{zip,jar,apk} file1 [file2 ...]
   Add specified files to Zip-compatible archive.

 aapt c[runch] [-v] -S resource-sources ... -C output-folder ...
   Do PNG preprocessing on one or several resource folders
   and store the results in the output folder.

 aapt s[ingleCrunch] [-v] -i input-file -o outputfile
   Do PNG preprocessing on a single file.

 aapt v[ersion]
   Print program version.

 Modifiers:
   -a  print Android-specific data (resources, manifest) when listing
   -c  specify which configurations to include.  The default is all
       configurations.  The value of the parameter should be a comma
       separated list of configuration values.  Locales should be specified
       as either a language or language-region pair.  Some examples:
            en
            port,en
            port,land,en_US
       If you put the special locale, zz_ZZ on the list, it will perform
       pseudolocalization on the default locale, modifying all of the
       strings so you can look for strings that missed the
       internationalization process.  For example:
            port,land,zz_ZZ
   -d  one or more device assets to include, separated by commas
   -f  force overwrite of existing files
   -g  specify a pixel tolerance to force images to grayscale, default 0
   -j  specify a jar or zip file containing classes to include
   -k  junk path of file(s) added
   -m  make package directories under location specified by -J
   -u  update existing packages (add new, replace older, remove deleted files)
   -v  verbose output
   -x  create extending (non-application) resource IDs
   -z  require localization of resource attributes marked with
       localization="suggested"
   -A  additional directory in which to find raw asset files
   -G  A file to output proguard options into.
   -F  specify the apk file to output
   -I  add an existing package to base include set
   -J  specify where to output R.java resource constant definitions
   -M  specify full path to AndroidManifest.xml to include in zip
   -P  specify where to output public resource definitions
   -S  directory in which to find resources.  Multiple directories will be scann
ed
       and the first match found (left to right) will take precedence.
   -0  specifies an additional extension for which such files will not
       be stored compressed in the .apk.  An empty string means to not
       compress any files at all.
   --debug-mode
       inserts android:debuggable="true" in to the application node of the
       manifest, making the application debuggable even on production devices.
   --min-sdk-version
       inserts android:minSdkVersion in to manifest.  If the version is 7 or
       higher, the default encoding for resources will be in UTF-8.
   --target-sdk-version
       inserts android:targetSdkVersion in to manifest.
   --max-res-version
       ignores versioned resource directories above the given value.
   --values
       when used with "dump resources" also includes resource values.
   --version-code
       inserts android:versionCode in to manifest.
   --version-name
       inserts android:versionName in to manifest.
   --custom-package
       generates R.java into a different package.
   --extra-packages
       generate R.java for libraries. Separate libraries with ':'.
   --generate-dependencies
       generate dependency files in the same directories for R.java and resource
 package
   --auto-add-overlay
       Automatically add resources that are only in overlays.
   --preferred-configurations
       Like the -c option for filtering out unneeded configurations, but
       only expresses a preference.  If there is no resource available with
       the preferred configuration then it will not be stripped.
   --rename-manifest-package
       Rewrite the manifest so that its package name is the package name
       given here.  Relative class names (for example .Foo) will be
       changed to absolute names with the old package so that the code
       does not need to change.
   --rename-instrumentation-target-package
       Rewrite the manifest so that all of its instrumentation
       components target the given package.  Useful when used in
       conjunction with --rename-manifest-package to fix tests against
       a package that has been renamed.
   --product
       Specifies which variant to choose for strings that have
       product variants
   --utf16
       changes default encoding for resources to UTF-16.  Only useful when API
       level is set to 7 or higher where the default encoding is UTF-8.
   --non-constant-id
       Make the resources ID non constant. This is required to make an R java cl
ass
       that does not contain the final value but is used to make reusable compil
ed
       libraries that need to access resources.
   --error-on-failed-insert
       Forces aapt to return an error if it fails to insert values into the mani
fest
       with --debug-mode, --min-sdk-version, --target-sdk-version --version-code

       and --version-name.
       Insertion typically fails if the manifest already defines the attribute.
   --output-text-symbols
       Generates a text file containing the resource symbols of the R class in t
he
       specified folder.
   --ignore-assets
       Assets to be ignored. Default pattern is:
       !.svn:!.git:!.ds_store:!*.scc:.*:<dir>_*:!CVS:!thumbs.db:!picasa.ini:!*~

D:\DosAndroidDemo>
参数很多,我们现在只看几个主要参数:
  -d  one or more device assets to include, separated by commas
  -f  force overwrite of existing files
  -g  specify a pixel tolerance to force images to grayscale, default 0
  -j  specify a jar or zip file containing classes to include
  -k  junk path of file(s) added
  -m  make package directories under location specified by -J
  -u  update existing packages (add new, replace older, remove deleted files)
  -v  verbose output
  -x  create extending (non-application) resource IDs
  -z  require localization of resource attributes marked with
      localization="suggested"
  -A  additional directory in which to find raw asset files
  -G  A file to output proguard options into.
  -F  specify the apk file to output
  -I  add an existing package to base include set
  -J  specify where to output R.java resource constant definitions
  -M  specify full path to AndroidManifest.xml to include in zip
  -P  specify where to output public resource definitions
  -S  directory in which to find resources.  Multiple directories will be scann
aapt编译R.java文件具体如下:
需要进入LBSDemo应用程序目录,新建一个gen目录,没有gen目录,命令将会出现找不到文件的错误!
命令成功执行后将会在gen目录下生成成包结构的目录树,及R.java文件!
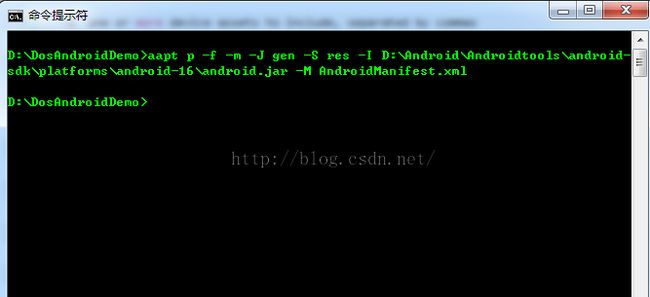
执行命令:
aapt p -f -m -J gen -S res -I D:\Android\Androidtools\android-sdk\platforms\android-16\android.jar -M AndroidManifest.xml
参数说明:
-f -m -J gen :以覆盖的形式在gen目录下生成带包路径的R.java
-S res:指定资源文件
-I E:\Android\SDK\android-sdk_r09-windows\platforms\android-7\android.jar:使用指定版本的android jar包
-M AndroidManifest.xml:指定程序的配置文件
命令成功后,将生成R.java文件。
3.2 使用aidl.exe将framework.aidl文件生成framework.java文件
注意:
aidl.exe位于D:\Android\Androidtools\android-sdk\build-tools\20.0.0\aidl.exe
framework.aidl位于D:\Android\Androidtools\android-sdk\platforms\android-16\framework.aidl
aidl.exe用法如下:
D:\DosAndroidDemo>aidl
INPUT required
usage: aidl OPTIONS INPUT [OUTPUT]
       aidl --preprocess OUTPUT INPUT...

OPTIONS:
   -I<DIR>    search path for import statements.
   -d<FILE>   generate dependency file.
   -a         generate dependency file next to the output file with the name bas
ed on the input file.
   -p<FILE>   file created by --preprocess to import.
   -o<FOLDER> base output folder for generated files.
   -b         fail when trying to compile a parcelable.

INPUT:
   An aidl interface file.

OUTPUT:
   The generated interface files.
   If omitted and the -o option is not used, the input filename is used, with th
e .aidl extension changed to a .java extension.
   If the -o option is used, the generated files will be placed in the base outp
ut folder, under their package folder

D:\DosAndroidDemo>
进入D:\DosAndroidDemo\src\com\itheima\xingyun目录,新建文件夹“aidl”,然后进入该文件夹,新建一个Remote.aidl文件
输入命令:
aidl -pD:\Android\Androidtools\android-sdk\platforms\android-16\framework.aidl -Isrc -ogen src\com\itheima\xingyun\aidl\Remote.aidl

3.3 用javac命令工具将.java源文件编译为.class文件
javac用法:
编译src目录下以及gen目录下R文件。
这里需要严重注意下:
待会用到的dx.bat无法运行jdk1.6以上版本的class,所以这里强制转换成1.6版本的class。
否则会出现错误提示信息。
![]()
ps:
这里忍不住吐槽下,![]() 太感谢绿柚子博主了,就这个问题郁闷了两天多,都打算要放弃了,这时突然看到博主的文章,救我于水火。
太感谢绿柚子博主了,就这个问题郁闷了两天多,都打算要放弃了,这时突然看到博主的文章,救我于水火。
参考绿柚子博主文章:dx使用出现的错误总结
具体命令如下:
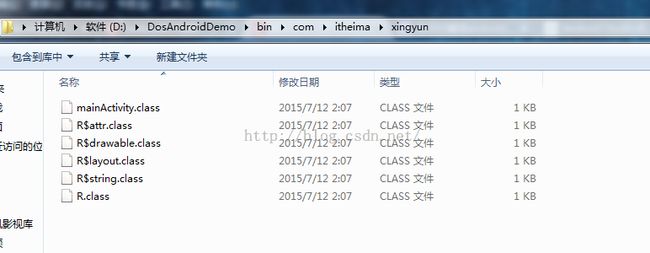
javac -encoding GBK -source 1.6 -target 1.6 -bootclasspath D:\Android\Androidtools\android-sdk\platforms\android-16\android.jar -d bin src\com\itheima\xingyun\mainActivity.java gen\com\itheima\xingyun\R.java

命令成功执行后,class文件已经生成。
3.4 命令行dx.bat脚本生成classes.dex文件
命令行下进入C:\Users\SuperXingyun\Desktop\MyFirstApplication 执行命令:
dx --dex --output=D:\DosAndroidDemo\bin\classes.dex D:\DosAndroidDemo\bin\
运行成功后会生成classes.dex文件
3.5 aapt.exe生成资源包文件
说明:
1.资源文件包括res、assets、androidmanifest.xml等
2.使用方法参考上面。
执行命令:
aapt package -f -S res -I D:\Android\Androidtools\android-sdk\platforms\android-16\android.jar -A assets -M AndroidManifest.xml -F D:\DosAndroidDemo\bin\resources.ap_命令成功运行后,会生成资源包文件。

3.6 apkbuilder工具生成未签名的APK文件
Android3.0以后已经废弃了APKBuilder,因此我们需要下载或者制作一个APKBuilder.bat.
方法一:
下载一个: APKBuilder免元宝下载
方法二:或者也可以创建一个记事本,复制下面的代码:
@echo off
rem Copyright (C) 2 The Android Open Source Project
rem
rem Licensed under the Apache License, Version 2.0 (the "License");
rem you may not use this file except in compliance with the License.
rem You may obtain a copy of the License at
rem
rem      http://www.apache.org/licenses/LICENSE-2.0
rem
rem Unless required by applicable law or agreed to in writing, software
rem distributed under the License is distributed on an "AS IS" BASIS,
rem WITHOUT WARRANTIES OR CONDITIONS OF ANY KIND, either express or implied.
rem See the License for the specific language governing permissions and
rem limitations under the License.

rem don't modify the caller's environment
setlocal

rem Set up prog to be the path of this script, including following symlinks,
rem and set up progdir to be the fully-qualified pathname of its directory.
set prog=%~f0

rem Change current directory and drive to where the script is, to avoid
rem issues with directories containing whitespaces.
cd /d %~dp0

rem Check we have a valid Java.exe in the path.
set java_exe=
call lib\find_java.bat
if not defined java_exe goto :EOF

set jarfile=sdklib.jar
set frameworkdir=

if exist %frameworkdir%%jarfile% goto JarFileOk
    set frameworkdir=lib\

if exist %frameworkdir%%jarfile% goto JarFileOk
    set frameworkdir=..\framework\

:JarFileOk

set jarpath=%frameworkdir%%jarfile%

call %java_exe% -classpath %jarpath% com.android.sdklib.build.ApkBuilderMain %*
复制到记事本中后,修改文件名和后缀为”apkbuilder.bat“.
将下载或者制作的"apkbuilder.bat"复制到D:\Android\Androidtools\android-sdk\tools 目录下便可以使用了。
验证:
好了,现在我们继续玩我们的。
执行命令:
apkbuilder D:\DosAndroidDemo\bin\DosAndroidDemo.apk -v -u -z D:\DosAndroidDemo\bin\resources.ap_ -f D:\DosAndroidDemo\bin\classes.dex -rf D:\DosAndroidDemo\src
参数说明:
apkbuilder 要生成apk的路径 -v -u -z 资源包文件(前面生成的resources.ap_文件)路径 -f *.dex文件路径 -rf 源码文件路径
注:
1,如果需要将so文件打包进apk,一定要加上-nf参数
2,如果第三方jar包里含有图片资源,一定要加上-rj参数,不然jar包里资源文件解不出来,程序会因为无法引用资源而报错!
3.7 keytool工具生成证书文件
上面只是生成了一个没有证书的apk文件,Android是不会去安装一个没有数字证书签名的apk包的,所以需要安装apk的话,必须用一个数字证书对其签名后,才可!
Keytool 工具在D:\Program Files\Java\jdk1.8.0_45\bin\keytool.exe
参考资料:Android 命令行编译、打包生成apk文件
-genkey 在用户主目录中创建一个默认文件".keystore",还会产生一个release的别名,release中包含用户的公钥、私钥和证书
-alias 产生别名
-keyalg 指定密钥的算法
-validity 指定创建的证书有效期多少天
-keystore 指定密钥库的名称(产生的各类信息将不在.keystore文件中)
创建密钥
编写执行命令如下:
keytool -genkey -alias release -keyalg RSA -validity 1000 -keystore release.keystore
3.8 通过jarsigner命令签名
通过jarsigner命令用证书文件对未签名的APK文件进行签名
-verbose 签名/验证时输出详细信息
-keystore 密钥库位置
-storepass 用于密钥库完整性的口令
-keypass 专用密钥的口令(如果不同)
-signedjar 已签名的 JAR 文件的名称 (第一个apk是签名之后的文件, 第二个apk是需要签名的文件)
编写执行命令如下:
jarsigner -verbose -keystore D:\DosAndroidDemo\release.keystore -storepass 123456 -keypass 123456 -signedjar D:\DosAndroidDemo\bin\DosAndroidDemo-signed.apk D:\DosAndroidDemo\bin\DosAndroidDemo.apk release

七、命令行创建模拟器
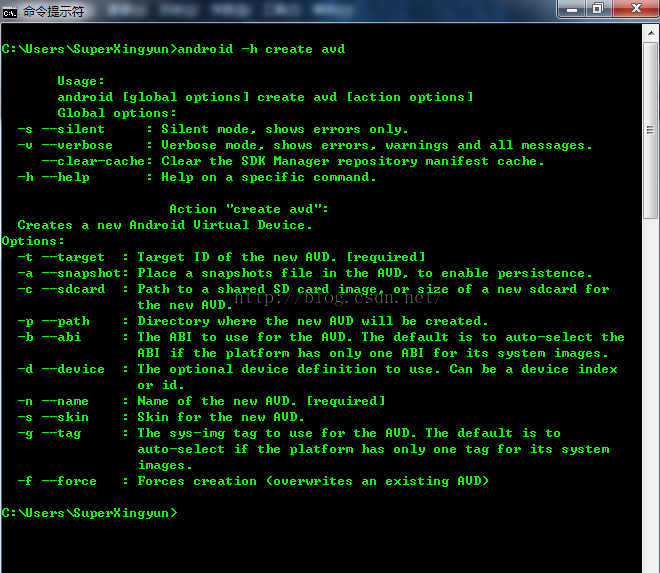
这时候我们可以输入命令:android -h create avd
文字描述如下:
Usage:
       android [global options] create avd [action options]
       Global options:

  -s --silent     : Silent mode, shows errors only.
  -v --verbose    : Verbose mode, shows errors, warnings and all messages.
     --clear-cache: Clear the SDK Manager repository manifest cache.
  -h --help       : Help on a specific command.

                     Action "create avd":

  Creates a new Android Virtual Device.

Options:
  -t --target  : Target ID of the new AVD. [required]
  -a --snapshot: Place a snapshots file in the AVD, to enable persistence.
  -c --sdcard  : Path to a shared SD card image, or size of a new sdcard for
                 the new AVD.
  -p --path    : Directory where the new AVD will be created.
  -b --abi     : The ABI to use for the AVD. The default is to auto-select the
                 ABI if the platform has only one ABI for its system images.
  -d --device  : The optional device definition to use. Can be a device index
                 or id.
  -n --name    : Name of the new AVD. [required]
  -s --skin    : Skin for the new AVD.
  -g --tag     : The sys-img tag to use for the AVD. The default is to
                 auto-select if the platform has only one tag for its system
                 images.
  -f --force   : Forces creation (overwrites an existing AVD)
这个Android -h 命令是 D:\Android\Androidtools\android-sdk\tools\android.bat中的用法
Usage:
       android [global options] create avd [action options]
现在我们分析下,先看前半部分,确定开头一定是android,然后后面紧跟Global options参数。
      Global(全局) options(选项):

  -s --silent     : Silent mode, shows errors only./* 注释:安静模式,只显示错误信息。*/
  -v --verbose    : Verbose mode, shows errors, warnings and all messages./* 注释:创建时显示所有信息,清晰的缓存库清单。 */
     --clear-cache: Clear the SDK Manager repository manifest cache.
  -h --help       : Help on a specific command./* 显示android.bat 帮助信息 */
我们再看后半部分:
Action "create avd": Creates a new Android Virtual Device.

Options:
  -t --target  : Target ID of the new AVD.<span style="color:#FF0000;"> [required]</span> /* 安卓模拟器(AVD)目标值 必选项 */
  -a --snapshot: Place a snapshots file in the AVD, to enable persistence./* 在模拟器里放一个快照文件实现持久化 */
  -c --sdcard  : Path to a shared SD card image, or size of a new sdcard for the new AVD.
/* 放SD(sdcard)卡的镜像路径,或这个新建的这个模拟器的SD卡设置大小。*/
  -p --path    : Directory where the new AVD will be created./* 安卓模拟器位置创建后保存的路径 */
  -b --abi     : The ABI to use for the AVD. The default is to auto-select the ABI if the platform has only one ABI for its system images.
/* 通俗地解释就是CPU/ABI 选择armeabi-v7a 还是 x86  */
  -d --device  : The optional device definition to use. Can be a device index or id./* *、
  -n --name    : Name of the new AVD.<span style="color:#FF6666;"> <span style="color:#FF0000;">[required]</span></span>/* 模拟器的名字 必选项 */
  -s --skin    : Skin for the new AVD./* 新创建的模拟器的皮肤 */
  -g --tag     : The sys-img tag to use for the AVD. The default is to auto-select if the platform has only one tag for its system images.
/* 安卓系统镜像tag值,如果这个镜像只有一个tag值的话,将会自动选择。  */
 -f --force   : Forces creation (overwrites an existing AVD) /* 强制创建,如果存在则重写这个已存在的模拟器。 */
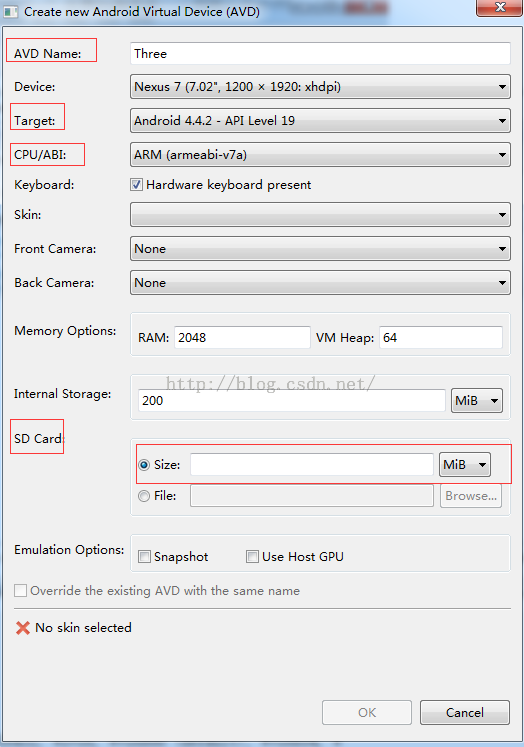
也许对这些参数还不是很理解,那么看俩图形用户界面的图吧。
刚才这些命令行中的参数,其实就是图形用户界面这几个必选参数。
命令行中提到的其他几个参数
好了,现在我们回过头继续我们的工作。
现在我想通过命令行创建一个Android 4.1.2 版本16的模拟器,取名字为“DosOneVirtual”
我们在建立这个模拟器之前先看下上面Android 4.1.2 版本信息。
----------
id: 2 or "android-16"
     Name: Android 4.1.2
     Type: Platform
     API level: 16
     Revision: 4
     Skins: HVGA, QVGA, WQVGA400, WQVGA432, WSVGA, WVGA800 (default), WVGA854, W
XGA720, WXGA800, WXGA800-7in
 Tag/ABIs : default/armeabi-v7a, default/x86
----------
我们将用到的Android 4.1.2主要信息有:
id: 2 or "android-16 "
API level: 16
Tag/ABIs:default/armeabi-v7a, default/x86
好了现在我们开始构造命令:
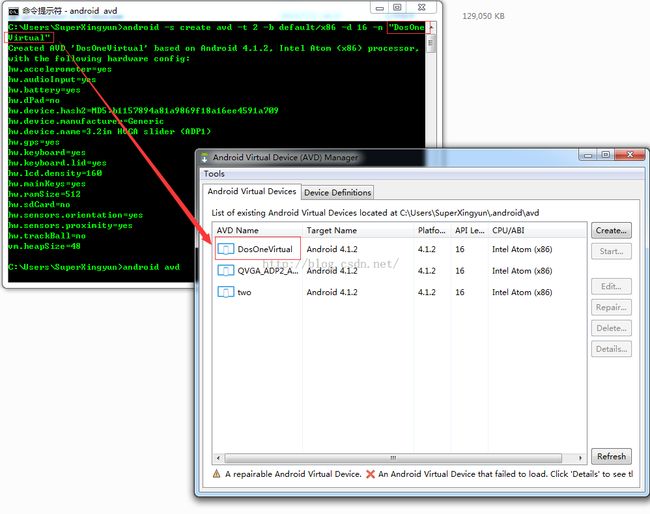
android -s create avd -t 2 -b default/x86 -d 16 -n "<span style="font-size:14px;"><span style="font-size:14px;">DosOneVirtual</span></span>"
运行成功后如图所示:
这时候我们可以检查下,是否创建成功!
输入命令:android avd ,打开模拟器管理。
-----------android培训、java培训、java学习型技术博客、期待与您交流!------------
