IOS5基础之四-----自动旋转和调整大小
前面这几章都是属于复习,书写比较简略,因为主要是xcode4.2和之前区别。
新建一个项目 AutoNSize后
这就是指定应用程序所支持的方向的方法。
这里对应到文件夹中的supporting Files---Supported interface orientations 的子项
在.m文件中可以看到xcode默认自动生成的代码。
- (BOOL)shouldAutorotateToInterfaceOrientation:(UIInterfaceOrientation)interfaceOrientation
{
// Return YES for supported orientations
return (interfaceOrientation !=);
}
IOS常见的4种方式
UIInterfaceOrientationPortrait
UIInterfaceOrientationPortraitUpsideDown
UIInterfaceOrientationLandscapeLeft
UIInterfaceOrientationLandscapeRight
模板默认支持除第二个方向的其他三个方向。IOS实际上有两个不同类型的方向。
1。界面方向--是指屏幕上元素的旋转方向。
2。设备方向--指明设备当前时如何被持握的。
大小检查器 属性检查器的右边第一个
当我们选中UL时,可以看到右边的大小检查其中的Autosizing中有实线的I和虚线的I,这个I表示选定对象的边与包含他的视图的同侧边之间的距离。如果时虚线那么距离是灵活可变的,如果是红色实线,则间距值尽可能的保持不变。如果当把鼠标移动到Example上时,还有动画效果,可以看到放大和缩小时红点的大体位置。当我们同时选中6个一起修改width和height时,当然这个只能时修改成一样的大小。在大小检查器中修改我们想的width和height为125。
-(void) willAnimateRotationToInterfaceOrientation:(UIInterfaceOrientation)interfaceOrientation duration:(NSTimeInterval)duration
{
if(UIInterfaceOrientationIsPortrait(interfaceOrientation))
{
buttonUL.frame=CGRectMake(20, 20, 125, 125);
buttonL.frame=CGRectMake(175, 20, 125, 125);
buttonLL.frame=CGRectMake(20, 168, 125, 125);
buttonUR.frame=CGRectMake(175, 168, 125, 125);
buttonR.frame=CGRectMake(20, 315, 125, 125);
buttonLR.frame=CGRectMake(175, 315, 125, 125);
}
else
{
buttonUL.frame=CGRectMake(20, 20, 125, 125);
buttonL.frame=CGRectMake(20, 155, 125, 125);
buttonLL.frame=CGRectMake(177, 20, 125, 125);
buttonUR.frame=CGRectMake(177, 155, 125, 125);
buttonR.frame=CGRectMake(328, 20, 125, 125);
buttonLR.frame=CGRectMake(328, 155, 125, 125);
}
}
此方法将在旋转开始之后,最后的旋转动画发生之前自动调用。
切换视图
创建一个纵向模式。
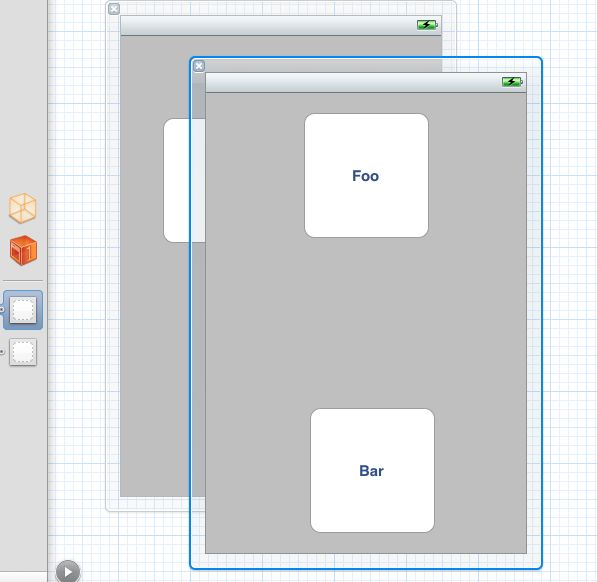
如何快速的创建横向模式的视图,dock中最下面有view,按住option,点击图标向下移动,当出现绿色加号的时候,放开鼠标则生成第二个视图,
图中可以看到左边有两个view 右边则是两个一样的view。
然后选择一个view并在属性检查器中找到Simulated Metrics--Orientation 将Portrait选择为LandScape。
首先给纵向视图创建输出口portrait,给横向视图创建输出口landscape。
其次横向视图中的Foo创建输出口集合
命名为foos,从纵向视图中的Foo关联到这个输出口集合上。Bar同理。
然后创建一个操作方法 在横向视图总选择Foo创建一个操作方法buttonTapped。(任意一个button都可以)。其他的三个都关联到这个方法上。
实现交换
首先定义在.m文件中定义宏
#define degreesToRadians(x) (M_PI *(x)/180.0)
-(void) willAnimateRotationToInterfaceOrientation:(UIInterfaceOrientation)interfaceOrientation duration:(NSTimeInterval)duration
{
if(interfaceOrientation==UIInterfaceOrientationPortrait)
{
self.view=self.portrait;
self.view.transform=CGAffineTransformIdentity;
self.view.transform=CGAffineTransformMakeRotation(degreesToRadians(0));
self.view.bounds=CGRectMake(0.0, 0.0, 320.0, 460.0);
}
else if(interfaceOrientation==UIInterfaceOrientationLandscapeLeft)
{
self.view=self.landscape;
self.view.transform=CGAffineTransformIdentity;
self.view.transform=CGAffineTransformMakeRotation(degreesToRadians(-90));
self.view.bounds=CGRectMake(0.0, 0.0, 480.0, 300.0);
}
else if(interfaceOrientation==UIInterfaceOrientationLandscapeRight)
{
self.view=self.landscape;
self.view.transform=CGAffineTransformIdentity;
self.view.transform=CGAffineTransformMakeRotation(degreesToRadians(90));
self.view.bounds=CGRectMake(0.0, 0.0, 480.0, 300.0);
}
}
还是在旋转开始之后,最后的旋转动画发生之前自动调用。 CGAffineTransformMakeRotation是创建一个旋转变换。变换是对对象大小,位置或角度的更改的数学描述。
- (IBAction)buttonTapped:(id)sender {
if([self.foos containsObject:sender])
{
for (UIButton *oneFoo in foos) {
oneFoo.hidden=YES;
}
}
else
{
for (UIButton *oneBar in bars) {
oneBar.hidden=YES;
}
}
/*
NSString *message=nil;
if([self.foos containsObject:sender])
message=@"Foo Button pressed";
else
message=@"Bar Button pressed";
UIAlertView *alert=[[UIAlertView alloc] initWithTitle:message message:nil delegate:nil cancelButtonTitle:@"OK" otherButtonTitles:nil];
[alert show];
*/
}


