基于web的android图像处理示例(Win7+Apache+PHP+Matlab+Android)
本文将介绍C/S模式的图像处理系统。C/S的框架已经在[1]中作了简单的介绍。[2]中介绍了如何搭建基于android和WAMP5的B/S模式的本机测试平台。本系统是在[4]中介绍的基础上开发的,有关图像显示和本地图像处理的框架可以参看[4];
@author:郑海波 [email protected]
转载请声明:http://blog.csdn.net/nuptboyzhb/article/details/7945249
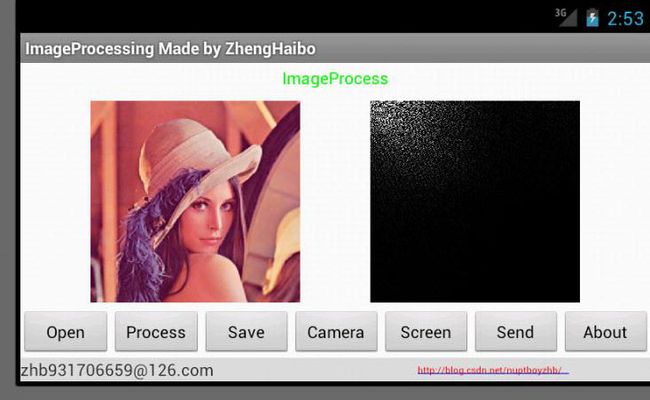
实验结果展示:(图像的DCT变换)
实验平台:
服务器:Windows 7+Apache+MySQL+PHP
客户端:Android
开发工具:Eclipse+ADT+AVD
我们先看客户端(Client)的android开发
1.图像处理框架:
本次试验的图像处理框架我们依然使用[4]的实验平台。该实验平台已经实现了图像的打开,保存,摄像,截屏,显示和简单的图像处理算法等功能。
我们本次试验,需要用到该框架的图像打开,显示,保存等基本功能。
2.客户端的核心
在客户端,C/S模式的核心就是如何将本机数据发送到服务器,并从服务器中下载处理完后的数据。由于连接服务器,发送,接收等需要较长时间,因此
我们将其过程封装到一个AsyncTask派生的类中,代码如下:
[java code]
public class ServerTask  extends AsyncTask<String, Integer , Void>
		{
			public byte[] dataToServer;

			//Task state
			private final int UPLOADING_PHOTO_STATE  = 0;
			private final int SERVER_PROC_STATE  = 1;

			private ProgressDialog dialog;
			//upload photo to server
			HttpURLConnection uploadPhoto(FileInputStream fileInputStream)
			{

				//final String serverFileName = "test"+ (int) Math.round(Math.random()*1000) + ".jpg";
				final String serverFileName = "test.jpg";
				final String lineEnd = "\r\n";
				final String twoHyphens = "--";
				final String boundary = "*****";
				Log.e("msg","begin HttpURLConnection......");
				try
				{
					URL url = new URL(SERVERURL);
					// Open a HTTP connection to the URL
					final HttpURLConnection conn = (HttpURLConnection)url.openConnection();
					// Allow Inputs
					conn.setDoInput(true);
					// Allow Outputs
					conn.setDoOutput(true);
					// Don't use a cached copy.
					conn.setUseCaches(false);

					// Use a post method.
					conn.setRequestMethod("POST");
					conn.setRequestProperty("Connection", "Keep-Alive");
					conn.setRequestProperty("Content-Type", "multipart/form-data;boundary="+boundary);

					DataOutputStream dos = new DataOutputStream( conn.getOutputStream() );

					dos.writeBytes(twoHyphens + boundary + lineEnd);
					dos.writeBytes("Content-Disposition: form-data; name=\"uploadedfile\";filename=\"" + serverFileName +"\"" + lineEnd);
					dos.writeBytes(lineEnd);

					// create a buffer of maximum size
					int bytesAvailable = fileInputStream.available();
					int maxBufferSize = 1024;
					int bufferSize = Math.min(bytesAvailable, maxBufferSize);
					byte[] buffer = new byte[bufferSize];

					// read file and write it into form...
					int bytesRead = fileInputStream.read(buffer, 0, bufferSize);

					while (bytesRead > 0)
					{
						dos.write(buffer, 0, bufferSize);
						bytesAvailable = fileInputStream.available();
						bufferSize = Math.min(bytesAvailable, maxBufferSize);
						bytesRead = fileInputStream.read(buffer, 0, bufferSize);
					}

					// send multipart form data after file data...
					dos.writeBytes(lineEnd);
					dos.writeBytes(twoHyphens + boundary + twoHyphens + lineEnd);
					publishProgress(SERVER_PROC_STATE);
					// close streams
					fileInputStream.close();
					dos.flush();
					Log.e("msg","upload finished!");
					return conn;
				}
				catch (MalformedURLException ex){
					Log.e(TAG, "error: " + ex.getMessage(), ex);
					return null;
				}
				catch (IOException ioe){
					Log.e(TAG, "error: " + ioe.getMessage(), ioe);
					return null;
				}
			}

		    //get image result from server and display it in result view
			void getResultImage(HttpURLConnection conn){
				// retrieve the response from server
				InputStream is;
				try {
					is = conn.getInputStream();
					//get result image from server
			        resultForWebImage = BitmapFactory.decodeStream(is);
			        is.close();
			        IsShowingResult = true;
			        Log.d("msg","download finished!");
				} catch (IOException e) {
					Log.e(TAG,"getResultImage:"+e.toString());
					e.printStackTrace();
				}
			}
			//Main code for processing image algorithm on the server
			void processImage(String inputImageFilePath){
				publishProgress(UPLOADING_PHOTO_STATE);
				File inputFile = new File(inputImageFilePath);
				try {

					//create file stream for captured image file
					FileInputStream fileInputStream  = new FileInputStream(inputFile);

					//upload photo
			    	final HttpURLConnection  conn = uploadPhoto(fileInputStream);

			    	//get processed photo from server
			    	if (conn != null){
			    	  getResultImage(conn);
			    	//String download="http://10.10.145.154/EE368_Android_Tutorial3_Server/computeSIFTOnSCIEN.php";

			    	}
					fileInputStream.close();
				}
		        catch (FileNotFoundException ex){
		        	Log.e(TAG, "processImage"+ex.toString());
		        }
		        catch (IOException ex){
		        	Log.e(TAG, "processImage"+ex.toString());
		        }
			}

		    public ServerTask() {
		        dialog = new ProgressDialog(SystemMain.this);
		    }

		    protected void onPreExecute() {
		        this.dialog.setMessage("Photo captured");
		        this.dialog.show();
		    }
			@Override
			protected Void doInBackground(String... params) {			//background operation
				String uploadFilePath = params[0];
				processImage(uploadFilePath);
				//release camera when previous image is processed
				mCameraReadyFlag = true;
				return null;
			}
			//progress update, display dialogs
			@Override
		     protected void onProgressUpdate(Integer... progress) {
		    	 if(progress[0] == UPLOADING_PHOTO_STATE){
		    		 dialog.setMessage("Uploading");
		    		 dialog.show();
		    	 }
		    	 else if (progress[0] == SERVER_PROC_STATE){
			           if (dialog.isShowing()) {
			               dialog.dismiss();
			           }
		    		 dialog.setMessage("Processing");
		    		 dialog.show();
		    	 }
		     }
		       @Override
		       protected void onPostExecute(Void param) {
		           if (dialog.isShowing()) {
		               dialog.dismiss();

		               if(IsShowingResult){
		            	   ShowImage(resultForWebImage, 2);
		            	   IsShowingResult=false;
		               }
		           }
		       }
		}
此时,我们只需要在适当的时候,启动这个任务。当用户点击send按钮时,启动服务:
[java code]
		sendBtnListener=new OnClickListener() {

			@Override
			public void onClick(View v) {
				// TODO Auto-generated method stub

				if(myBitmap!=null){
					mClientForWeb.compressByteImage(myBitmap, 75);;
					ServerTask task = new ServerTask();
	  				Log.e("msg","new ServerTask finished!");
	  				task.execute(Environment.getExternalStorageDirectory().toString() +mClientForWeb.INPUT_IMG_FILENAME);
				}
			}
		};
服务器端的PHP代码和matlab代码
1.服务器端的执行流程
首先,PHP获取到客户端发送过来的数据,然后在PHP中调用matlab代码对数据进行处理。PHP将处理后的结果再发回给客户端
2.本次试验
本次试验我们将实现图像的DCT变换。也即是:对客户端发送的图像做DCT变换,然后将变换后的图像发回给客户端。
如下图:
[图]
3.matlab的执行方式
我们用命令行的方式执行matlab代码,参见[3]。在PHP中,我们只需要用exec函数调用相应的指令即可。
4.PHP代码
[php code]
<?php
#-------------------------------------------------------------------------------
# EE368 Digital Image Processing
# Android Tutorial #3: Server-Client Interaction Example for Image Processing
# Author: Derek Pang ([email protected]), David Chen ([email protected])
#------------------------------------------------------------------------------

#function for streaming file to client
function streamFile($location, $filename, $mimeType='application/octet-stream')
{ if(!file_exists($location))
  { header ("HTTP/1.0 404 Not Found");
    return;
  }

  $size=filesize($location);
  $time=date('r',filemtime($location));
  #html response header
  header('Content-Description: File Transfer');
  header("Content-Type: $mimeType");
  header('Cache-Control: public, must-revalidate, max-age=0');
  header('Pragma: no-cache');
  header('Accept-Ranges: bytes');
  header('Content-Length:'.($size));
  header("Content-Disposition: inline; filename=$filename");
  header("Content-Transfer-Encoding: binary\n");
  header("Last-Modified: $time");
  header('Connection: close');

  ob_clean();
  flush();
  readfile($location);

}

#**********************************************************
#Main script
#**********************************************************

#<1>set target path for storing photo uploads on the server
$photo_upload_path = "./upload/";
$photo_upload_path = $photo_upload_path. basename( $_FILES['uploadedfile']['name']);
#<2>set target path for storing result on the server
$processed_photo_output_path = "./output/processed_";
$processed_photo_output_path = $processed_photo_output_path. basename( $_FILES['uploadedfile']['name']);
$downloadFileName = 'processed_' . basename( $_FILES['uploadedfile']['name']);

#<3>modify maximum allowable file size to 10MB and timeout to 300s
ini_set('upload_max_filesize', '10M');
ini_set('post_max_size', '10M');
ini_set('max_input_time', 300);
ini_set('max_execution_time', 300);

#<4>Get and stored uploaded photos on the server
if(copy($_FILES['uploadedfile']['tmp_name'], $photo_upload_path)) {

	#<5> execute matlab image processing algorithm
	#example: Compute and display SIFT features using VLFeat and Matlab
	$command = "matlab -nojvm -nodesktop -nodisplay -r \"ImageDCT('$photo_upload_path','$processed_photo_output_path');exit\"";
	exec($command);
	#<6>stream processed photo to the client
	streamFile($processed_photo_output_path, $downloadFileName,"application/octet-stream");
} else{
    echo "There was an error uploading the file to $photo_upload_path !";
}

?>
5.Matlab代码(实现DCT变换)
[matlab code]
function ImageDCT(input_img_path, output_img_path)
%-----------------------------------------------------------------------------
% @Author: ZhengHaibo [email protected]
% Android Tutorial : Server-Client Communication
%------------------------------------------------------------------------------
% INPUT:
% input_img_path 	- input image path
% output_img_path 	- output image path
%------------------------------------------------------------------------------
tic;
if nargin < 2
    input_img_path =('./upload/test.jpg');
    output_img_path =('./output/test.jpg');
end
if(isempty(input_img_path))
    input_img_path =('./upload/test.jpg');
end
if(isempty(output_img_path))
    output_img_path =('./output/test.jpg');
end
% --------------------------------------------------------------------
%                                                        Load an image
% --------------------------------------------------------------------
InputImg = imread(input_img_path);
GrayInputImg=rgb2gray(InputImg);
DCT_Result=dct2(GrayInputImg)*4;
imwrite(uint8(DCT_Result), output_img_path,'Quality',100);
toc
end
实验结果展示:
[图]
Reference:
[1]PHP学习之初:基本语法 http://blog.csdn.net/nuptboyzhb/article/details/7912483
[2]基于android和WAMP5的B/S模式的本机测试平台(android+web) http://blog.csdn.net/nuptboyzhb/article/details/7932234
[3]命令行方式执行matlab代码 :http://blog.csdn.net/nuptboyzhb/article/details/7943910
[4]Android图像处理系统1.4图像的锐化-边缘检测 :http://blog.csdn.net/nuptboyzhb/article/details/7926735
[5]斯坦福大学EE368实验室:http://www.stanford.edu/class/ee368/index.html

