Java多线程(四)之ConcurrentSkipListMap深入分析
一、前言
concurrentHashMap与ConcurrentSkipListMap性能测试
在4线程1.6万数据的条件下,ConcurrentHashMap 存取速度是ConcurrentSkipListMap 的4倍左右。
但ConcurrentSkipListMap有几个ConcurrentHashMap 不能比拟的优点:
1、ConcurrentSkipListMap 的key是有序的。
2、ConcurrentSkipListMap 支持更高的并发。ConcurrentSkipListMap 的存取时间是log(N),和线程数几乎无关。也就是说在数据量一定的情况下,并发的线程越多,ConcurrentSkipListMap越能体现出他的优势。
二、使用建议
在非多线程的情况下,应当尽量使用TreeMap。此外对于并发性相对较低的并行程序可以使用Collections.synchronizedSortedMap将TreeMap进行包装,也可以提供较好的效率。对于高并发程序,应当使用ConcurrentSkipListMap,能够提供更高的并发度。
所以在多线程程序中,如果需要对Map的键值进行排序时,请尽量使用ConcurrentSkipListMap,可能得到更好的并发度。
注意,调用ConcurrentSkipListMap的size时,由于多个线程可以同时对映射表进行操作,所以映射表需要遍历整个链表才能返回元素个数,这个操作是个O(log(n))的操作。
二、什么是SkipList
Skip list(跳表)是一种可以代替平衡树的数据结构,默认是按照Key值升序的。Skip list让已排序的数据分布在多层链表中,以0-1随机数决定一个数据的向上攀升与否,通过“空间来换取时间”的一个算法,在每个节点中增加了向前的指针,在插入、删除、查找时可以忽略一些不可能涉及到的结点,从而提高了效率。
从概率上保持数据结构的平衡比显示的保持数据结构平衡要简单的多。对于大多数应用,用Skip list要比用树算法相对简单。由于Skip list比较简单,实现起来会比较容易,虽然和平衡树有着相同的时间复杂度(O(logn)),但是skip list的常数项会相对小很多。Skip list在空间上也比较节省。一个节点平均只需要1.333个指针(甚至更少)。

图1-1 Skip list结构图(以7,14,21,32,37,71,85序列为例)
Skip list的性质
(1) 由很多层结构组成,level是通过一定的概率随机产生的。
(2) 每一层都是一个有序的链表,默认是升序,也可以根据创建映射时所提供的Comparator进行排序,具体取决于使用的构造方法。
(3) 最底层(Level 1)的链表包含所有元素。
(4) 如果一个元素出现在Level i 的链表中,则它在Level i 之下的链表也都会出现。
(5) 每个节点包含两个指针,一个指向同一链表中的下一个元素,一个指向下面一层的元素。
三、什么是ConcurrentSkipListMap
ConcurrentSkipListMap提供了一种线程安全的并发访问的排序映射表。内部是SkipList(跳表)结构实现,在理论上能够在O(log(n))时间内完成查找、插入、删除操作。
注意,调用ConcurrentSkipListMap的size时,由于多个线程可以同时对映射表进行操作,所以映射表需要遍历整个链表才能返回元素个数,这个操作是个O(log(n))的操作。
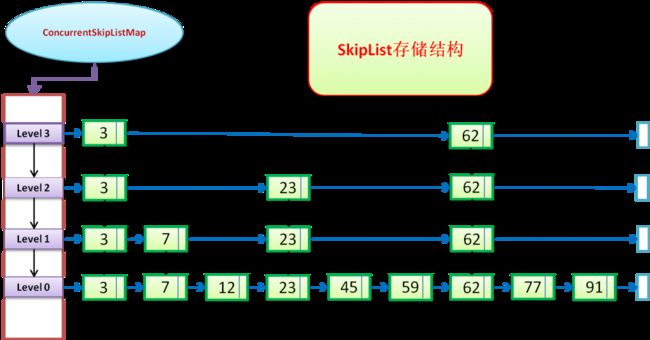
ConcurrentSkipListMap存储结构
跳跃表(SkipList):(如上图所示)
1.多条链构成,是关键字升序排列的数据结构;
2.包含多个级别,一个head引用指向最高的级别,最低(底部)的级别,包含所有的key;
3.每一个级别都是其更低级别的子集,并且是有序的;
4.如果关键字 key在 级别level=i中出现,则,level<=i的链表中都会包含该关键字key;
------------------------
ConcurrentSkipListMap主要用到了Node和Index两种节点的存储方式,通过volatile关键字实现了并发的操作
static final class Node<K,V> {
        final K key;
        volatile Object value;//value值
        volatile Node<K,V> next;//next引用
        ……
}
static class Index<K,V> {
        final Node<K,V> node;
        final Index<K,V> down;//downy引用
       volatile Index<K,V> right;//右边引用
       ……
}
------------------------
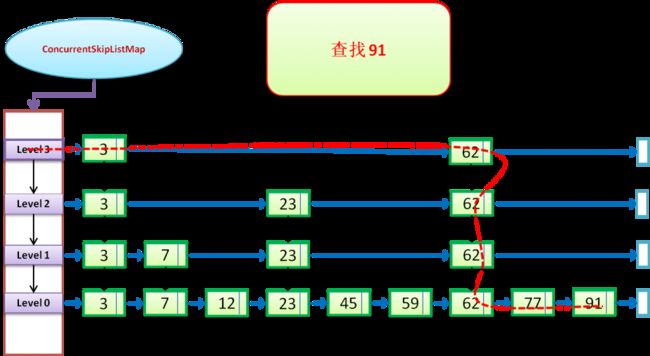
ConcurrentSkipListMap的查找
通过SkipList的方式进行查找操作:(下图以“查找91”进行说明:)
红色虚线,表示查找的路径,蓝色向右箭头表示right引用;黑色向下箭头表示down引用;
/get方法,通过doGet操作实现
public V get(Object key) {
      return doGet(key);
 }
 //doGet的实现
private V doGet(Object okey) {
        Comparable<? super K> key = comparable(okey);
        Node<K,V> bound = null;
        Index<K,V> q = head;//把头结点作为当前节点的前驱节点
        Index<K,V> r = q.right;//前驱节点的右节点作为当前节点
        Node<K,V> n;
        K k;
        int c;
        for (;;) {//遍历
            Index<K,V> d;
            // 依次遍历right节点
            if (r != null && (n = r.node) != bound && (k = n.key) != null) {
                if ((c = key.compareTo(k)) > 0) {//由于key都是升序排列的,所有当前关键字大于所要查找的key时继续向右遍历
                    q = r;
                    r = r.right;
                    continue;
                } else if (c == 0) {
                    //如果找到了相等的key节点,则返回该Node的value如果value为空可能是其他并发delete导致的,于是通过另一种
                    //遍历findNode的方式再查找
                    Object v = n.value;
                    return (v != null)? (V)v : getUsingFindNode(key);
                } else
                    bound = n;
            }
            //如果一个链表中right没能找到key对应的value,则调整到其down的引用处继续查找
            if ((d = q.down) != null) {
                q = d;
                r = d.right;
            } else
                break;
        }
        // 如果通过上面的遍历方式,还没能找到key对应的value,再通过Node.next的方式进行查找
        for (n = q.node.next;  n != null; n = n.next) {
            if ((k = n.key) != null) {
                if ((c = key.compareTo(k)) == 0) {
                    Object v = n.value;
                    return (v != null)? (V)v : getUsingFindNode(key);
                } else if (c < 0)
                    break;
            }
        }
        return null;
    }
------------------------------------------------
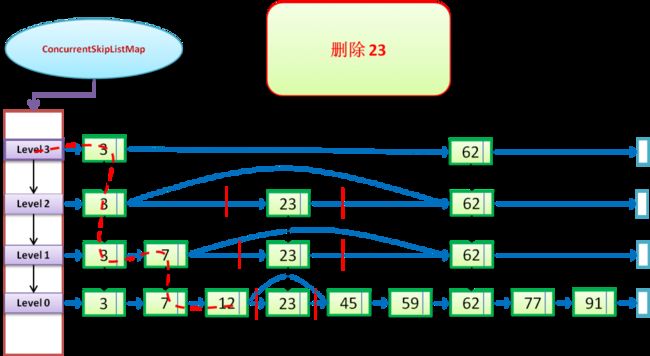
ConcurrentSkipListMap的删除
通过SkipList的方式进行删除操作:(下图以“删除23”进行说明:)
红色虚线,表示查找的路径,蓝色向右箭头表示right引用;黑色向下箭头表示down引用;
//remove操作,通过doRemove实现,把所有level中出现关键字key的地方都delete掉
public V remove(Object key) {
        return doRemove(key, null);
 }
 final V doRemove(Object okey, Object value) {
        Comparable<? super K> key = comparable(okey);
        for (;;) {
            Node<K,V> b = findPredecessor(key);//得到key的前驱(就是比key小的最大节点)
            Node<K,V> n = b.next;//前驱节点的next引用
            for (;;) {//遍历
                if (n == null)//如果next引用为空,直接返回
                    return null;
                Node<K,V> f = n.next;
                if (n != b.next)                    // 如果两次获得的b.next不是相同的Node,就跳转到第一层循环重新获得b和n
                    break;
                Object v = n.value;
                if (v == null) {                    // 当n被其他线程delete的时候,其value==null,此时做辅助处理,并重新获取b和n
                    n.helpDelete(b, f);
                    break;
                }
                if (v == n || b.value == null)      // 当其前驱被delet的时候直接跳出,重新获取b和n
                    break;
                int c = key.compareTo(n.key);
                if (c < 0)
                    return null;
                if (c > 0) {//当key较大时就继续遍历
                    b = n;
                    n = f;
                    continue;
                }
                if (value != null && !value.equals(v))
                    return null;
                if (!n.casValue(v, null))
                    break;
                if (!n.appendMarker(f) || !b.casNext(n, f))//casNext方法就是通过比较和设置b(前驱)的next节点的方式来实现删除操作
                    findNode(key);                  // 通过尝试findNode的方式继续find
                else {
                    findPredecessor(key);           // Clean index
                    if (head.right == null)   //如果head的right引用为空,则表示不存在该level
                        tryReduceLevel();
                }
                return (V)v;
            }
        }
    }
-------------------------------------
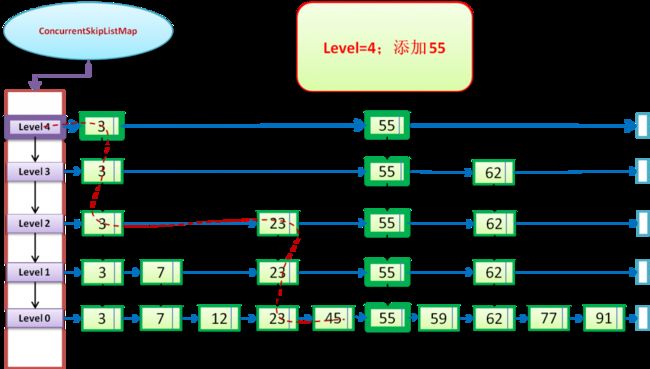
ConcurrentSkipListMap的插入
通过SkipList的方式进行插入操作:(下图以“添加55”的两种情况,进行说明:)
在level=2(该level存在)的情况下添加55的图示:只需在level<=2的合适位置插入55即可
--------
在level=4(该level不存在,图示level4是新建的)的情况下添加55的情况:首先新建level4,然后在level<=4的合适位置插入55
-----------
//put操作,通过doPut实现
 public V put(K key, V value) {
        if (value == null)
            throw new NullPointerException();
        return doPut(key, value, false);
 }
private V doPut(K kkey, V value, boolean onlyIfAbsent) {
        Comparable<? super K> key = comparable(kkey);
        for (;;) {
            Node<K,V> b = findPredecessor(key);//前驱
            Node<K,V> n = b.next;
           //定位的过程就是和get操作相似
            for (;;) {
                if (n != null) {
                    Node<K,V> f = n.next;
                    if (n != b.next)               // 前后值不一致的情况下,跳转到第一层循环重新获得b和n
                        break;;
                    Object v = n.value;
                    if (v == null) {               // n被delete的情况下
                        n.helpDelete(b, f);
                        break;
                    }
                    if (v == n || b.value == null) // b 被delete的情况,重新获取b和n
                        break;
                    int c = key.compareTo(n.key);
                    if (c > 0) {
                        b = n;
                        n = f;
                        continue;
                    }
                    if (c == 0) {
                        if (onlyIfAbsent || n.casValue(v, value))
                            return (V)v;
                        else
                            break; // restart if lost race to replace value
                    }
                    // else c < 0; fall through
                }
                Node<K,V> z = new Node<K,V>(kkey, value, n);
                if (!b.casNext(n, z))
                    break;         // restart if lost race to append to b
                int level = randomLevel();//得到一个随机的level作为该key-value插入的最高level
                if (level > 0)
                    insertIndex(z, level);//进行插入操作
                return null;
            }
        }
    }

 /**
     * 获得一个随机的level值
     */
    private int randomLevel() {
        int x = randomSeed;
        x ^= x << 13;
        x ^= x >>> 17;
        randomSeed = x ^= x << 5;
        if ((x & 0x8001) != 0) // test highest and lowest bits
            return 0;
        int level = 1;
        while (((x >>>= 1) & 1) != 0) ++level;
        return level;
    }
//执行插入操作:如上图所示,有两种可能的情况:
//1.当level存在时,对level<=n都执行insert操作
//2.当level不存在(大于目前的最大level)时,首先添加新的level,然后在执行操作1
private void insertIndex(Node<K,V> z, int level) {
        HeadIndex<K,V> h = head;
        int max = h.level;
        if (level <= max) {//情况1
            Index<K,V> idx = null;
            for (int i = 1; i <= level; ++i)//首先得到一个包含1~level个级别的down关系的链表,最后的inx为最高level
                idx = new Index<K,V>(z, idx, null);
            addIndex(idx, h, level);//把最高level的idx传给addIndex方法
        } else { // 情况2 增加一个新的级别
            level = max + 1;
            Index<K,V>[] idxs = (Index<K,V>[])new Index[level+1];
            Index<K,V> idx = null;
            for (int i = 1; i <= level; ++i)//该步骤和情况1类似
                idxs[i] = idx = new Index<K,V>(z, idx, null);
            HeadIndex<K,V> oldh;
            int k;
            for (;;) {
                oldh = head;
                int oldLevel = oldh.level;
                if (level <= oldLevel) { // lost race to add level
                    k = level;
                    break;
                }
                HeadIndex<K,V> newh = oldh;
                Node<K,V> oldbase = oldh.node;
                for (int j = oldLevel+1; j <= level; ++j)
                    newh = new HeadIndex<K,V>(oldbase, newh, idxs[j], j);//创建新的
                if (casHead(oldh, newh)) {
                    k = oldLevel;
                    break;
                }
            }
            addIndex(idxs[k], oldh, k);
        }
    }
/**
     *在1~indexlevel层中插入数据
     */
    private void addIndex(Index<K,V> idx, HeadIndex<K,V> h, int indexLevel) {
        //  insertionLevel 代表要插入的level,该值会在indexLevel~1间遍历一遍
        int insertionLevel = indexLevel;
        Comparable<? super K> key = comparable(idx.node.key);
        if (key == null) throw new NullPointerException();
        // 和get操作类似,不同的就是查找的同时在各个level上加入了对应的key
        for (;;) {
            int j = h.level;
            Index<K,V> q = h;
            Index<K,V> r = q.right;
            Index<K,V> t = idx;
            for (;;) {
                if (r != null) {
                    Node<K,V> n = r.node;
                    // compare before deletion check avoids needing recheck
                    int c = key.compareTo(n.key);
                    if (n.value == null) {
                        if (!q.unlink(r))
                            break;
                        r = q.right;
                        continue;
                    }
                    if (c > 0) {
                        q = r;
                        r = r.right;
                        continue;
                    }
                }
                if (j == insertionLevel) {//在该层level中执行插入操作
                    // Don't insert index if node already deleted
                    if (t.indexesDeletedNode()) {
                        findNode(key); // cleans up
                        return;
                    }
                    if (!q.link(r, t))//执行link操作,其实就是inset的实现部分
                        break; // restart
                    if (--insertionLevel == 0) {
                        // need final deletion check before return
                        if (t.indexesDeletedNode())
                            findNode(key);
                        return;
                    }
                }
                if (--j >= insertionLevel && j < indexLevel)//key移动到下一层level
                    t = t.down;
                q = q.down;
                r = q.right;
            }
        }
    }
参考:
集合框架 Map篇(5)----ConcurrentSkipListMap http://hi.baidu.com/yao1111yao/item/0f3008163c4b82c938cb306d
Java里多个Map的性能比较(TreeMap、HashMap、ConcurrentSkipListMap) http://blog.hongtium.com/java-map-skiplist/
跳表SkipList的原理和实现 http://imtinx.iteye.com/blog/1291165


