iphone 分享到twitter
转自:http://www.icodeblog.com/2010/09/16/dealing-with-the-twitter-oauth-apocalypse/
注:通过文章末尾的链接“here”,可以现在demo的代码
As many of you may have seen in recent weeks, Twitter changed its access policies and now requires OAuth from all third party applications that access Twitter user accounts. This is a large change from how many iPhone developers having been incorporating Twitter into their applications. What is OAuth exactly? How can iPhone developers get their apps up to date so they don’t break their Twitter incorporation? Well we have all the info you need to know about the OAuth-Apocalypse.
What is Oauth?
Twitter has a brief explanation of the difference between Basic Authentication and OAuth. They use the example of a letter and how it is addressed as their metaphor, and I think this gets the idea across clearly. You can see their entire explanation along with pros and conshere.
TL;DR With Basic Auth you would make every request and would include a username and password with each. This method is very insecure because it allows applications to actively hold user’s credentials and does not have any accountability for which application is performing what action on who’s account. If you imagine your Twitter account as a room, this is like having access to the room be granted based on a single key that many people have copies of. OAuth makes access to your room be granted by a key pad. And everyone that has access to the room has a different code they input into the keypad. You can see who came in and when and revoke anyone’s code at any time.
Twitter is evolving and now requiring that applications register. As a result, user’s gain more control over what services have access to their account. Additionally, Twitter can be more effective at targeting malicious applications, and developers can get more accurate feedback on the frequency of their app’s use throughout Twitter. With all this said, OAuth is tough to implement from scratch. So today we are going to go through the installation and use of a collection of classes that takes care of the dirty work for us, and let developers update the Twitter functionality of their application easily.
Required Classes
Today we are going to be building off a collection of classes that were created by several different people. The main portion of the class is the MGTwitterEngine which was created by Matt Legend Gemmell who’s website can be found here. From here, Ben Gottlieb took the classes and added his own drop in view controller to them. With all this together we have a simple view controller that will perform login and OAuth, and from there an engine that will perform any type of Twitter request we are looking to do. You can get a zip file of the root folder that contains all of these files here.
Installation
We are going to start out with a blank, view based iPhone project called iCodeOAuth. Once the project has come up, take the folder you downloaded called “Twitter+OAuth” and drag it into the “Other Sources” folder within Xcode. Make sure you check the box to copy the sources into the project folder. If we do a build now, you will get a ton of errors. That is because these classes require that libXML be a target of the project build as well. This can be accomplished by clicking the arrow next to Targets in the left column of the Xcode project. Here there will be an application called iCodeOAuth. If we right click on this and select Get Info we will see the info about our target. From here we click the build tab and search for the field “Header Search Paths”. You need to add the following into the Header Search Paths:
$(SDKROOT)/usr/include/libxml2
EDIT: I forgot to include here that you must also include a special XML library for the build to be successful. The Framework is called libxml2.dylib. You can find it at
/Macintosh HD/Developer/Platforms/iPhoneOS.platform/Developer/SDK/iPhoneOS4.1SDK/usr/lib
If you build again, you should see no errors and we can move forward with using this awesome set of classes.
Getting your Creds from Twitter
Now that we have these classes properly installed, it is time to take care of some registration requirements for OAuth. In order to use OAuth you must identify your app to Twitter. Once you do so, Twitter will provide you with an OAuthConsumerKey and an OAuthConsumerSecretKey. These are going to need to be provided to the classes we have just added into our project in order to talk with Twitter’s OAuth system. To register your application and get these creds go to http://dev.twitter.com/apps/new. I have created a application called the iCodeBlog OAuth Demo, whose credentials are included in the sample app which I have provided. For your own personal app you will need to go create your own Twitter Application and get your own keys.
Using SA_OAuthTwitter Engine
Ben Gottlieb used a great design pattern to create a very easy to use access point for the more complex MGTwitterEngine which lies underneath. In order to use these classes we will go into out view controller and add the following code to the header:
And add the following into the Main
This will instantiate our engine with the appropriate consumer and consumer secret keys. With this done we will create a controller. If you run the app now you will see a modal web view come up and lead to a sign in page for Twitter. This is a web view, but the great classes written by Ben are set up to programmatically handle the progression of these web views as the user signs in.
Scrolling to the bottom of this page there will be a username and password field to fill out. Don’t put in your Twitter credentials yet. We need to fill out a few delegate methods to handle the callback from SA_OAuthTwitterEngine.
Handling Login Callbacks
Insert the following into your main class.
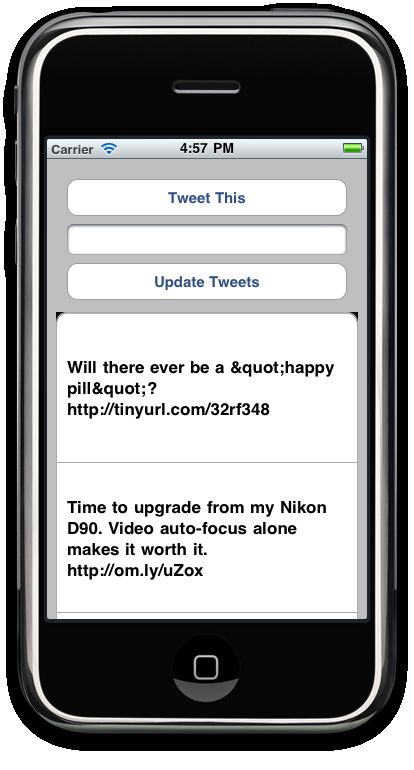
We just implemented the SA_OAuthTwitterControllerDelegate and the SA_OAuthTwitterEngineDelegate. The SA_OAuthTwitterEngineDelegate methods take care of storing the OAuth data string in a plist so that when the app is launched again the user will not have to sign in. SA_OAuthTwitterControllerDelegate methods are callbacks depending on what happens upon sign in. In this case when sign in is successful another method in our class called updateTweets will fire. For now we have those methods defined but we don’t have them filled in. We will get to that in a few steps. If you run the application and login using some Twitter credentials, you should see a successful authentication message appear in your debug screen. With this done, let’s add some interface elements to our view controller XIB so that we can start interacting with Twitter. Our final product is going to look like this:

Building the Interface
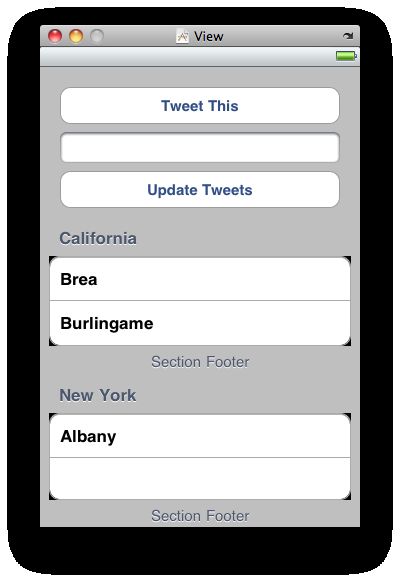
To Build the interface open up the XIB for your view controller. We are going to be putting in 2 buttons, a UITextField and a UITableView. Lay the elements out like so.

Make sure to connect the delegate and data source of the table view to the file owner. Also connect the “Tweet This” button to the tweet method and the Update Tweets method to the updateStream method. Finally, make sure the IBOutlets for the UITextField and the UITableView are set. With these in place we can fill in the final methods to take advantage of our Twitter engine.
Filling in our IBActions
Put the following code in for the IBActions which we defied before.
The update stream method will ask our engine to get the Twitter timeline of the people you follow. It will retrieve the first page of the first 100 tweets. There is a delegate method that fires off on this request completing that we will fill out in a moment. The tweet method dismisses the keyboard and then uses our engine to send an update. Once the update is send we update the tweet view below.
Making a really simple Tweet Object
To help us with displaying tweets we are going to make a very quick Tweet object. This will be a simple NSObject subclass. Use this code for the header:
And this code for the main
Finally make sure to import the class within the main of your view controller class. These will simply give easy methods to get the info we want out of each tweet dictionary that the MGTwitterEngine will return to us.
Filling in our MGTwitterEngineDelegate Methods
The MGTwitterEngine is doing most of the heavy lifting here when it comes to interacting with Twitter. The methods we are using to get tweets and to send tweets are all defined within the MGTwitterEngine. There is also a defined MGTwtterEngineDelegate which defines the callback methods that fire upon these requests finishing. For the sake of completeness, I have filled out all the methods, although only a few of them will be called in the case of our application working properly. Insert the following code into your main.
These methods are all very straightforward in their naming. The only one we fill out significantly is the statusesReceived:forRequest method. Here is where tweets will be returned to us, each as a separate dictionary when we request the timeline for a user. We will clear the tweets array that we have defined for our class and create a Tweet object for each of the dictionaries we have representing a tweet. From there we will ask our table view to reload. The only task we have left to perform is to fill in our table view data source methods to show all the tweets.
Table View Data Source and Delegate Methods
Now we have everything in place. We just need to create a UITableViewCell for every tweet we have. We will also do some tweaking of the size of each cell and the number of lines of each UITextField within each table view cell. These methods are very common so I wont go into much detail on them. Here are the necessary Data Source and Delegate Methods.
With this in place you will have an OAuth twitter client that is capable of doing any type of interaction with Twitter. You can find the source for the project here. Please post any questions you have and happy coding!
Follow me on Twitter at @cruffenach