windows xp 驱动开发(七)WDK源码 UsbSamp例子的编译及使用
转载请标明是引用于 http://blog.csdn.net/chenyujing1234
参考文章: http://msdn.microsoft.com/zh-cn/library/windows/hardware/ff544747
欢迎大家提出意见,一起讨论!
需要源码的请独与我联系.
一、例子介绍
UsbSamp是你安装完WinDDK后自带的一个USB例子,在D:\WINDDK\7600.16385.1\src\usb\usbsamp下.
演示了如何通过WDF将大量及等时的数据传送到一个通用的USB设备。
此例子是针对Intel 82930 USB测试板。它包含一个控制台的应用程序来初始化
传送并获得在设备的I/O endpoints上的信息。它也演示了如果用基于GUID的设备名和
pips名。
二、编译例子:
1、usbsamp_new.SYS文件的编译
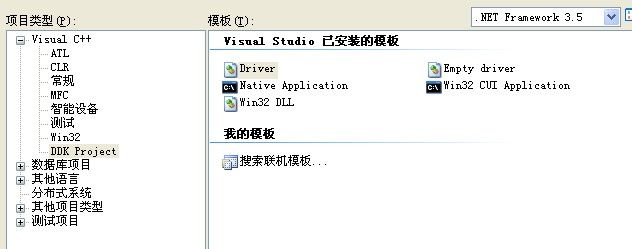
我是通过新建一个DDK Project工程,(方法参考 http://blog.csdn.net/chenyujing1234/article/details/7565364)
删除新建时产生的文件,然后把D:\WINDDK\7600.16385.1\src\usb\usbsamp\sys下的.c .h .rc文件拷到我们的工程目录下,编组成工程:
sources内容如下:
# $Id$
TARGETNAME=usbsamp_new
TARGETPATH=obj
TARGETTYPE=DRIVER


KMDF_VERSION_MAJOR=1

MSC_WARNING_LEVEL=/W4 /WX


# Create browse info
#BROWSER_INFO=1
#BROWSERFILE=<some path>


# Additional defines for the C/C++ preprocessor
C_DEFINES=$(C_DEFINES)

INCLUDES=D:\WINDDK\7600.16385.1\inc\wdf\kmdf\1.9

TARGETLIBS=D:\WINDDK\7600.16385.1\lib\wxp\i386\usbd.lib

SOURCES=SOURCES= \
     driver.c  \
     device.c  \
     queue.c  \
     bulkrwr.c  \
     isorwr.c  \
     usbsamp.rc
这里不得不提一下编译出错:
1>Linking Executable - objchk_win7_x86\i386\usbsamp_new.sys
1>1>errors in directory e:\g2\fft\usbdri~1\usbsam~1\usbsam~1
1>1>e:\g2\fft\usbdri~1\usbsam~1\usbsam~1\isorwr.obj : error LNK2019: unresolved external symbol _WdfFunctions referenced in function _ReadWriteIsochEndPoints@16
1>1>e:\g2\fft\usbdri~1\usbsam~1\usbsam~1\driver.obj : error LNK2001: unresolved external symbol _WdfFunctions
1>1>e:\g2\fft\usbdri~1\usbsam~1\usbsam~1\device.obj : error LNK2001: unresolved external symbol _WdfFunctions
1>1>e:\g2\fft\usbdri~1\usbsam~1\usbsam~1\queue.obj : error LNK2001: unresolved external symbol _WdfFunctions
1>1>e:\g2\fft\usbdri~1\usbsam~1\usbsam~1\bulkrwr.obj : error LNK2001: unresolved external symbol _WdfFunctions
1>1>e:\g2\fft\usbdri~1\usbsam~1\usbsam~1\isorwr.obj : error LNK2001: unresolved external symbol _WdfDriverGlobals
1>1>e:\g2\fft\usbdri~1\usbsam~1\usbsam~1\driver.obj : error LNK2001: unresolved external symbol _WdfDriverGlobals
1>1>e:\g2\fft\usbdri~1\usbsam~1\usbsam~1\device.obj : error LNK2001: unresolved external symbol _WdfDriverGlobals
1>1>e:\g2\fft\usbdri~1\usbsam~1\usbsam~1\queue.obj : error LNK2001: unresolved external symbol _WdfDriverGlobals
1>1>e:\g2\fft\usbdri~1\usbsam~1\usbsam~1\bulkrwr.obj : error LNK2019: unresolved external symbol _WdfDriverGlobals referenced in function _ReadWriteBulkEndPoints@16
1>1>e:\g2\fft\usbdri~1\usbsam~1\usbsam~1\objchk_win7_x86\i386\usbsamp_new.sys : error LNK1120: 2 unresolved externals
如果大家把此错误在网上搜索,一般都没有人解答。
解决方法是在sources里添加以下选项:
KMDF_VERSION_MAJOR=1
MSC_WARNING_LEVEL=/W4 /WX
==================================================================================================
编译产生了我们想要的sys文件
2、usbsamp.exe文件的编译
新建一个DDK Project工程,模板选择Native Application
把D:\WINDDK\7600.16385.1\src\usb\usbsamp\exe下的testapp.c与testapp.rc组织进工程
sources内容为:
# $Id$
TARGETNAME=usbsamp
TARGETTYPE=PROGRAM

_NT_TARGET_VERSION= $(_NT_TARGET_VERSION_WINXP)

USE_MSVCRT=1


UMTYPE=console
UMBASE=0x01000000

# Create browse info
#BROWSER_INFO=1
#BROWSERFILE=<some path>

# Additional defines for the C/C++ preprocessor
C_DEFINES=$(C_DEFINES)

# If you uncomment the following line, the linker will not use buffer overflow
# checking for the entry point and so on. Leave it commented if possible.
#BUFFER_OVERFLOW_CHECKS=0

INCLUDES=$(DDK_INC_PATH);$(CRT_INC_PATH);$(SDK_INC_PATH);$(IFSKIT_INC)	\
		..\..\usbsamp_new\usbsamp_new


TARGETLIBS=D:\WINDDK\7600.16385.1\lib\wxp\i386\usbd.lib	\
          D:\WINDDK\7600.16385.1\lib\wxp\i386\setupapi.lib

SOURCES=      \
        testapp.c  \
        testapp.rc
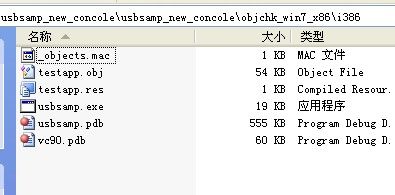
编译后得到
三、安装驱动
确保你已经有.inf文件,且文件中有相关设备的VID/PID、描述text。如果没有自己编辑。
这里我用系统自带的GenInf工具来产生.inf文件.
自动产生usbsamp.inf文件后右击选择安装即可。
On Windows XP and later:
-
"Found New Hardware Wizard" dialog box will appear. Here select the radio button labeled "Install from a list of specific location (Advanced)" and then hit the "Next" button.
-
In the following screen select the radio button labeled " Search the best driver in these locations" and then select "Include this location in the search path" and specify the target media or the directory where the INF and SYS files are copied and then hit the "Next" button.
-
The system will scan the directory and pick up the matching INF and start the installation. You will get a Hardware Installation Warning dialog stating that your driver has not passed Windows Logo Testing. Hit "Continue Anyway" button.
-
The system will copy the KMDF coinstaller (wdfcoinstallerMMmmm.dll), driver, INF file, load the driver and start the device. If every thing goes fine, you will get "Completing the Found New Hardware Wizard". Hit the "Finish" button and the installation is complete.
-
You should be able to see the device in the Device manager under "Universal Serial Bus controllers"
Testing
You can use usbsamp.exe to test the device. This console application enumerates the interface registered by the driver and opens the device to send read, write or ioctl requests based on the command line options.
usbsamp.exe -u <-- Will dump all the descriptors and endpoint information.
usbsamp.exe -r 1024 -w 1024 -c 100 -v <-- This command first writes 1024 bytes of data to bulk out endpoint (pipe1), and then reads 1024 bytes from bulk in endpoint (pipe1), and compares the read buffer with write buffer to see if they match. If the buffer contents match, it performs this operation 100 times.
To read and write to bulk endpoints you can run one or more of these commands simultaneously. The driver is multi-thread safe so it can handle multiple request at a time.
usbsamp.exe -r 65536 <--- by default, the device reads pipe0
usbsamp.exe -w 65536 <--- by default, the device write to pipe1
usbsamp.exe -r 65536 -i pipe02 <--- read 65536 bytes from pipe02
usbsamp.exe -w 65536 -o pipe03 <--- write 65536 bytes to pipe03
To read and write to Isochronous endpoints you can run one or more of these commands simultaneously.
usbsamp.exe -r 510 -i pipe04
usbsamp.exe -w 510 -o pipe05
usbsamp.exe -w 10245 -o pipe05 -r 1024 -i pipe04 -c 100 -v
扩展阅读
INF文件全称Information File文件,是Winodws操作系统下用来描述设备或文件等数据信息的文件。INF文件是由标准的ASCII码组成,您可以用任何一款文字编辑器查看修改其中的内容。一般我们总是认为INF文件是系统设备的驱动程序,其实这是错误的认识,Windows之所以在安装某些硬件的驱动时提示需要INF文件是因为INF文件为该设备提供了一个全面描述硬件参数和相应驱动文件(DLL文件)的信息。就好比我们看着说明书安装电脑硬件一样,我们就是Windows系统,说明书就是INF文件。INF文件功能非常强大,几乎能完成日常操作的所有功能。您可以把它看成是Windows系统底下的超强批初理。要熟练掌握和理解甚至是编写INF文件需要对其内部结构有相当的认识。下面就让我们来深入到INF文件中的内部一窥其真面貌吧!
INF文件的组成有节(Sections),键(Key)和值(value)三部分。
关键节有
[Version]版本描述信息,主要用于版本控制。
[Strings]字符串信息,用于常量定义。
[DestinationDirs]定义系统路径信息。
[SourceDisksNames]指明源盘信息。
[SourceDisksNames]指明源盘文件名。
[DefaultInstall]开始执行安装。
其它的节可以自定义,下面用一实例来具体讲解。
程序代码
[Version]
Signature=$Chicago$
Provider=%Author%
[Strings]
Product="添加文件关联演示"
Version="1.0"
Author="Xunchi"
Copyright="Copyright 2005"
CustomFile="inf" ;修改您需要的文件名后缀
Program="NOTEPAD.EXE" ;修改您需要关联的应用程序名
[Add.Reg]
HKCR,"."%CustomFile%,"",FLG_ADDREG_TYPE_SZ ,%CustomFile%File
HKCR,%CustomFile%File,"",FLG_ADDREG_TYPE_SZ,安装信息
HKCR,%CustomFile%"File\shell","",FLG_ADDREG_TYPE_SZ,open
HKCR,%CustomFile%"File\shell\open\command","",FLG_ADDREG_TYPE_SZ,%program% %1
[DefaultInstall]
AddReg=Add.Reg
在[Version]节中"Signature"项定义了该INF文件需要运行在何种操作系统版本中。有$Windows NT$, $Chicago$, or $Windows 95$三个值供选择,一般选择$Chicago$即可。项Provider中定义了该文件的创作来源,%Author%指引用Author项的值。您也可自定其它项来描述该INF文件的版本信息。该INF文件的作用是关联文件,所以主要是对注册表的操作,我们来看[Add.Reg]节,共四条语句,格式都是一样。HKCR表示根HKEY_CLASSES_ROOT,第二个参数是子键的路径名,第三个参数是表明值的类型,最后是值(具体见附表)。以上都是对操作的定义与过程,在节[DefaultInstall]中是开始执行要安装的流程,AddReg表明是对注册表进行操作,操作对象是Add.Reg节中的定义。如果您把AddReg换成DelReg则是删除注册表中的键值。当鼠标单击该INF文件在弹出的菜单中选择“安装”就开始执行您所定义的操作。该示例在系统的INF文件右键菜单中增加了查看编辑功能并设置了默认动作,因为在安装了不了解的INF文件有可能对系统产生不良的影响,这样双击文件就可打开编辑该文件了。
再看看INF文件在文件操作方面的能力吧。请看下面的一个例子。
程序代码
[Version]
Signature=$Chicago$
Provider=%Author%
[Strings]
Product="文件复制和安装演示"
Version="1.0"
Author="Xunchi"
Copyright="Copyright 2005"
[FileList]
ProcessList.exe ;此文件已在当前目录下,下同。
[FileList1]
Wordpad.exe
[DestinationDirs]
FileList=11 ;安装到Windows的系统目录
FileList1=10 ;安装到Windows目录
[DefaultInstall]
Copyfiles=FileList,FileList1
相同的节的作用与上一例类似,请注意新出现的节[FileList],这是我自定义的节名,它表示了一个文件组,[FileList1]也类似。在节[DestinationDirs]中需定义每个文件组复制到的目录(各个常量的意义见附表)。Copyfiles指明了需要进行复制的文件组。
INF文件的操作还包括服务(NT系统)程序的安装和卸载,INI文件的转换等。由于这些操作都比较的复杂和繁琐,且有一定的危险性故下次有机会再向大家进行深入探讨。
最后我们来看一下INF文件的执行机制,这时你也许要问不就是简单的执行一下“安装”吗?知其然不知其所以然知识水平是不会提高的。在“文件夹选项”中的“文件类型”找到INF文件的“安装”命令看到一串命令。“rundll32.exe setupapi,InstallHinfSection DefaultInst_all 132 %1”它表示了运行Dll文件setupapi.dll中的命令InstallHinfSection并传递给它起始节的名字 DefaultInstall。可见起始节是可以自定义的。INF文件的执行也可用在各种支持API调用的编程工具中。至此INF文件的结构和运行机制我们已基本了解,现在就让你的思维开动起来,让它更好的为我们工作吧。
注册表操作的常量定义:
----------------------------------------------------------
常量 根值
HKCR HKEY_CLASSES_ROOT.
HKCU HKEY_CURRENT_USER.
HKLM HKEY_LOCAL_MACHINE.
HKU HKEY_USERS.
-----------------------------------------------------------
FLG_ADDREG_APPEND 在多字符串后添加字符
FLG_ADDREG_TYPE_SZ 字符类型
FLG_ADDREG_TYPE_MULTI_SZ 字符串类型
FLG_ADDREG_TYPE_EXPAND_SZ 扩展字符串类型
FLG_ADDREG_TYPE_BINARY 二进制值
FLG_ADDREG_TYPE_DWORD DWord值
FLG_ADDREG_TYPE_NONE NULL值
----------------------------------------------------------
[DestinationDirs]节中所定义的常量路径
----------------------------------------------------------
01 源目录(后跟路径)
10 Windows目录
11 Windows系统目录
12 驱动目录
17 INF文件目录
18 帮助文件目录
20 字体目录
21 根目录
24 应用程序目录
25 共享目录
30 当前根目录
50 System目录
51 Spool 目录
52 Spool 驱动目录
53 用户配置目录
----------------------------------------------------------
[DefaultInstall]节中定义的操作
----------------------------------------------------------
LogConfig Log日志文件配置
Copyfiles 复制文件
Renfiles 文件改名
Delfiles 删除文件
UpdateInis 更新Inis
UpdateIniFields 更新Ini字段
AddReg 添加注册项
DelReg 删除注册项
Ini2Reg Ini文件转换为Reg文件


