log4cxx-win7-调试成功
Log4cxx是开放源代码项目Apache Logging Service的子项目之一,是Java社区著名的log4j的c++移植版,用于为C++程序提供日志功能,以便开发者对目标程序进行调试和审计。有关 log4cxx的更多信息可以从 Apache Loggin Service的网站 http://logging.apache.org 获得。当前的最新版本为0.10.0,本文内容及示例代码都是基于此版本。
2.获取软件包
1、 从官方 http://apr.apache.org/download.cgi下载下面二个软件包:
Win32 Source: apr-1.4.5-win32-src.zip [PGP] [MD5] [SHA1]
Windows Source: apr-util-1.3.12-win32-src.zip [PGP] [MD5]
官方 http://logging.apache.org/log4cxx/download.html 下载:
| Apache log4cxx 0.10.0 (tar.gz) | apache-log4cxx-0.10.0.tar.gz | apache-log4cxx-0.10.0.tar.gz.md5 | apache-log4cxx-0.10.0.tar.gz.asc |
| Apache log4cxx 0.10.0 (zip) | apache-log4cxx-0.10.0.zip | apache-log4cxx-0.10.0.zip.md5 | apache-log4cxx-0.10.0.zip.asc |
下载tar.gz 和zip包都可。
2、或者从本人的资源上下载: http://download.csdn.net/detail/Qyee16/3662176 (资源分1分)
3.解压三个软件包,得到
1.) apache-log4cxx-0.10.0 2.) apr-1.4.5-win32-src 3.)apr-util-1.3.12-win32-src
因为其解压目录下面分别存在其同名文件,因此需要把其分别复制出来,分别重命名为:apache-log4cxx、 arp、 apr-util,置于同一目录下,我放置在D:\log4cxx目录下
4. 执行bat文件
打开cmd命令行,切换到D:\log4cxx\apache-log4cxx(因为上面我建立的目录是 D:\log4cxx)
(1)键入:configure (执行configure.bat
如下则成功:
已复制 1个文件
已复制 1个文件
其实际完成这个任务:configure.bat copies the prefabricated log4cxx.hw and private/log4cxx_private.hw over to log4cxx.h and private/log4cxx_private.h.
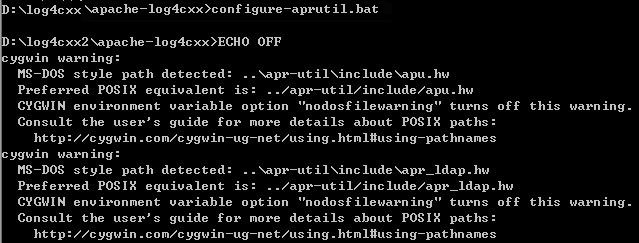
(2)键入:configure-aprutil (执行configure-aprutil.bat
如下则成功:
其实际完成的工作是: "sed" to modify apu.hw and apr_ldap.hw to disable APR-Iconv and LDAP which are not necessary for log4cxx and problematic to build. If "sed" is not available, the modifications would be trivial to do in any text editor.
常见错误:上面看到了,使用“sed”命令,“sed”命令是unix命令,在执行时window会报不是其“内部或外部命令”。
解决方法:就是下载安装Cygwin 可以从官方:http://www.cygwin.com/下载,本人提供的下载包里面也已经包含。安装很简单但是安装完成在把其安装目录下的bin包含到系统环境变量中
本人安装目录为: C:\Cygwin,则把:C:\Cygwin\bin 包含到系统Path中。
5.编译生成lib 、dl文件
1、使用vc.net2003打开Projects文件夹下的log4cxx.dsw项目,将log4cxx工程设为启动项目,然后编译,
2、漫长的等待, 编译成功后,就可以在projects的Debuge或者Release文件夹下看到lib和dll文件
备注:如果使用vs2010出现错误,请使用vs2008编译。
6.测试
1.打开vs2008,新建一个win32控制台工程Test
2.右键点击Test工程,选择”属性”,然后在C++选项卡中添加附加库目录,注意该目录为../ apache-log4cxx-0.10.0\src\main\include
3.在属性的链接器输入选项卡的”附加依赖项”中添加” log4cxx.lib” ,同时把上面编译的log4cxxlib、log4cxx.dll拷贝到Test工程目录下面
4.在cpp文件中输入如下测试代码:
// log4cppTest.cpp : Defines the entry point for the console application.
//
#include "stdafx.h"
#include <string>
#include <log4cxx/logger.h>
#include <log4cxx/propertyconfigurator.h>
#include <log4cxx/helpers/exception.h>
using namespace log4cxx;
using namespace log4cxx::helpers;
using namespace std;

int main(int argc, char* argv[])
{
    string msg = "log4cxx.properties";

    LoggerPtr Logger = Logger::getRootLogger();
    log4cxx::PropertyConfigurator::configure(msg);

    Logger->info(_T("Hello world"));
    LOG4CXX_INFO(Logger, "你好");
    getchar();
    return 0;
}
5.新建一个文本文件,命名为log4cxx.properties,并键入如下内容:(也是放在Test工程目录下面)
# 设置root logger为DEBUG级别,使用了ca和fa两个Appender
log4j.rootLogger=DEBUG, ca, fa

#对Appender fa进行设置:
# 这是一个文件类型的Appender,
# 其输出文件(File)为./output.log,
# 输出方式(Append)为覆盖方式,
# 输出格式(layout)为PatternLayout
log4j.appender.fa=org.apache.log4j.FileAppender
log4j.appender.fa.File=./output.log
log4j.appender.fa.Append=false
log4j.appender.fa.layout=org.apache.log4j.PatternLayout
log4j.appender.fa.layout.ConversionPattern=%d [%t] %-5p %.16c - %m%n

#对Appender ca进行设置
# 这是一个控制台类型的Appender
# 输出格式(layout)为PatternLayout
log4j.appender.ca=org.apache.log4j.ConsoleAppender
log4j.appender.ca.layout=org.apache.log4j.PatternLayout
log4j.appender.ca.layout.ConversionPattern=%d [%t] %-5p %.16c - %m%n
6.运行Test,成功的话,就会在其工程目录下生成: output.log,文件里已经记录了信息了。
log4cxx是强大的可配置的日志记录工具,详细的配置可以自己研究了哦。
